Obsidian 2026 Latest Remotely Save Sync Tutorial: Complete Tencent Cloud COS Setup Guide
Obsidian Remotely Save tutorial (2026): configure Tencent Cloud COS to sync your Obsidian vault between computers and mobile phones, step by step.
Remotely Save lets Obsidian sync across multiple devices through a cloud relay. Its setup has a few unfamiliar pieces, so this article starts with Tencent Cloud COS.
I will add Cloudflare R2, WebDAV, OneDrive, and other platform guides later. For now, the Tencent Cloud setup works as a complete example of how Remotely Save syncs files.
Synchronization principle
An Obsidian vault is essentially a folder. Remotely Save uploads that folder to a cloud relay, then downloads it from the relay to another device.
To use this plugin, you need a cloud platform to act as the relay. Common choices include:
- Cloudflare R2
- WebDAV solution (NAS, Nut Cloud, etc.)
- Other S3 compatible object storage (Tencent Cloud COS, Backblaze B2, etc.)
- Mainstream cloud drive solutions (OneDrive, Google Drive, etc.)
This article only covers Tencent Cloud COS. Other platforms use different dashboards and fields, but the idea is the same: prepare a cloud relay, then enter the same connection information in Remotely Save on every device.
Step 1: install the Remotely Save plugin
Search for and install the Remotely Save plugin in Obsidian on every device. If you have not installed community plugins before, read this first: Obsidian plugin installation tutorial for all platforms
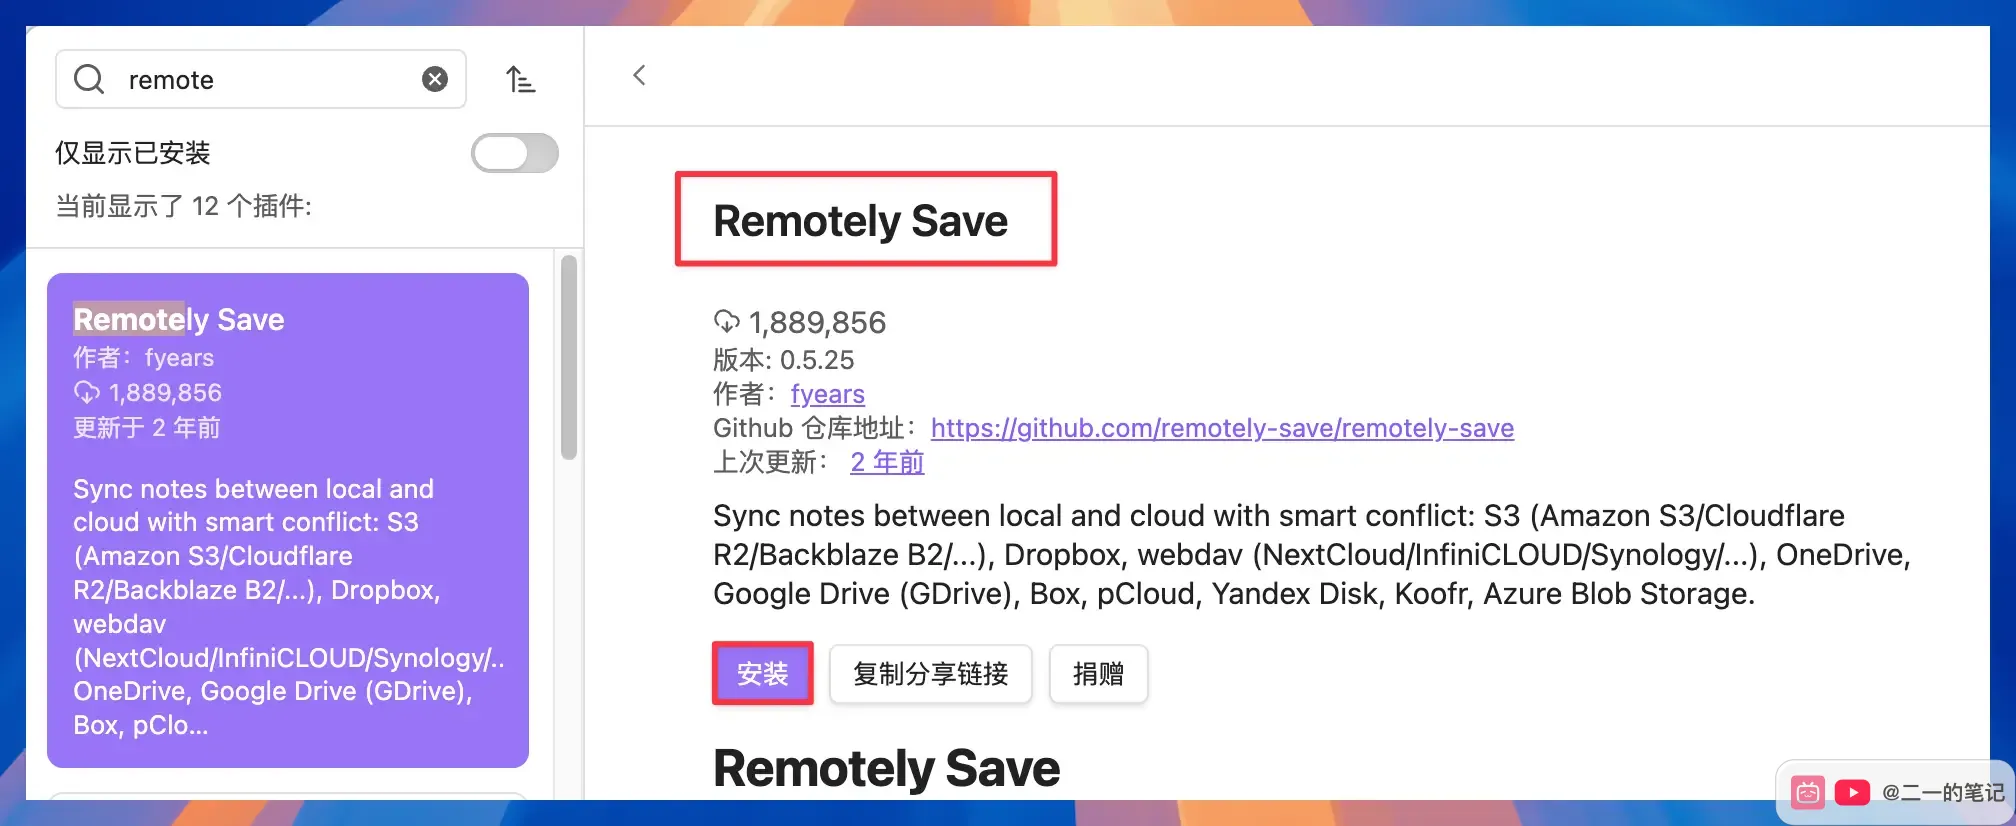
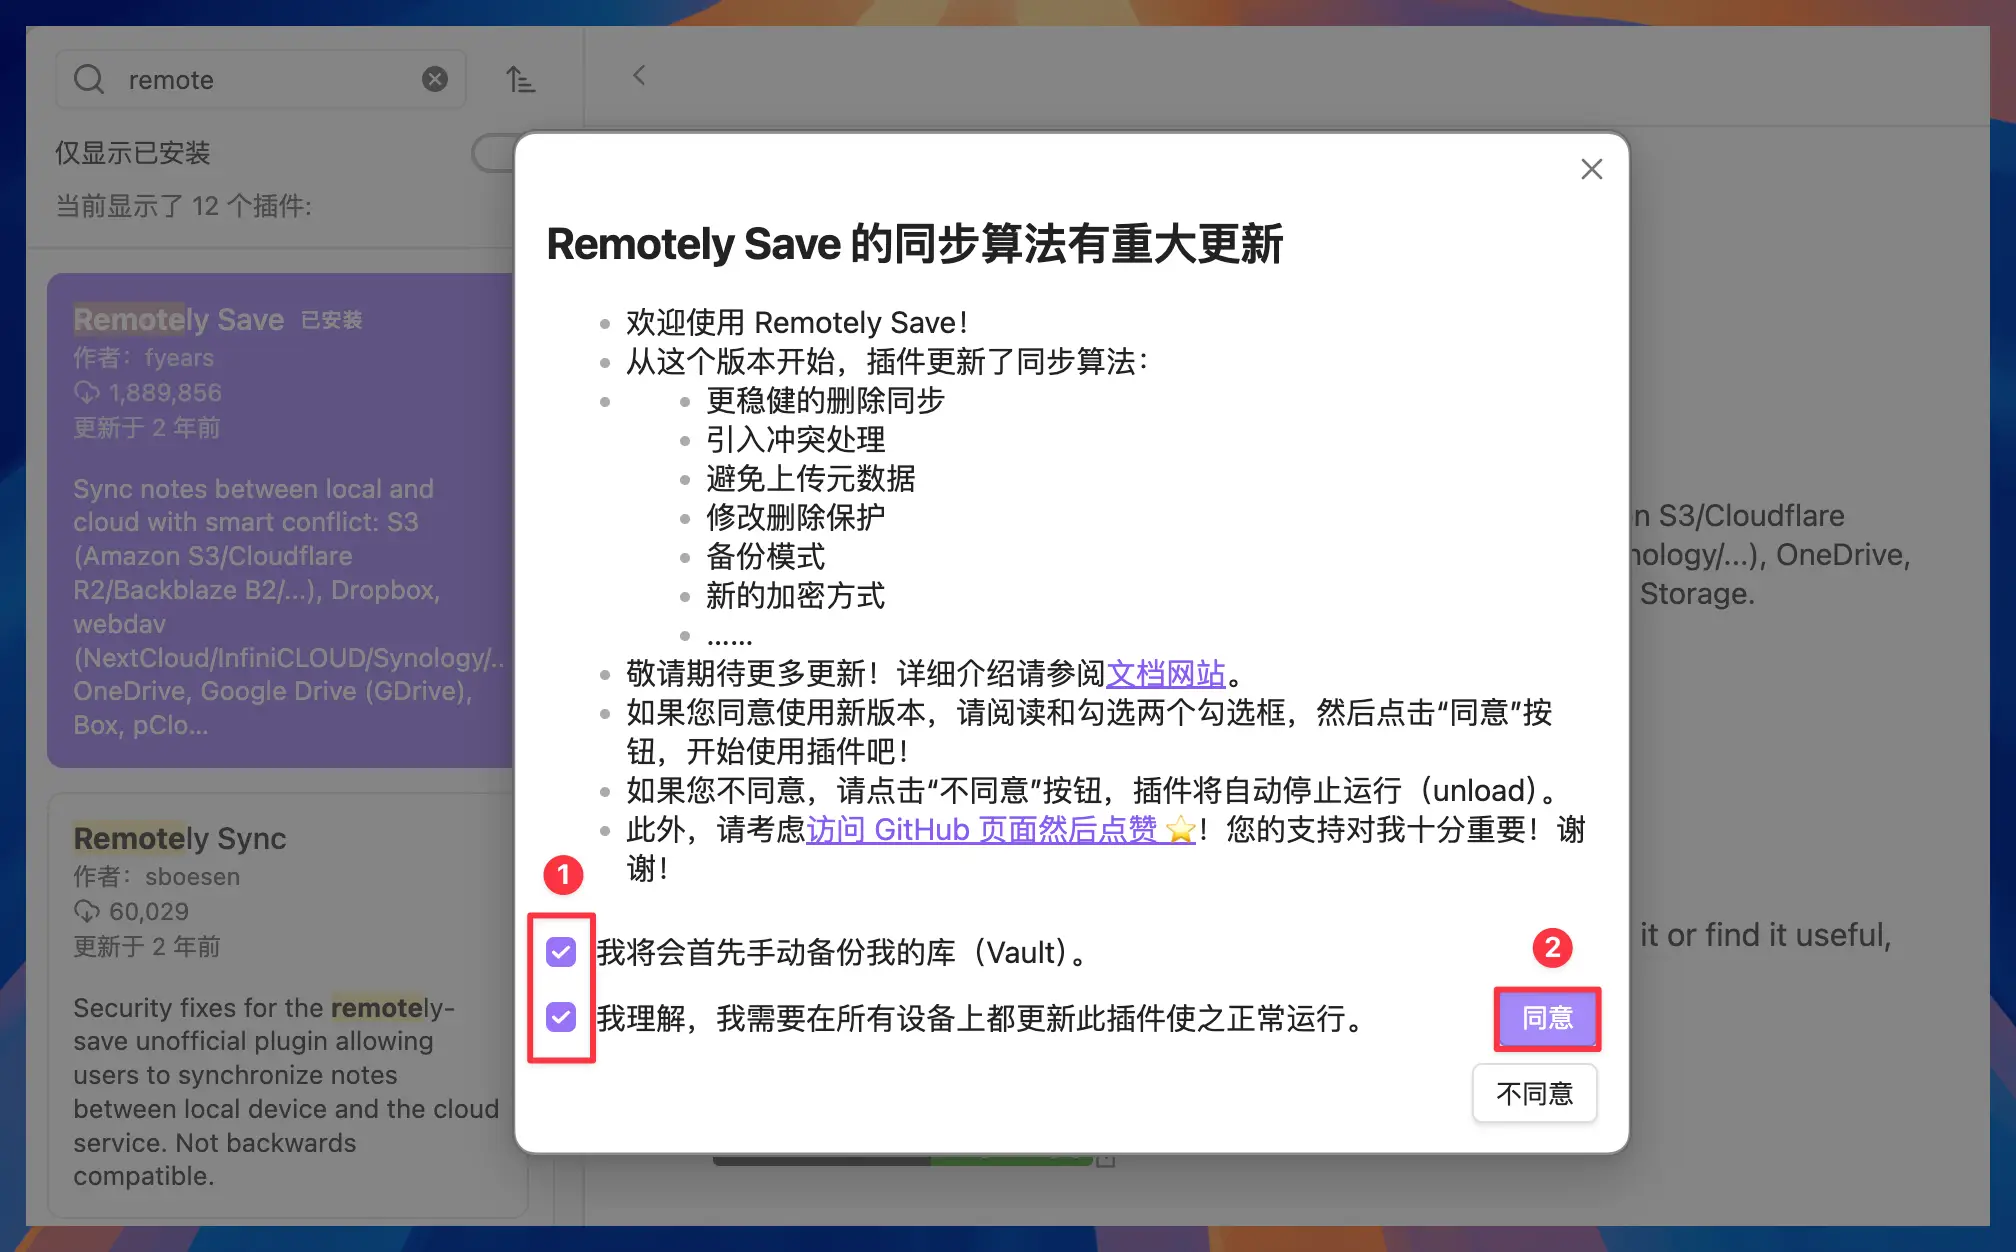
After installation, open the plugin settings.
Remotely Save access to Tencent Cloud COS tutorial
This guide uses Tencent Cloud COS as the Remotely Save relay. COS works like a cloud file storage space: Obsidian files are uploaded there first, then downloaded from there on another device.
The Tencent Cloud part is more involved than a regular cloud drive because you need to register an account, complete real-name verification, create a bucket, and generate keys. Treat it as a one-time setup.
After that, Tencent Cloud COS can also be used as an image host for Obsidian. The setup takes some time, but you can reuse it later.
The bucket name, region, SecretId, and SecretKey shown in the screenshots are only examples. When you set this up, use the information shown in your own Tencent Cloud console. Do not copy values from the screenshots.
Register for Tencent Cloud and verify your real name
First open the Tencent Cloud registration link: https://curl.qcloud.com/ariznC6p
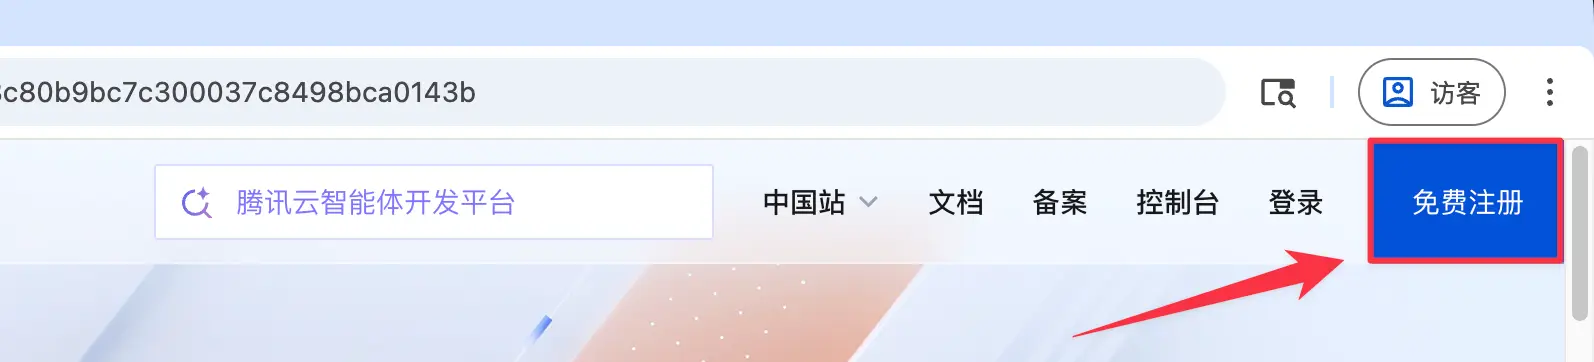
After entering the page, click "Register for Free" in the upper right corner.
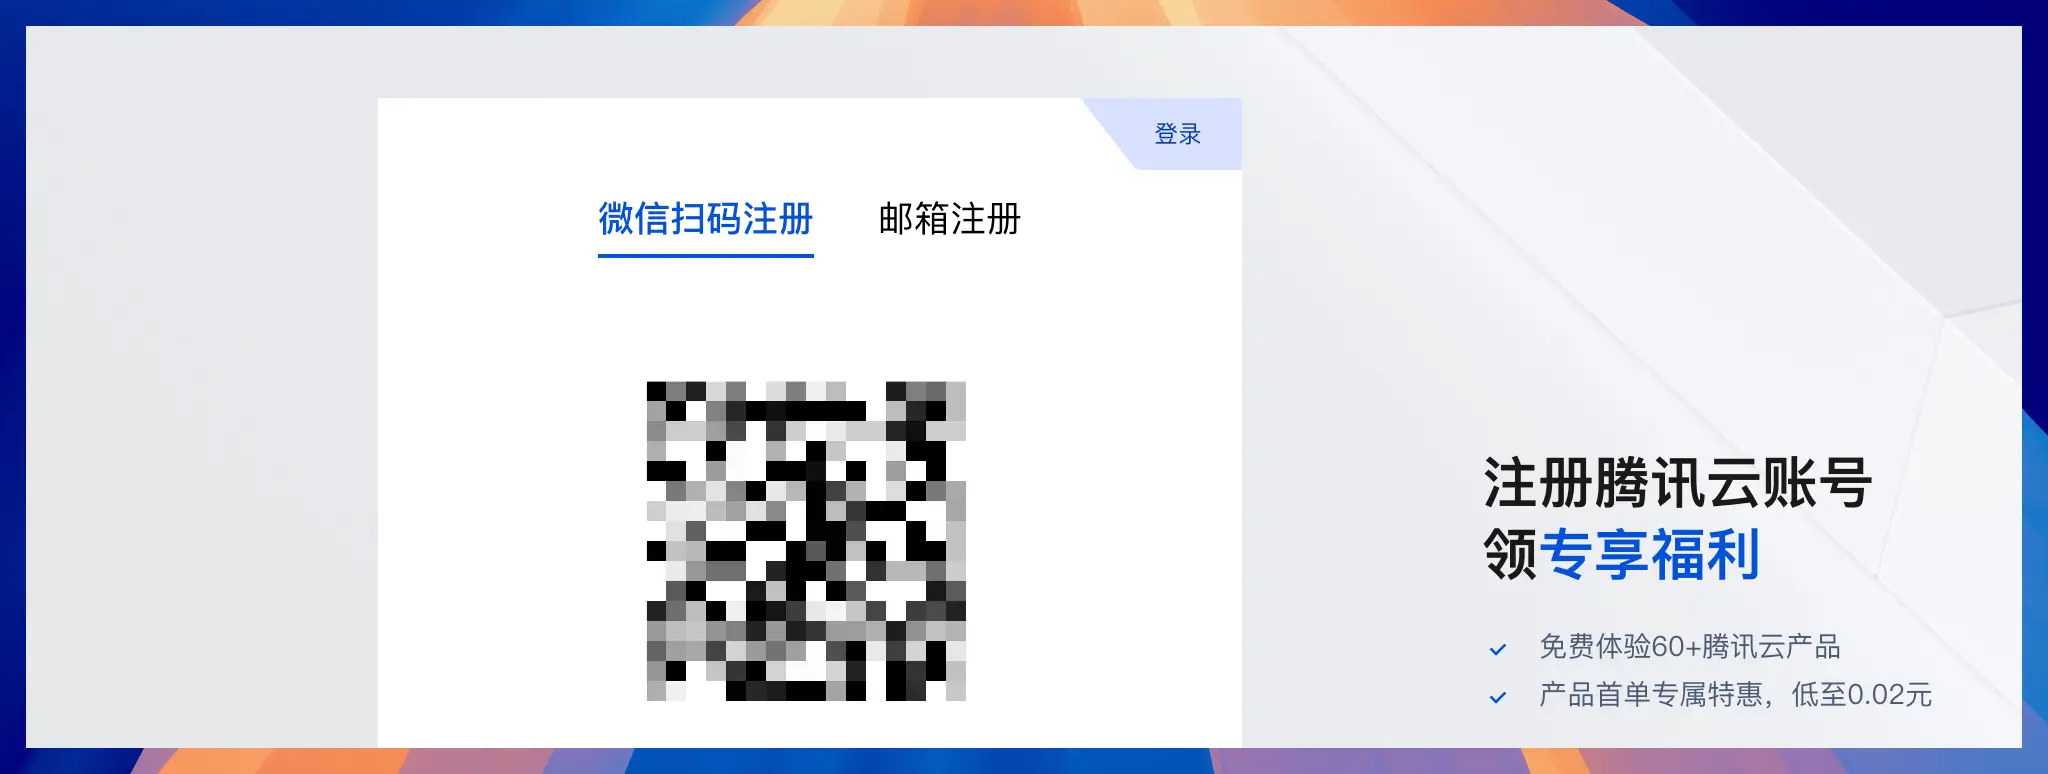
You can choose the registration method according to your own habits. Here I choose to register by email, but you can also use WeChat to scan the QR code to register.
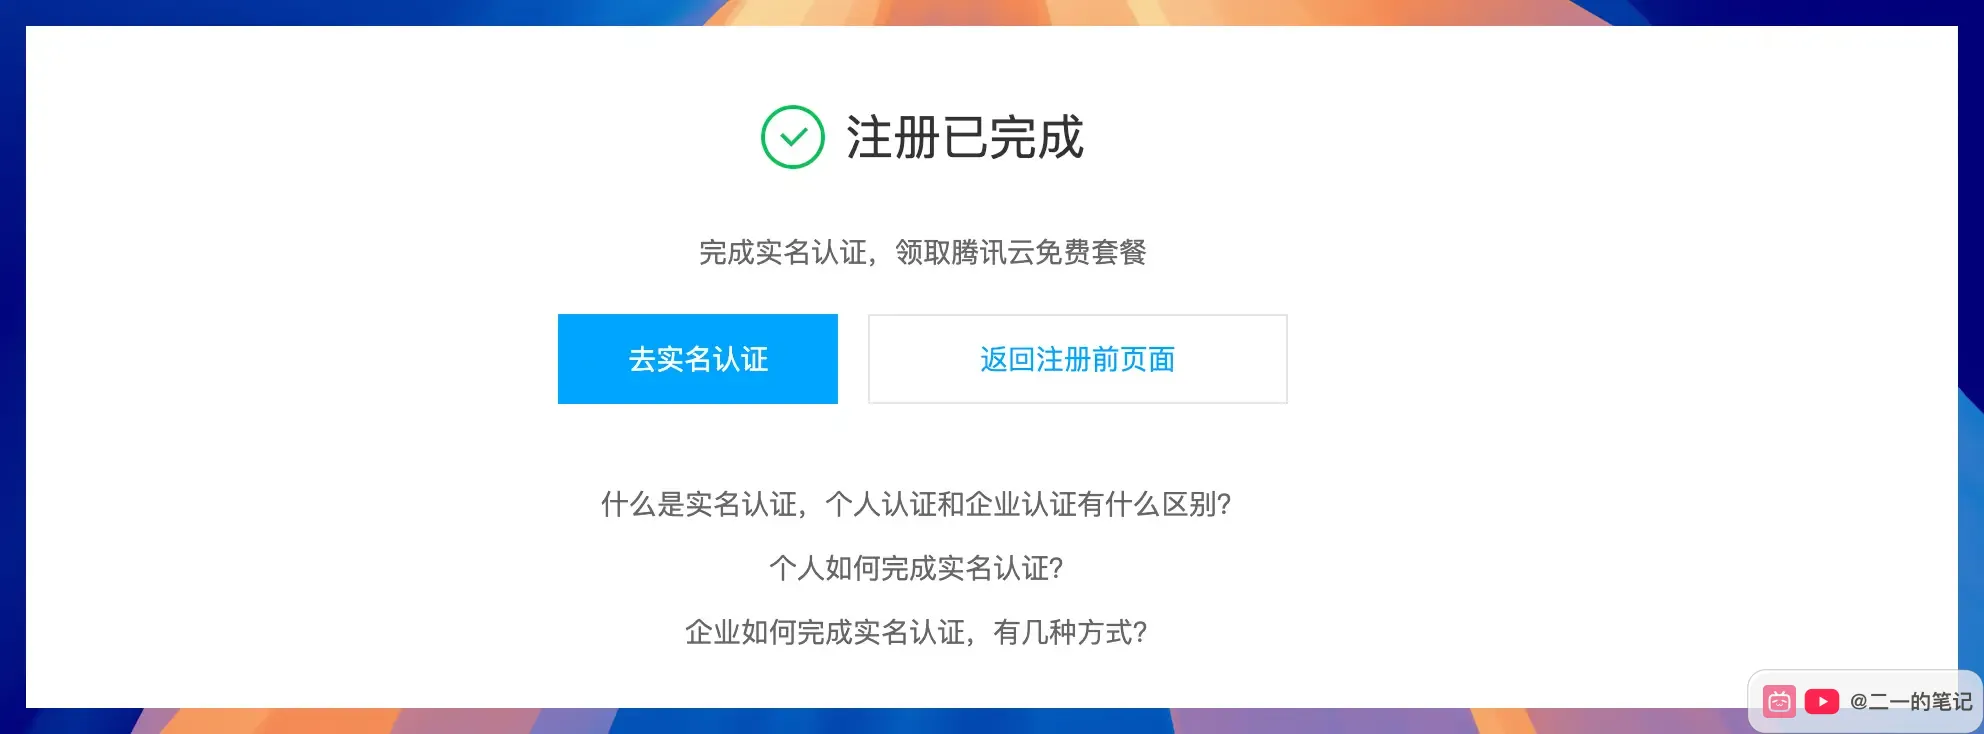
After registering the Tencent Cloud account, complete real-name verification. Without it, you cannot activate the object storage service later.
On this page, click "Go to real-name authentication".
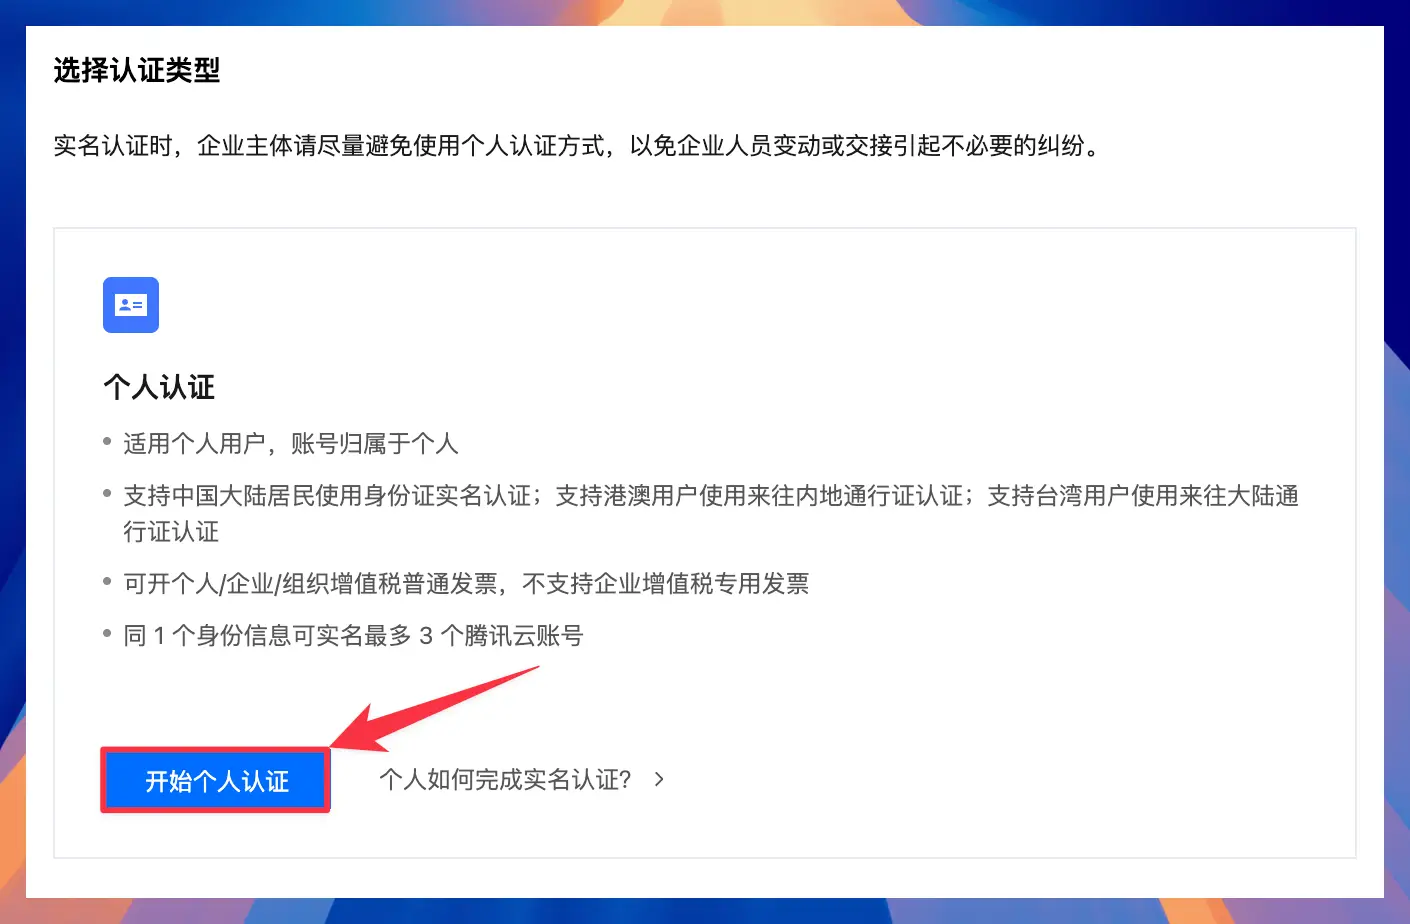
Just select "Personal Authentication" as the authentication type, and then click "Start Personal Authentication".
Follow the prompts, add your identity information, and scan the QR code with WeChat to complete verification.
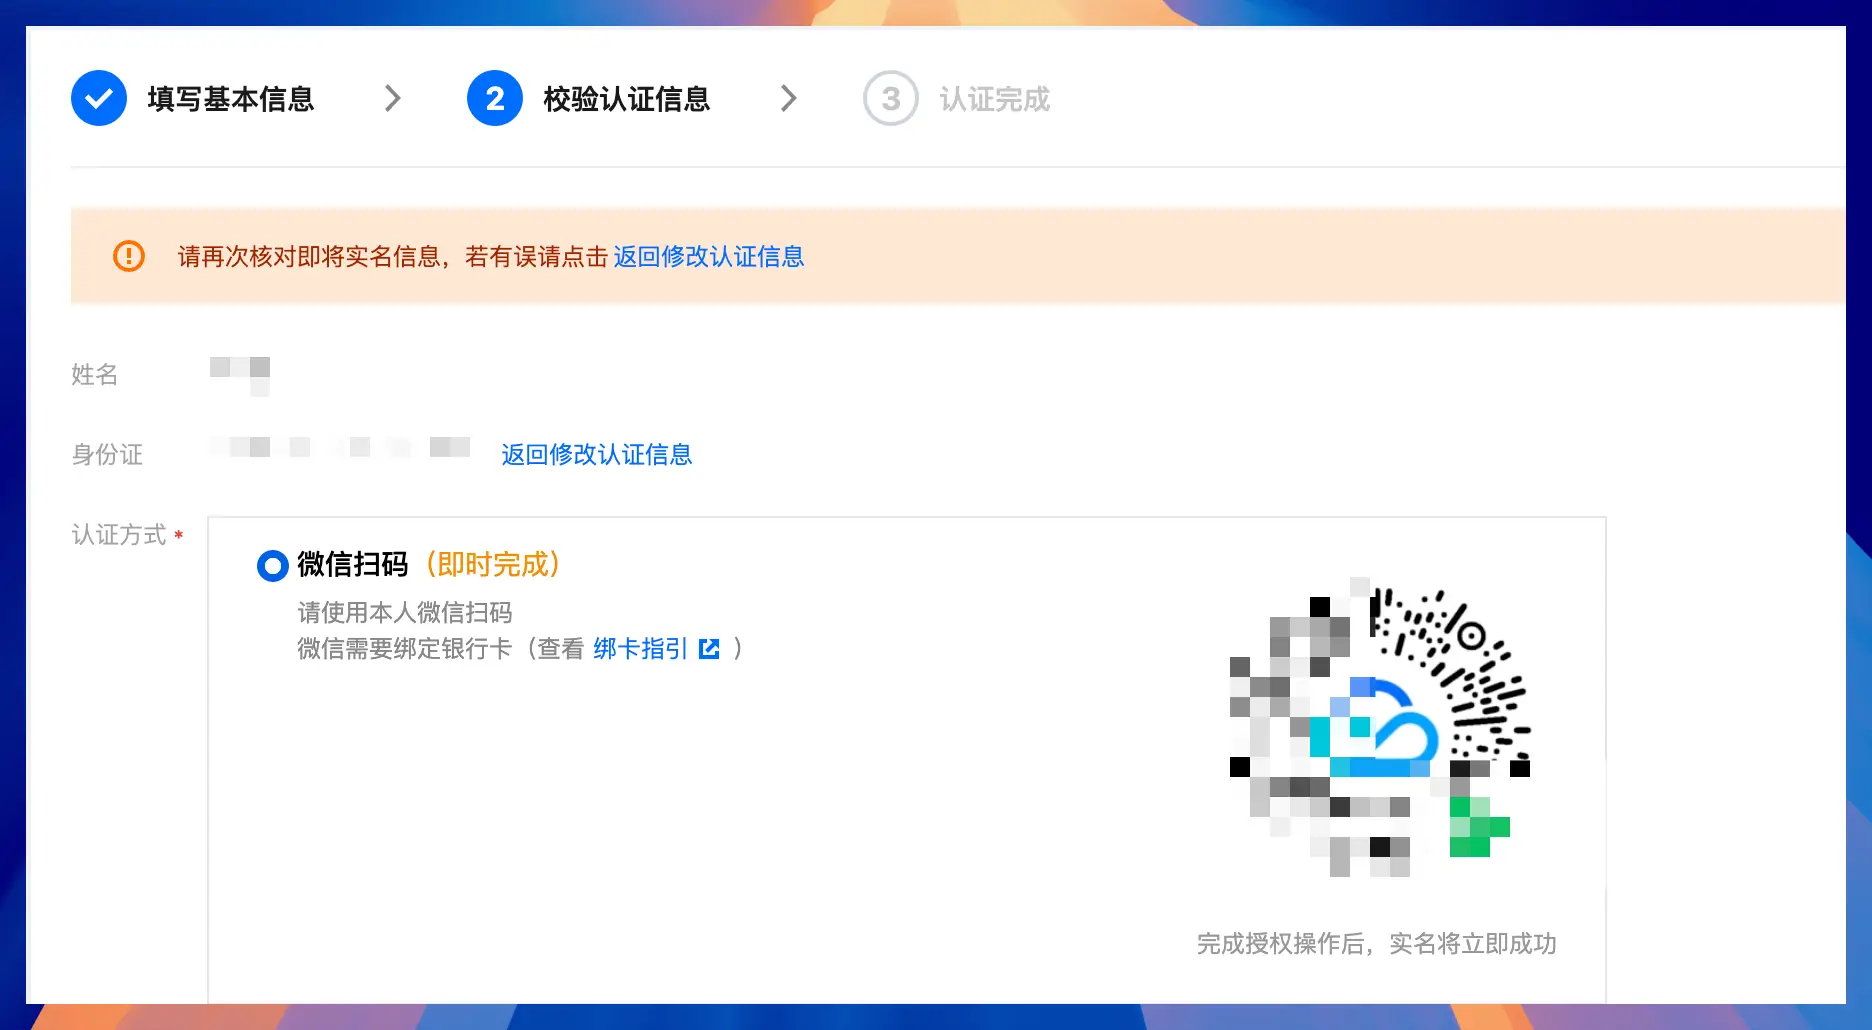
After real-name verification passes, you can activate COS object storage.
Activate Tencent Cloud COS
Open the Tencent Cloud COS console: https://console.cloud.tencent.com/cos
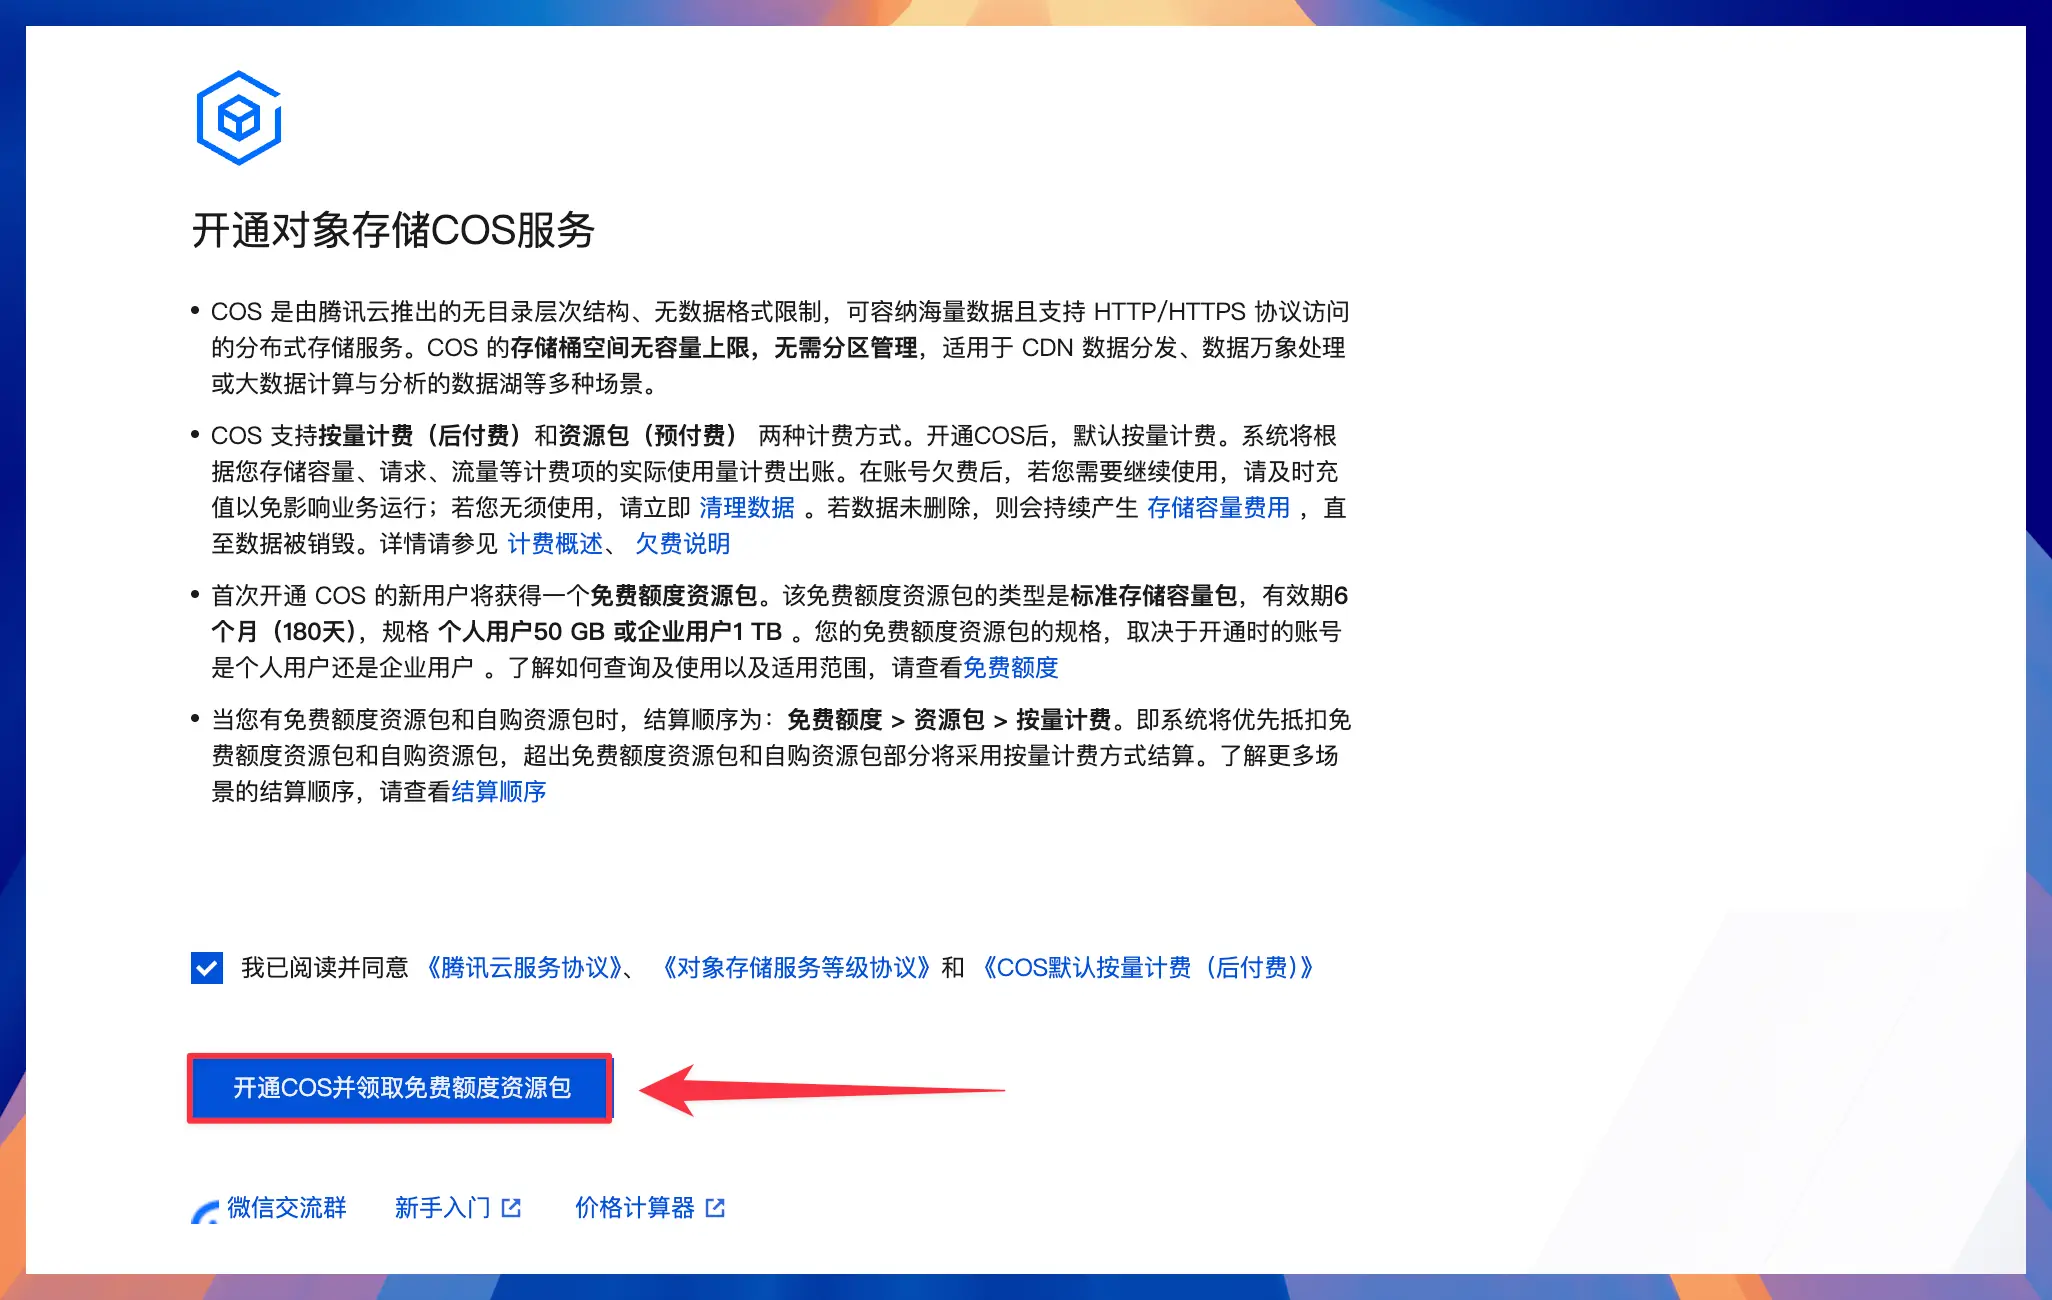
The first time you enter, Tencent Cloud prompts you to activate COS. Check the service agreement, then click "Open COS and receive free quota".
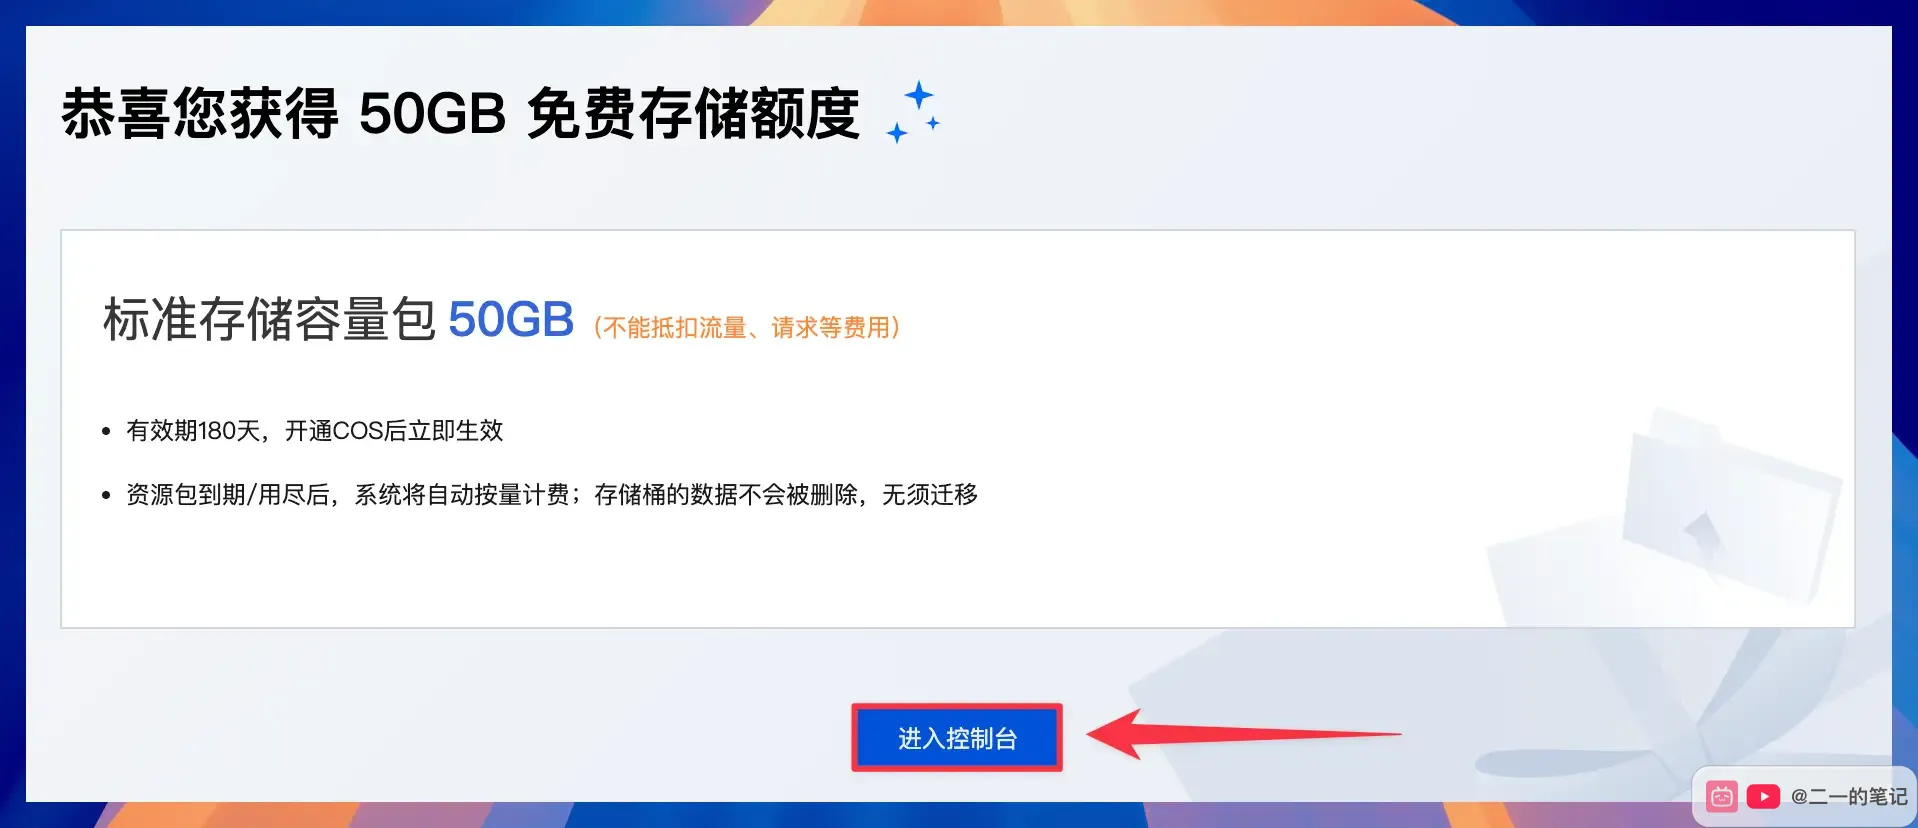
After activation, Tencent Cloud shows a 50GB free storage quota. Click "Enter Control Panel".
Tencent Cloud COS is not permanently free, and storage or traffic fees may appear later. To keep the setup moving, I put the details at the end: View Tencent Cloud COS free quota and fee instructions.
In the console, the page prompts you to create a bucket. Click "Create Bucket".
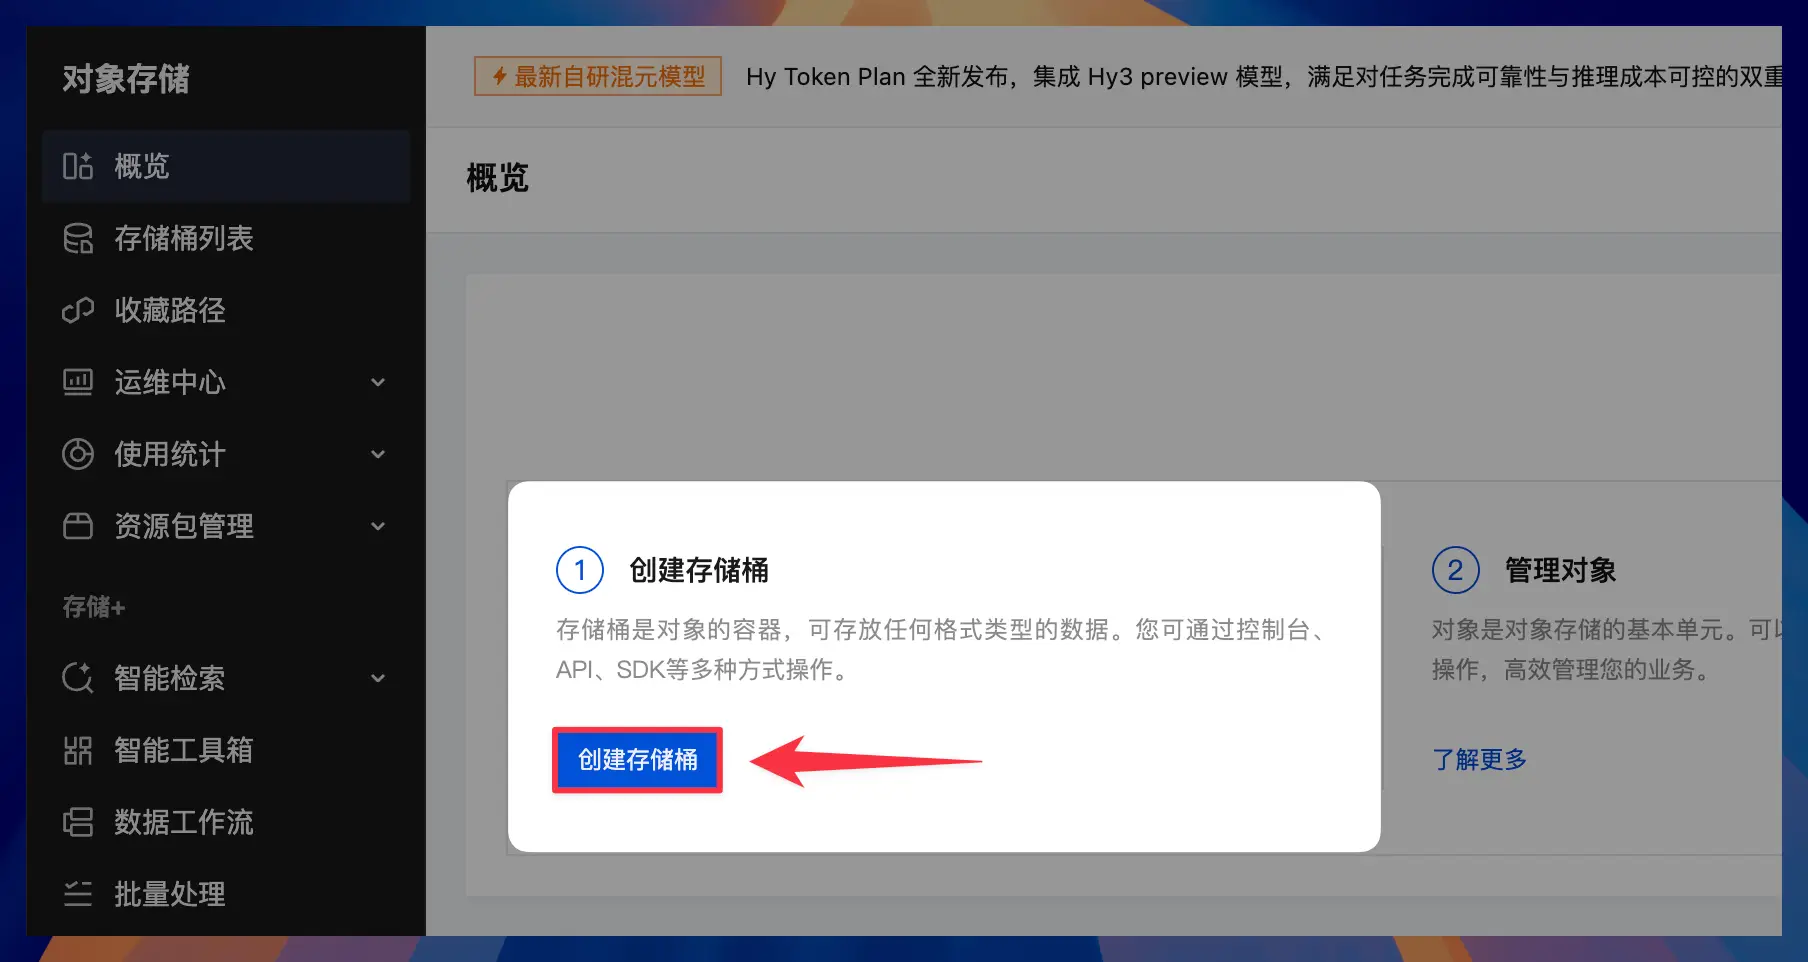
Create Tencent Cloud COS bucket
You will enter the "Create Bucket" page. A bucket is the Tencent Cloud space used to store files. Remotely Save will upload the Obsidian sync files here.
This page has many options, but only a few need to change.
First, look at the first half of "Bucket Basic Configuration".
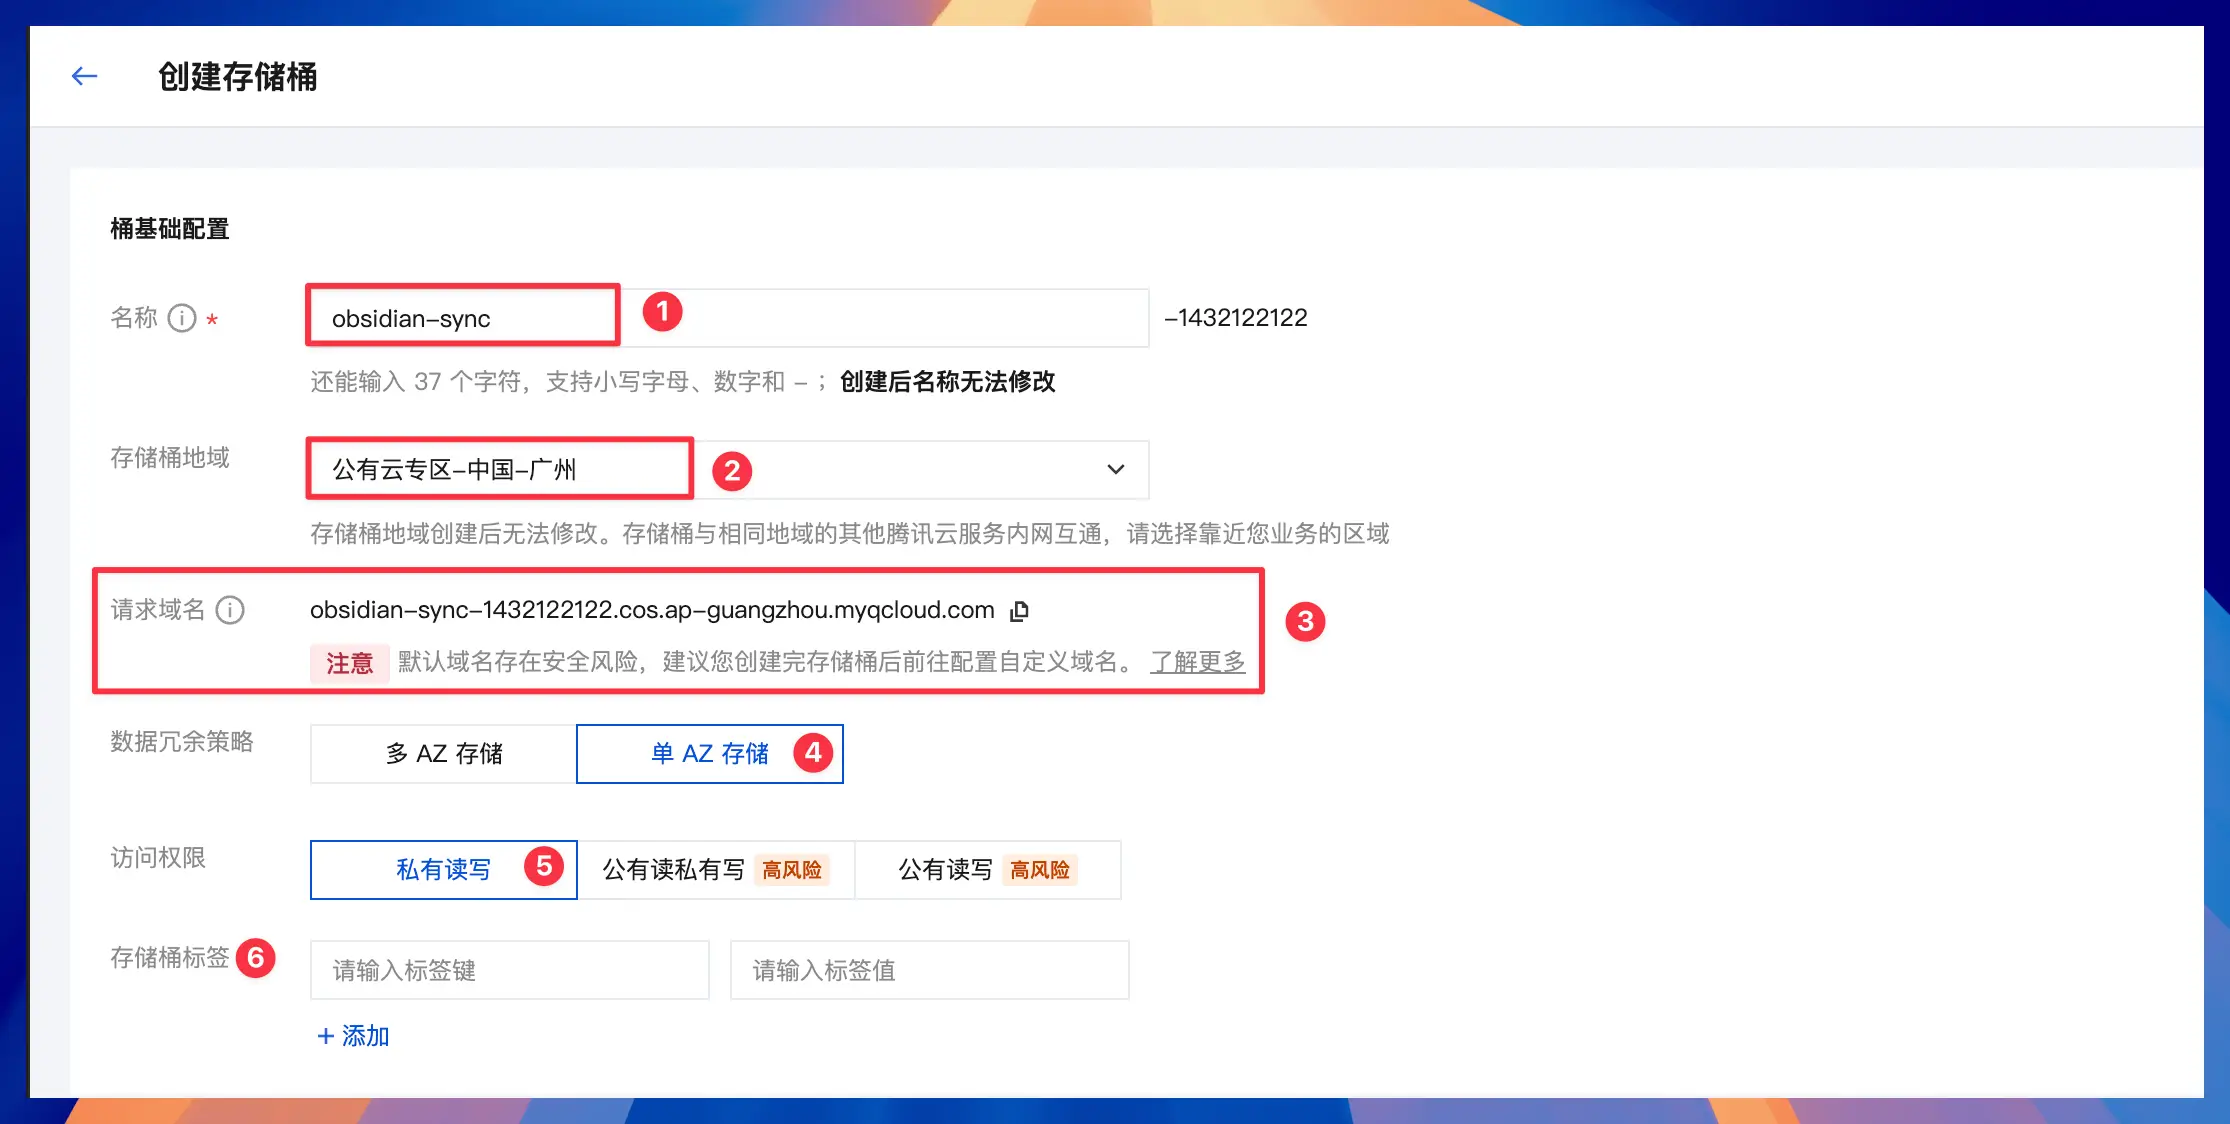
In the "Name" field, enter a name that shows the purpose, such as:
obsidian-syncTencent Cloud automatically adds an account ID after the name you enter.
-143XXXXXXXThe final bucket name will look similar to this. Later, when Remotely Save asks for the Bucket, enter this complete name.
obsidian-sync-143XXXXXXXX"Bucket Region" lets you choose a region closer to your usual devices. This example uses "Public Cloud Zone-China-Guangzhou", which can stay unchanged. Users in China usually choose Guangzhou, Shanghai, or Beijing.
After you choose a region, Tencent Cloud generates the "requested domain name" below. In the screenshot, the domain contains:
ap-guangzhouThat means the current bucket region is Guangzhou. You will also use this region value when configuring Remotely Save later.
For "Data Redundancy Strategy", choose "Single AZ Storage".
The "multi-AZ storage" marked in the screenshot is more suitable for enterprise high-availability scenarios, and the cost may also be higher. We are only synchronizing personal Obsidian notes here, using "single AZ storage" is enough.
Keep "Access Permissions" set to "Private Read and Write".
Do not select "Public Read and Private Write" or "Public Read and Write". Obsidian notes often contain private content, and buckets must remain private.
Leave "Bucket Label" blank.
Then look down to "Bucket Advanced Functions".
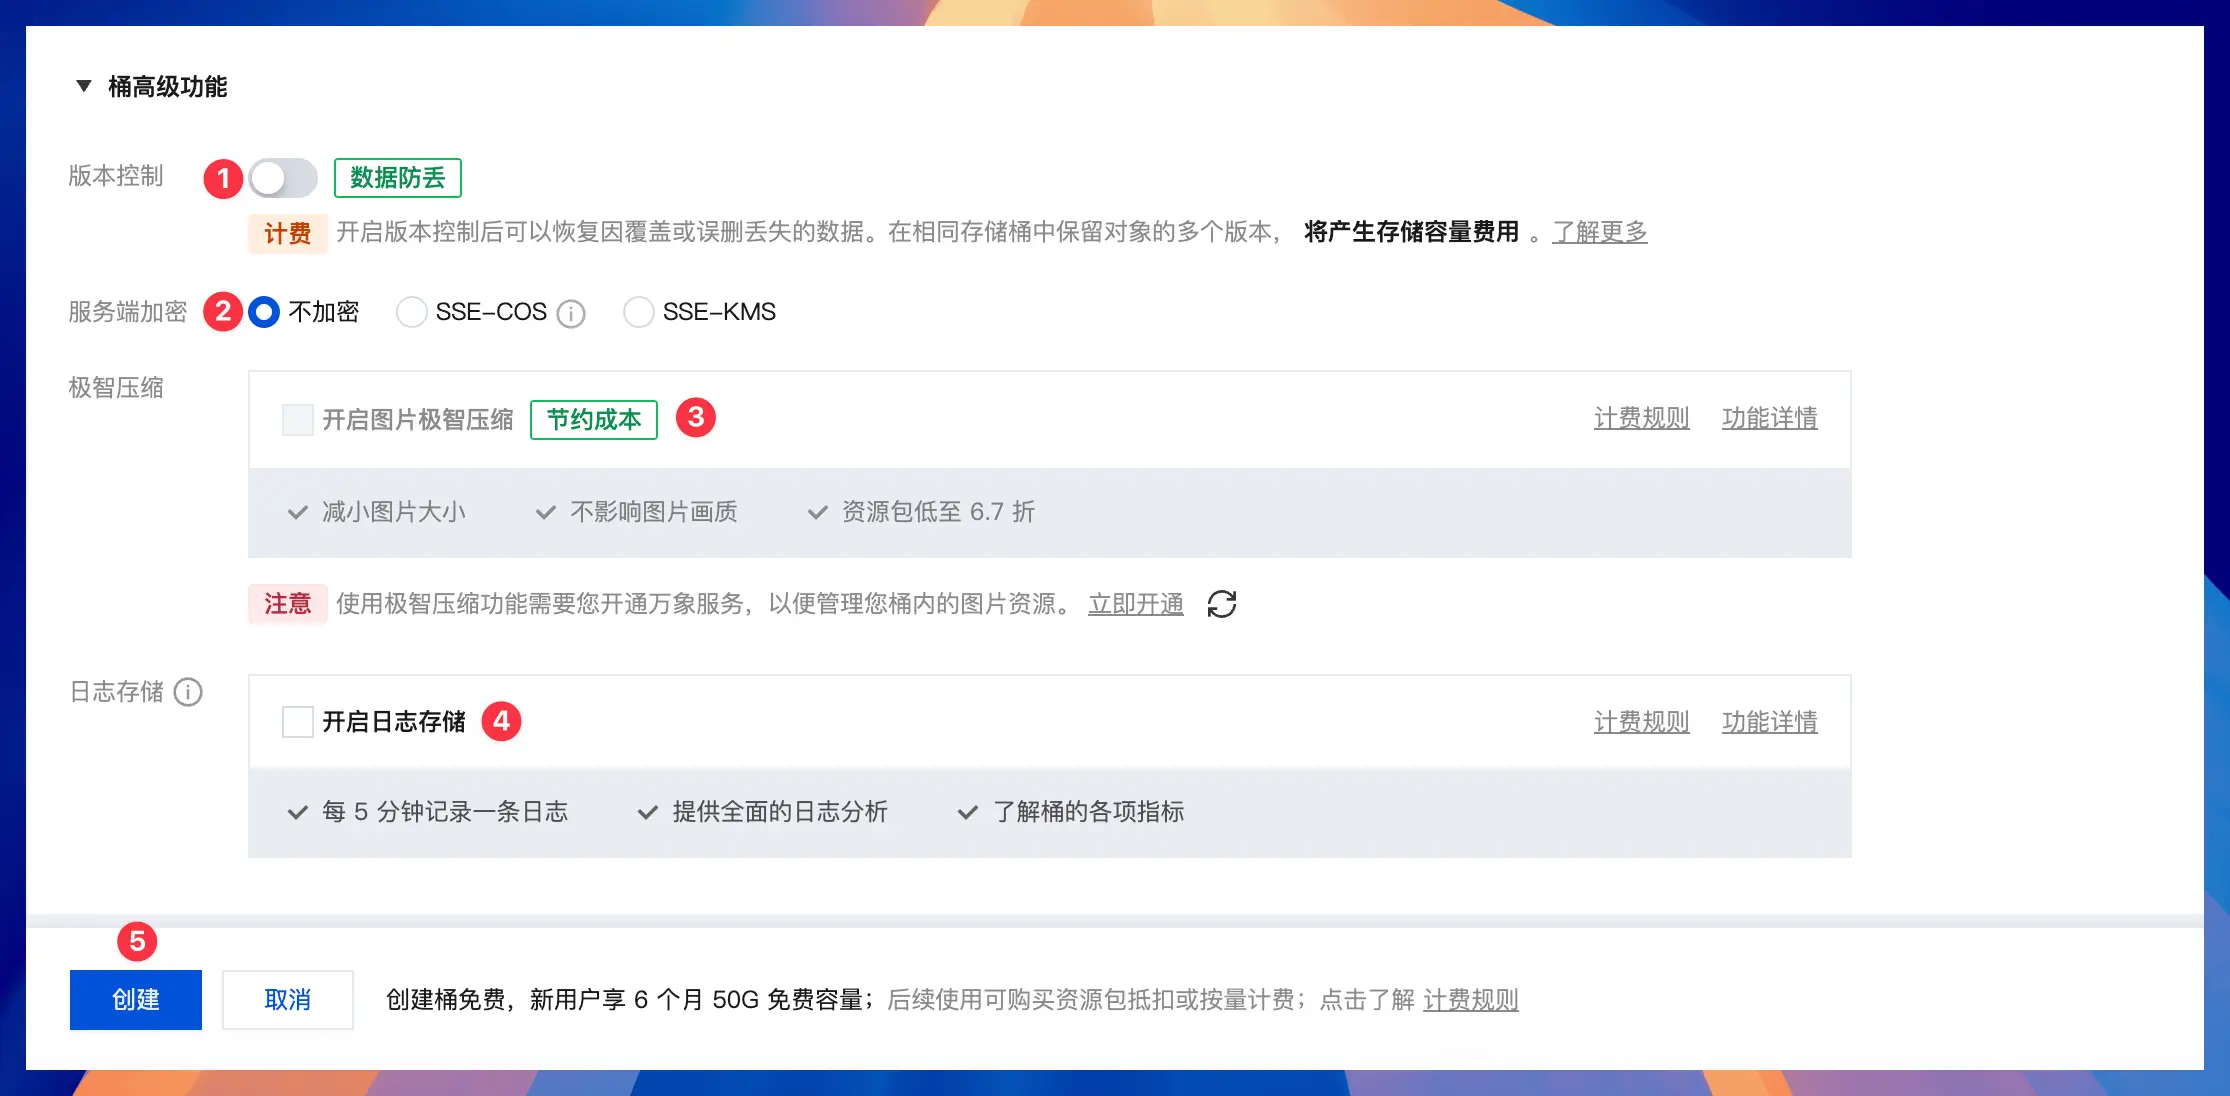
Keep the defaults here:
- Version Control: Off
- Server-side encryption: no encryption
- Extremely smart compression: unchecked
- Log storage: Uncheck
Version control keeps historical versions of files, which sounds safe, but it also increases storage usage and cost. Remotely Save already handles sync, so leave Tencent Cloud version control off for now.
Keep server-side encryption as "Unencrypted" for now. Run through the sync flow first; if you have stricter security requirements later, study the encryption options separately.
Smart compression is mainly for image compression, and log storage creates extra records. They are not related to this Obsidian sync setup, so leave them off.
The final confirmation page should look roughly like this:
Name: obsidian-sync
Bucket region: Public Cloud Zone-China-Guangzhou
Data redundancy strategy: single AZ storage
Access permissions: Private read and write
Bucket Label: Leave blank
Version Control: Off
Server-side encryption: no encryption
Extremely smart compression: unchecked
Log storage: Uncheck
After confirming the settings, click "Create" in the lower-left corner.
After the creation is completed, Tencent Cloud may automatically jump to the "Domain Name and Transmission Management" page.
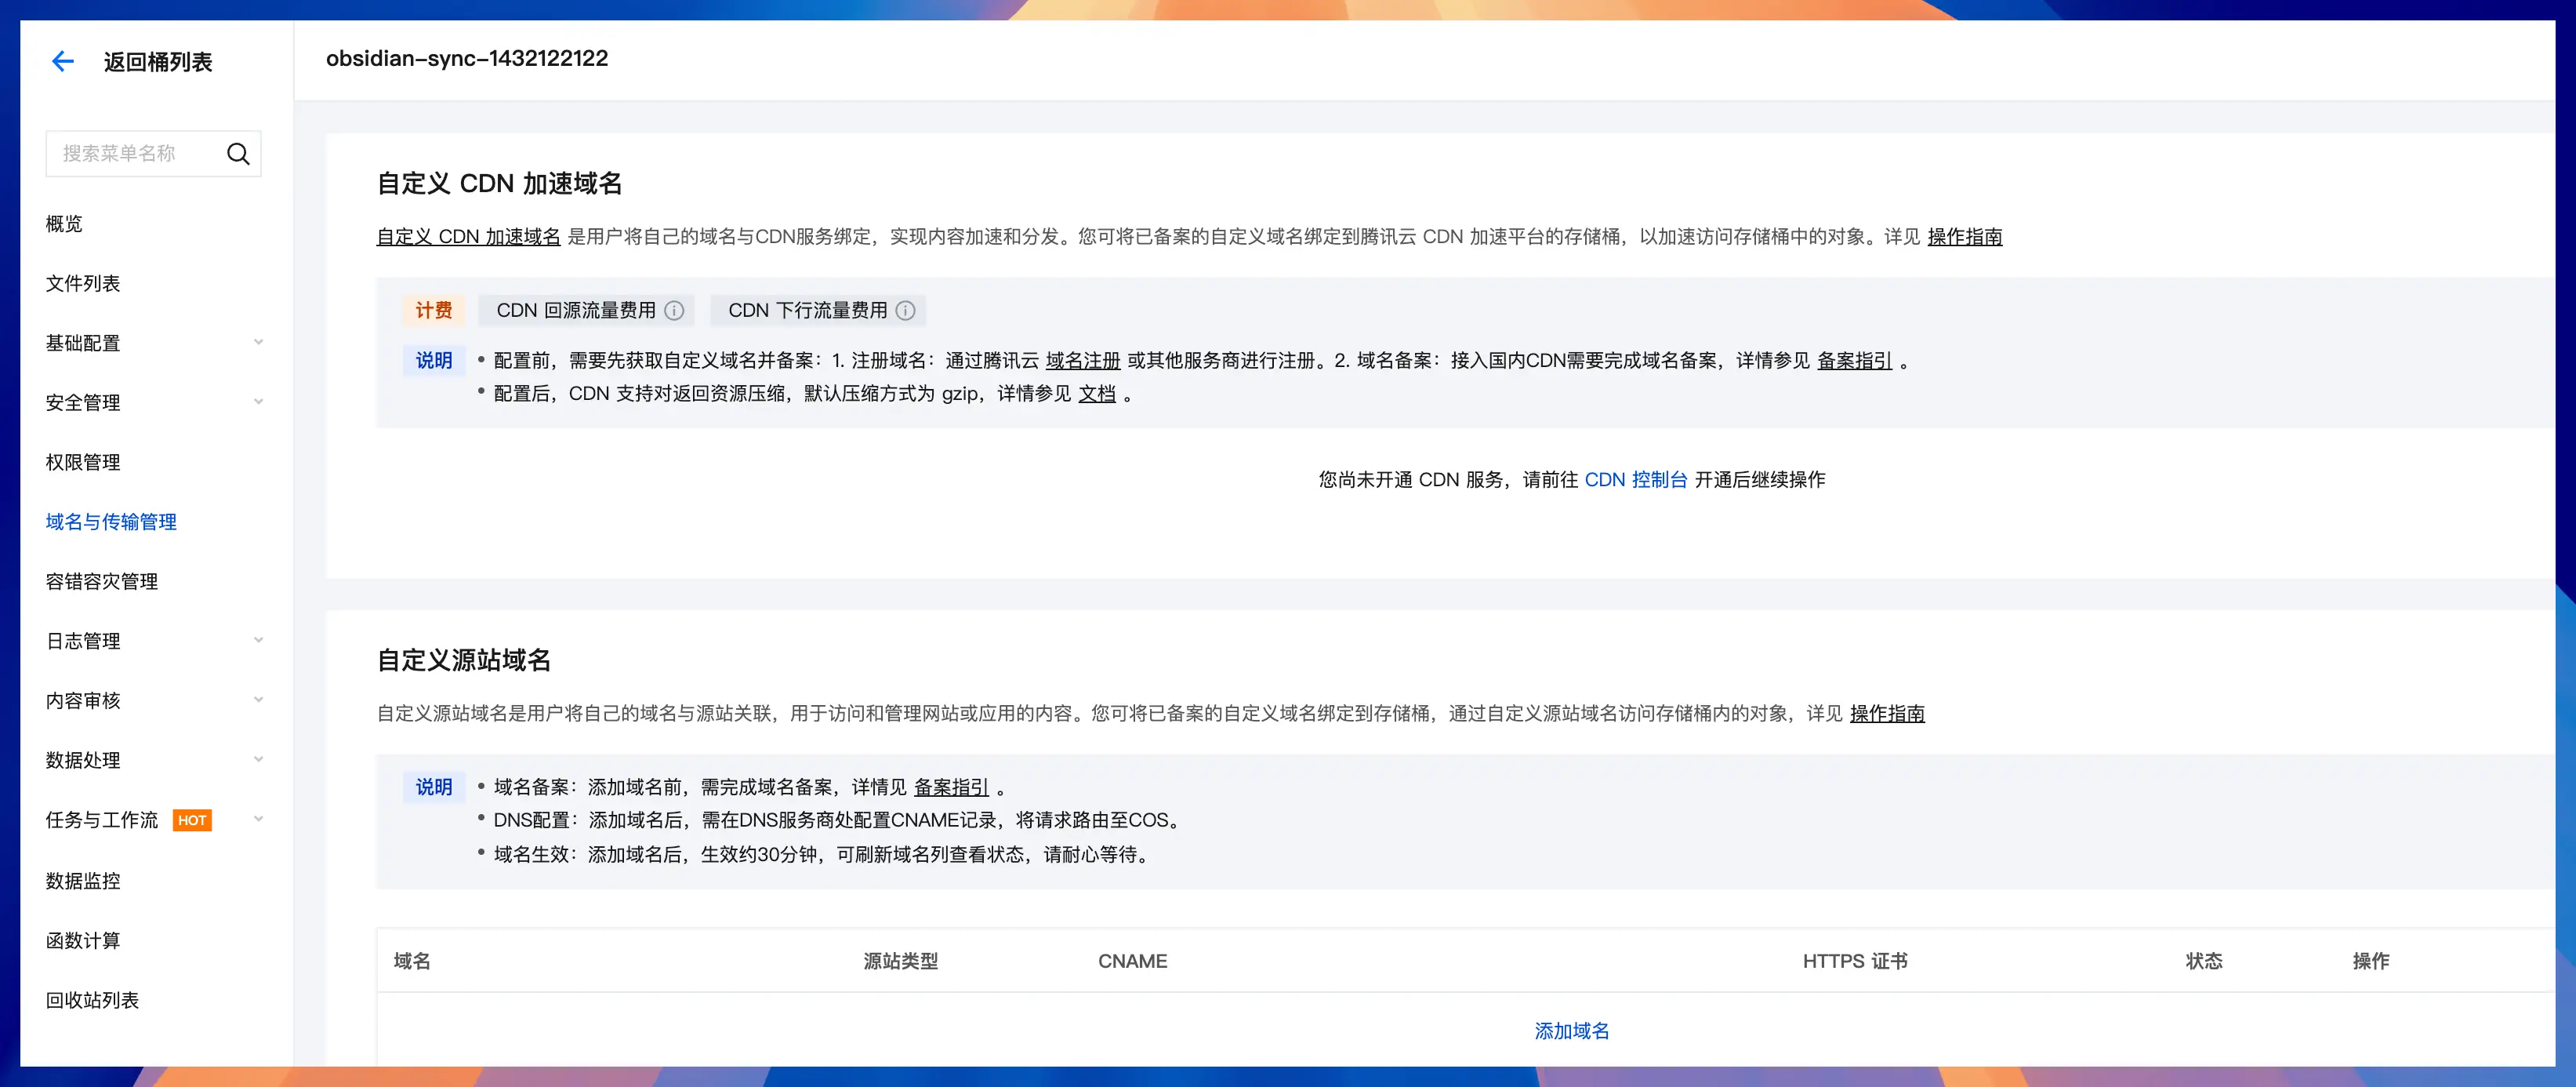
This page is for custom domains and CDN acceleration. Remotely Save does not need it, so do not click "Add Domain Name" or activate CDN.
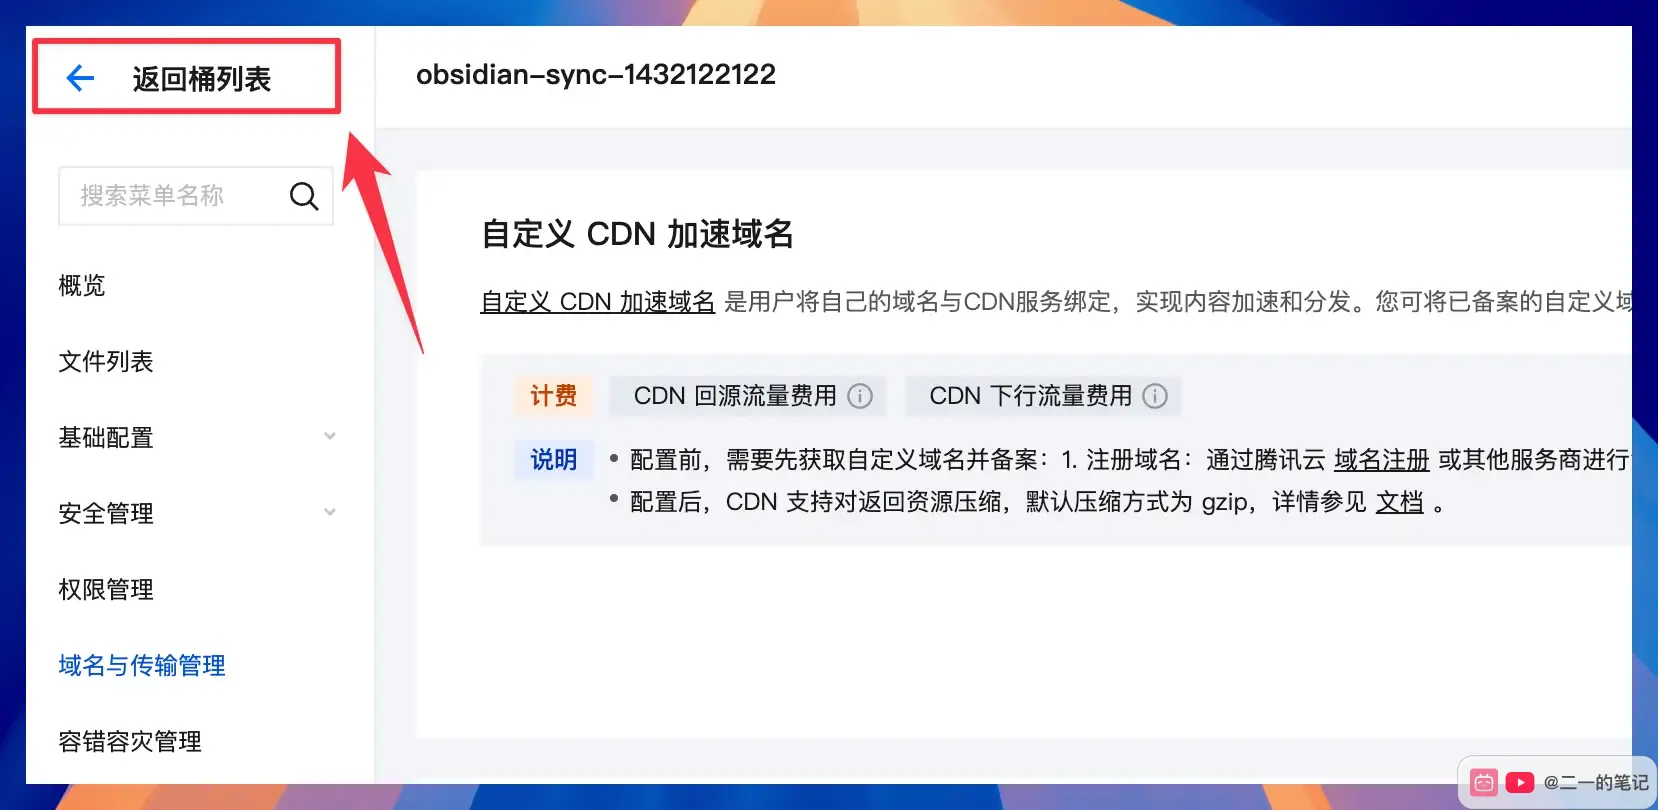
Directly click "Return to Bucket List" in the upper left corner.
After returning to the bucket list, you should see the bucket you just created.
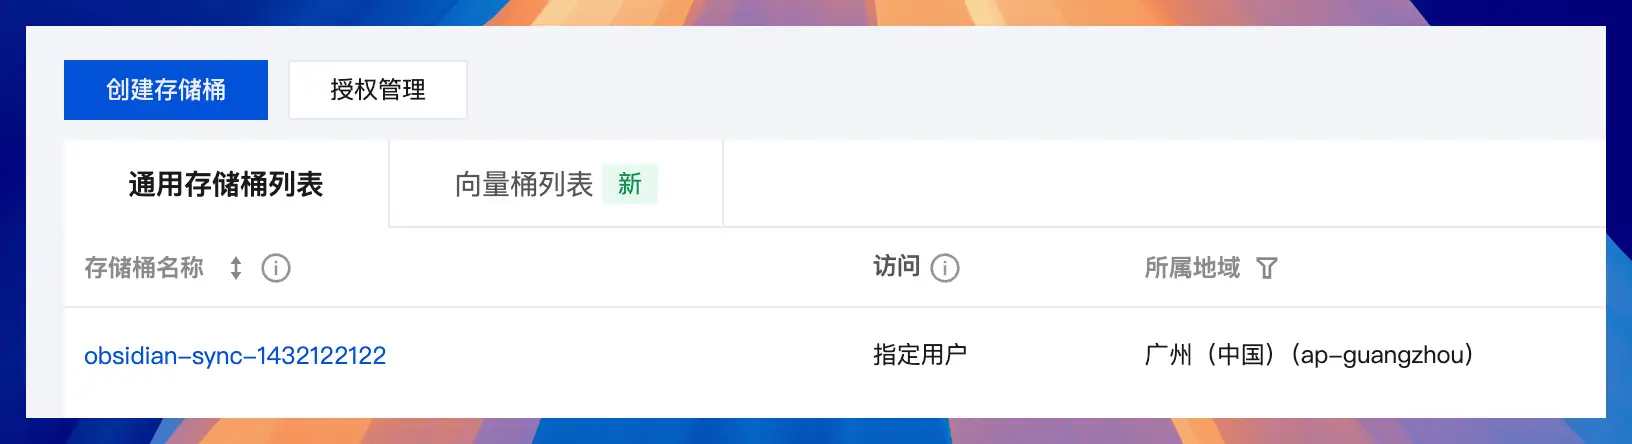
You will use two pieces of information later:
Bucket name: obsidian-sync-1432122122
Region: Guangzhou (China) (ap-guangzhou)
Fill the bucket name into the Bucket field in Remotely Save, and fill ap-guangzhou into the Region field. The screenshot uses my demo values. In your setup, use the values shown on your own page.
Get key
After creating the bucket, generate a set of Tencent Cloud API keys. Remotely Save will use these keys to connect to Tencent Cloud COS.
Open the API key management page: https://console.cloud.tencent.com/cam/capi
When you enter for the first time, Tencent Cloud may remind you that "it is not recommended to use the main account API access key."
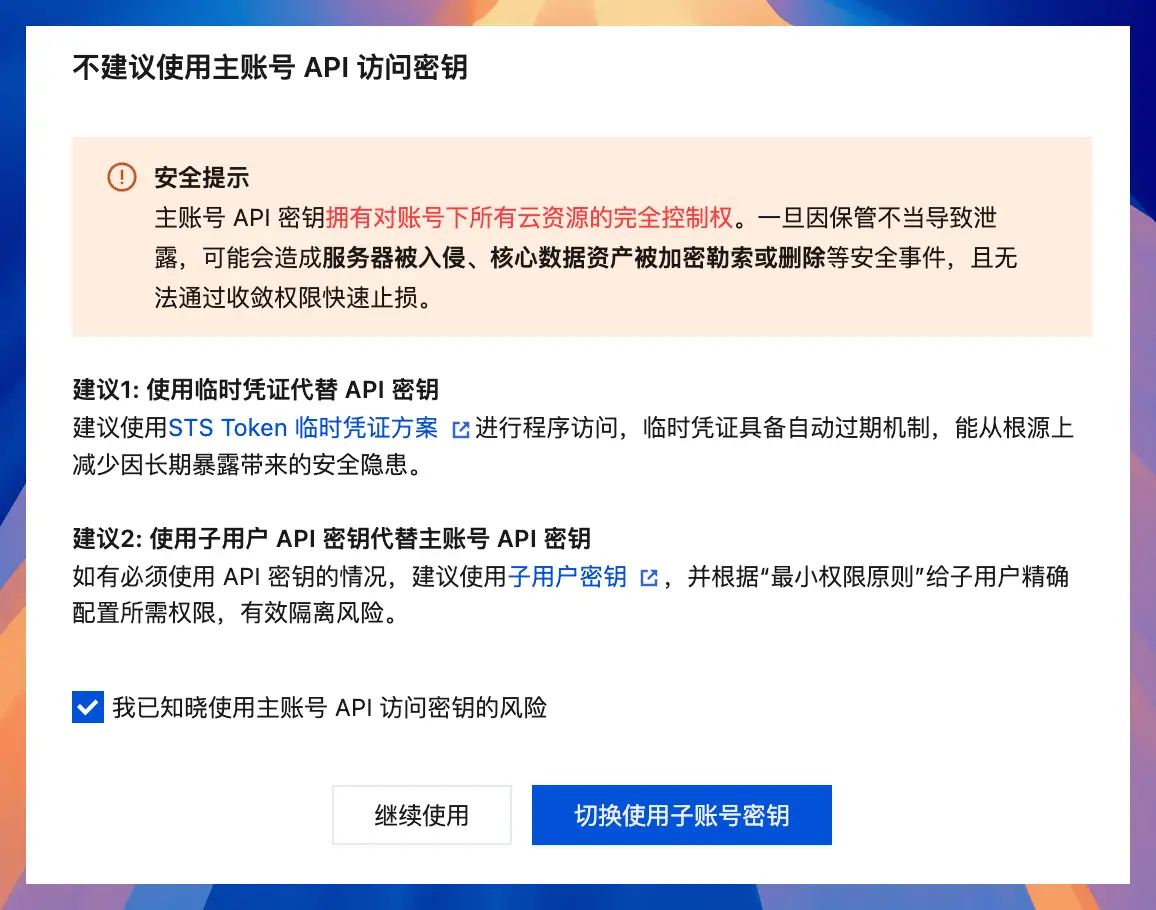
For better security, a separate sub-user key is the cleaner choice. This tutorial uses the fewest steps to get sync working, so check "I am aware of the risks of using the master account API access key", then click "Continue to use".
After you are familiar with the setup, you can create a separate sub-user key for Obsidian with narrower permissions.
Tencent Cloud will then show a SecretKey visibility warning.
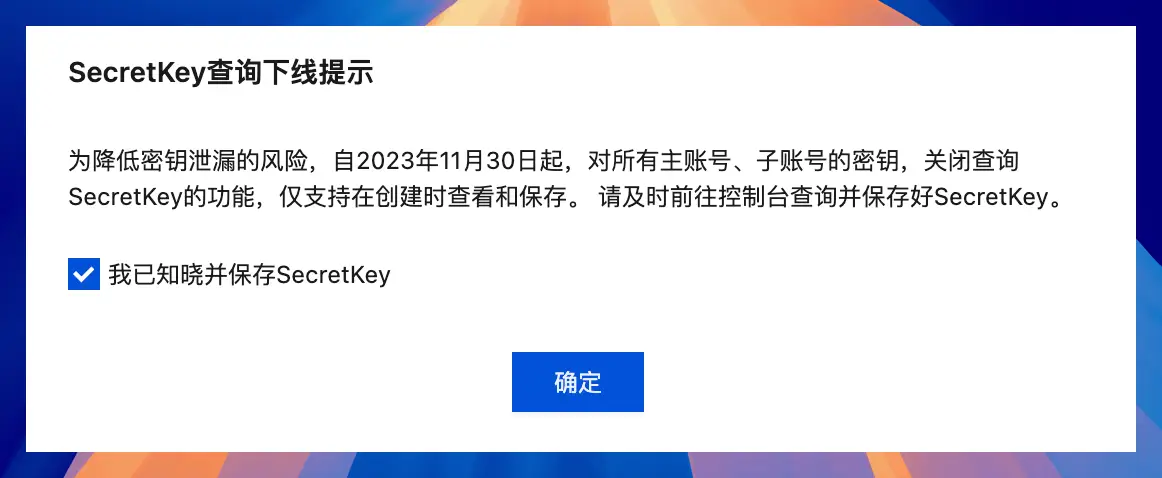
This warning means the SecretKey is shown in full only once during creation and cannot be viewed again later. After the key is created, copy and save both the SecretId and SecretKey right away.
Check "I know and save the SecretKey" and click "OK".
After returning to the API key management page, click "New Key".
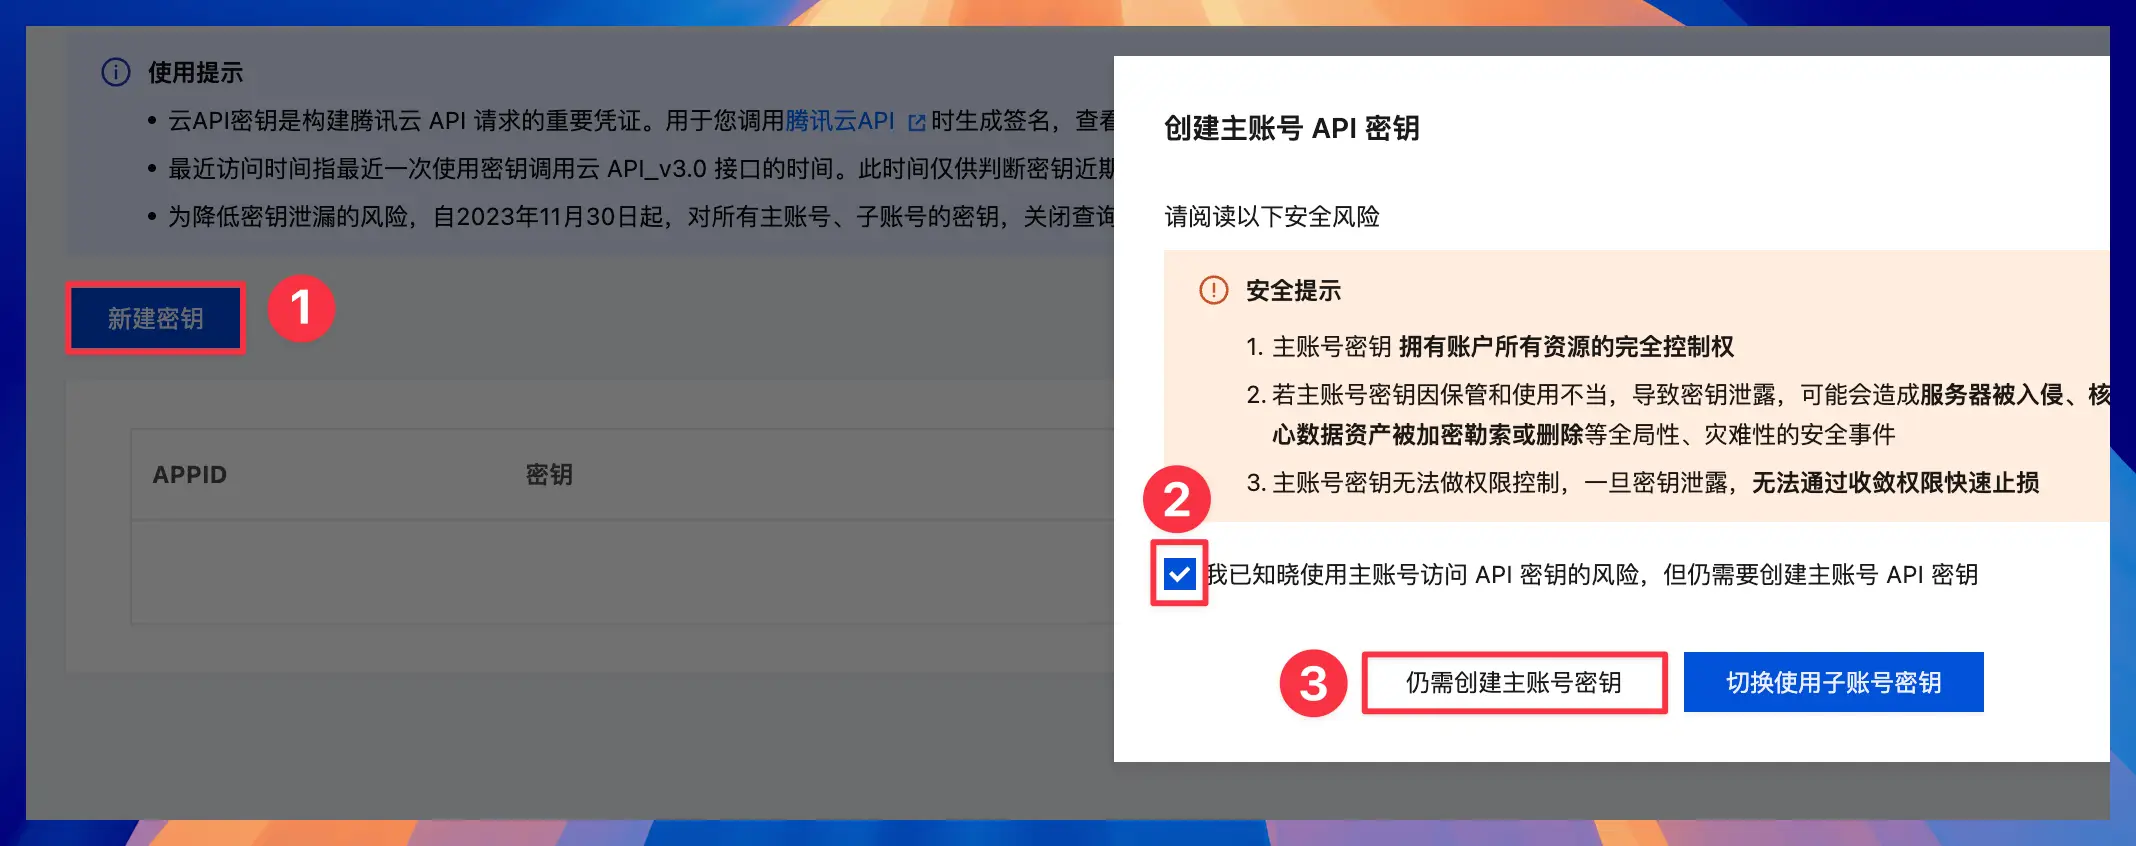
Another security confirmation appears during creation. Check the risk confirmation again, then click "Still need to create a master account key".
Tencent Cloud may require mobile phone verification.
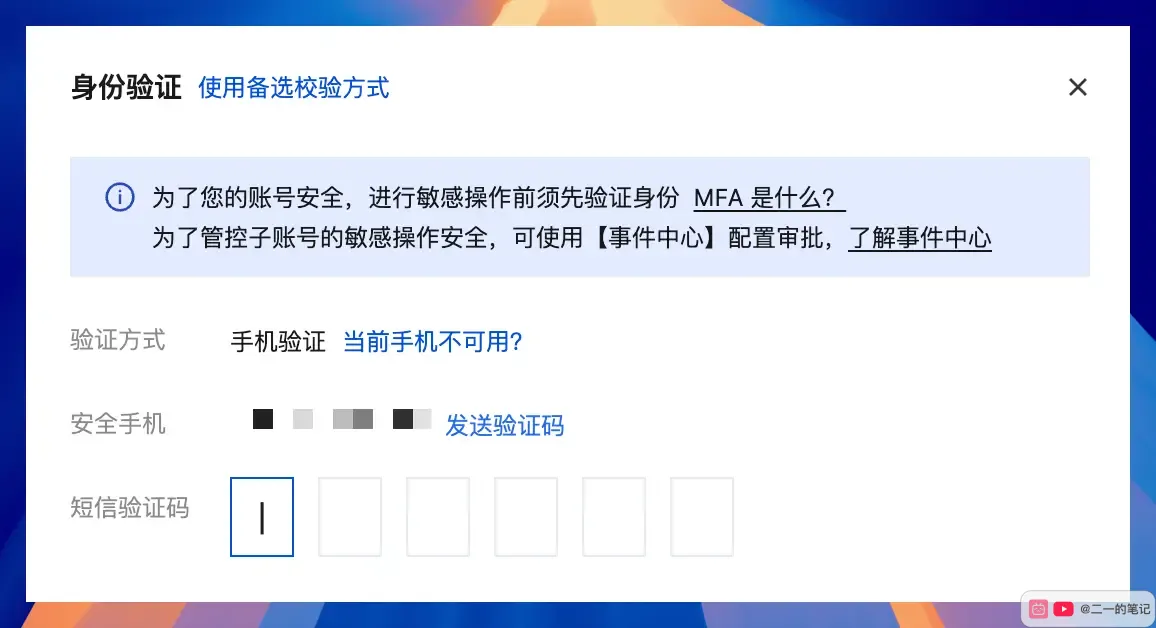
Click "Send Verification Code" and enter the SMS verification code to continue.
After verification passes, you will see the newly created SecretId and SecretKey.
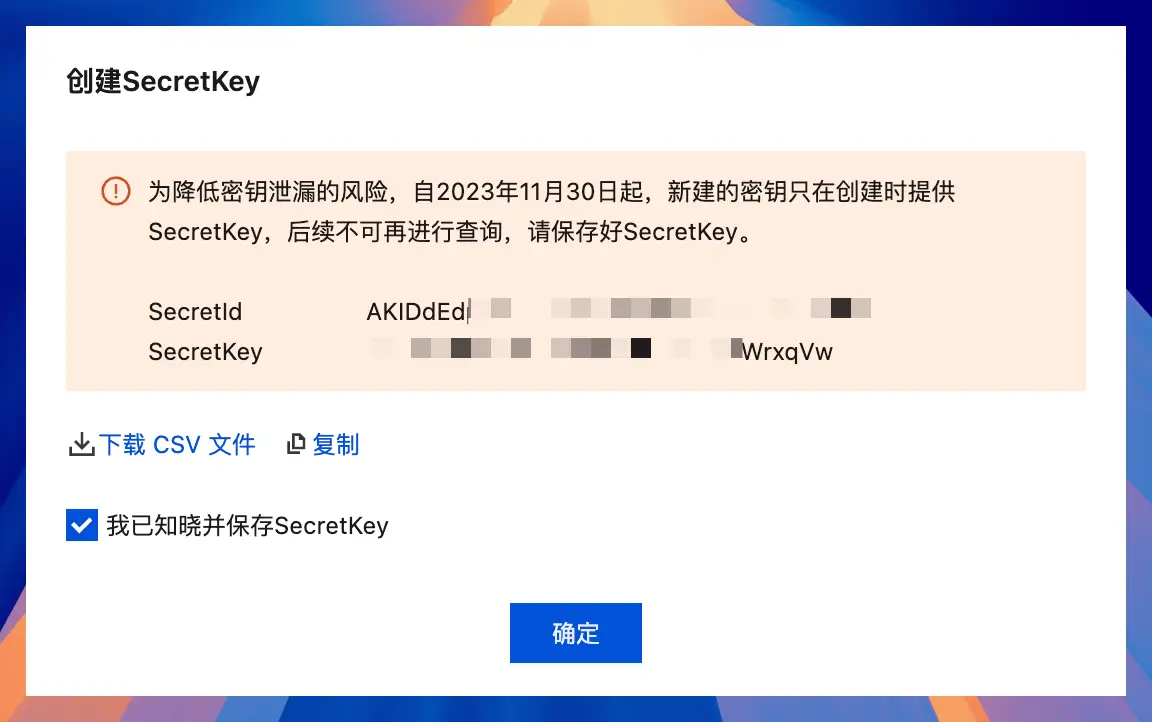
Pay close attention here:
- SecretId goes into Access Key ID in Remotely Save
- SecretKey goes into Secret Access Key in Remotely Save
- SecretKey is displayed only once, so copy and save it immediately
- Before taking a screenshot or sending it to anyone, mask the SecretKey
If you are worried about manual copying errors, you can click "Download CSV file" to save the key locally. After saving, check "I already know and save the SecretKey" and click "OK".
Back on the list page, you should see the key you just created.

If you no longer use this set of keys in the future, you can click "Disable" here. Once disabled, Remotely Save can no longer access Tencent Cloud COS through this set of keys.
You now have the 4 Tencent Cloud values needed for Remotely Save. The following list is only a mapping, not something to copy:
Bucket: Your own full bucket name
Region: your own bucket region code
Access Key ID: your own SecretId
Secret Access Key: your own SecretKey
Now return to Obsidian and enter this information in Remotely Save.
Set up the Remotely Save plugin
After Tencent Cloud is ready, return to Obsidian and open the Remotely Save plugin settings.
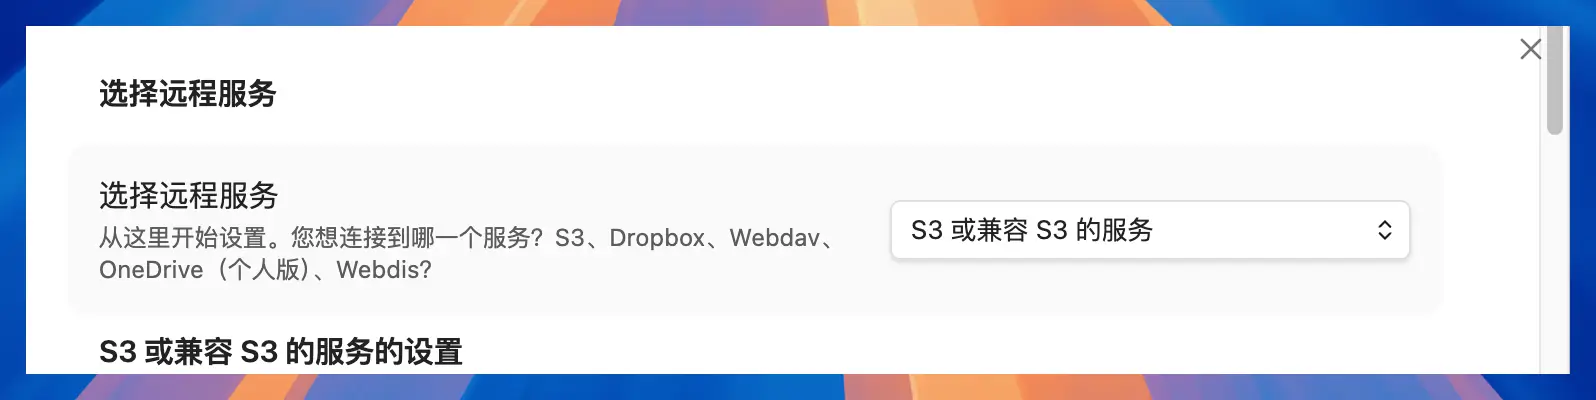
Under "Select Remote Service", select:
S3 or S3-compatible service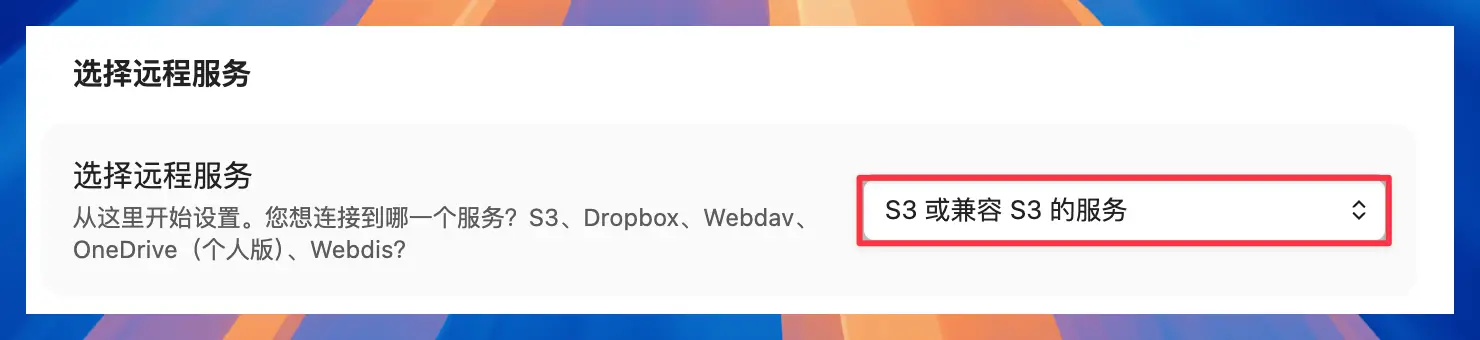
Tencent Cloud COS is an object storage service compatible with S3, so you can select the S3 compatible service here.
After you select it, the page shows a set of S3 configuration fields. Fill in the Tencent Cloud information prepared earlier.
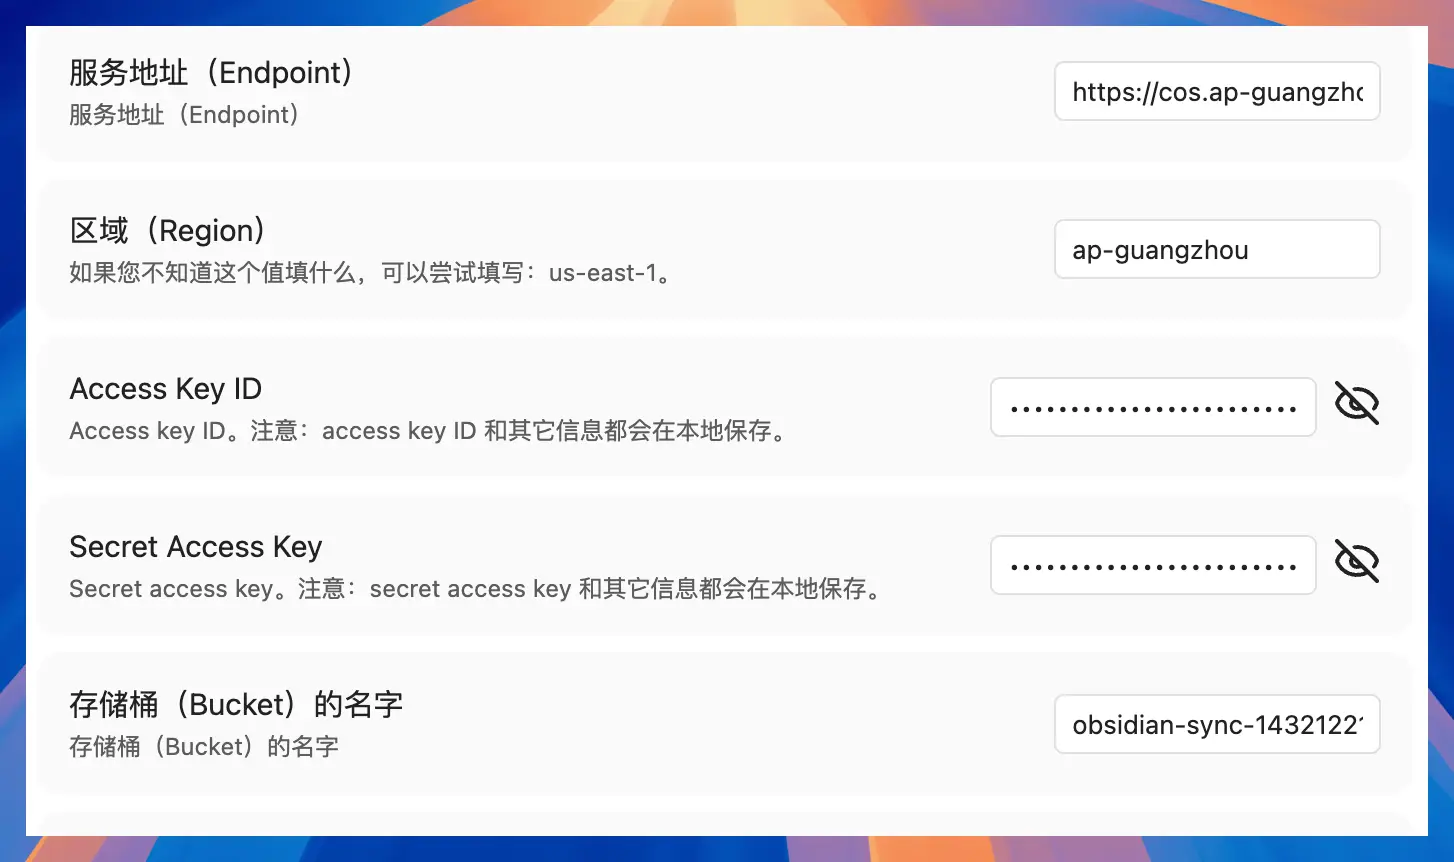
Fill it in as follows. The obsidian-sync-1432122122 value below is only my demo bucket name. Replace it with the full name shown in your Tencent Cloud console. SecretId and SecretKey must also come from your own account, not from the screenshot.
Service address (Endpoint): https://cos.ap-guangzhou.myqcloud.com
Region: ap-guangzhou
Access Key ID: Your own Tencent Cloud SecretId
Secret Access Key: Your own Tencent Cloud SecretKey
Bucket name: your own full bucket name
Write the Endpoint according to the region. Earlier, this example used Guangzhou, whose region code is:
ap-guangzhouSo the Endpoint is:
https://cos.ap-guangzhou.myqcloud.comIf you selected Shanghai, Beijing or other regions earlier, the ap-guangzhou here must also be replaced with your own region code.
Keep the following options at their defaults:
S3 URL style:Virtual Hosted-Style(default)
Block parallelism: 20 (default)
Use exact file modification time: off
Modify the remote prefix path: leave it blank
S3 reverse proxy address: Leave blank
Whether to generate folder Object: Do not generate (default)
After filling in, scroll down to find "Check Can Connect" and click "Check" on the right.
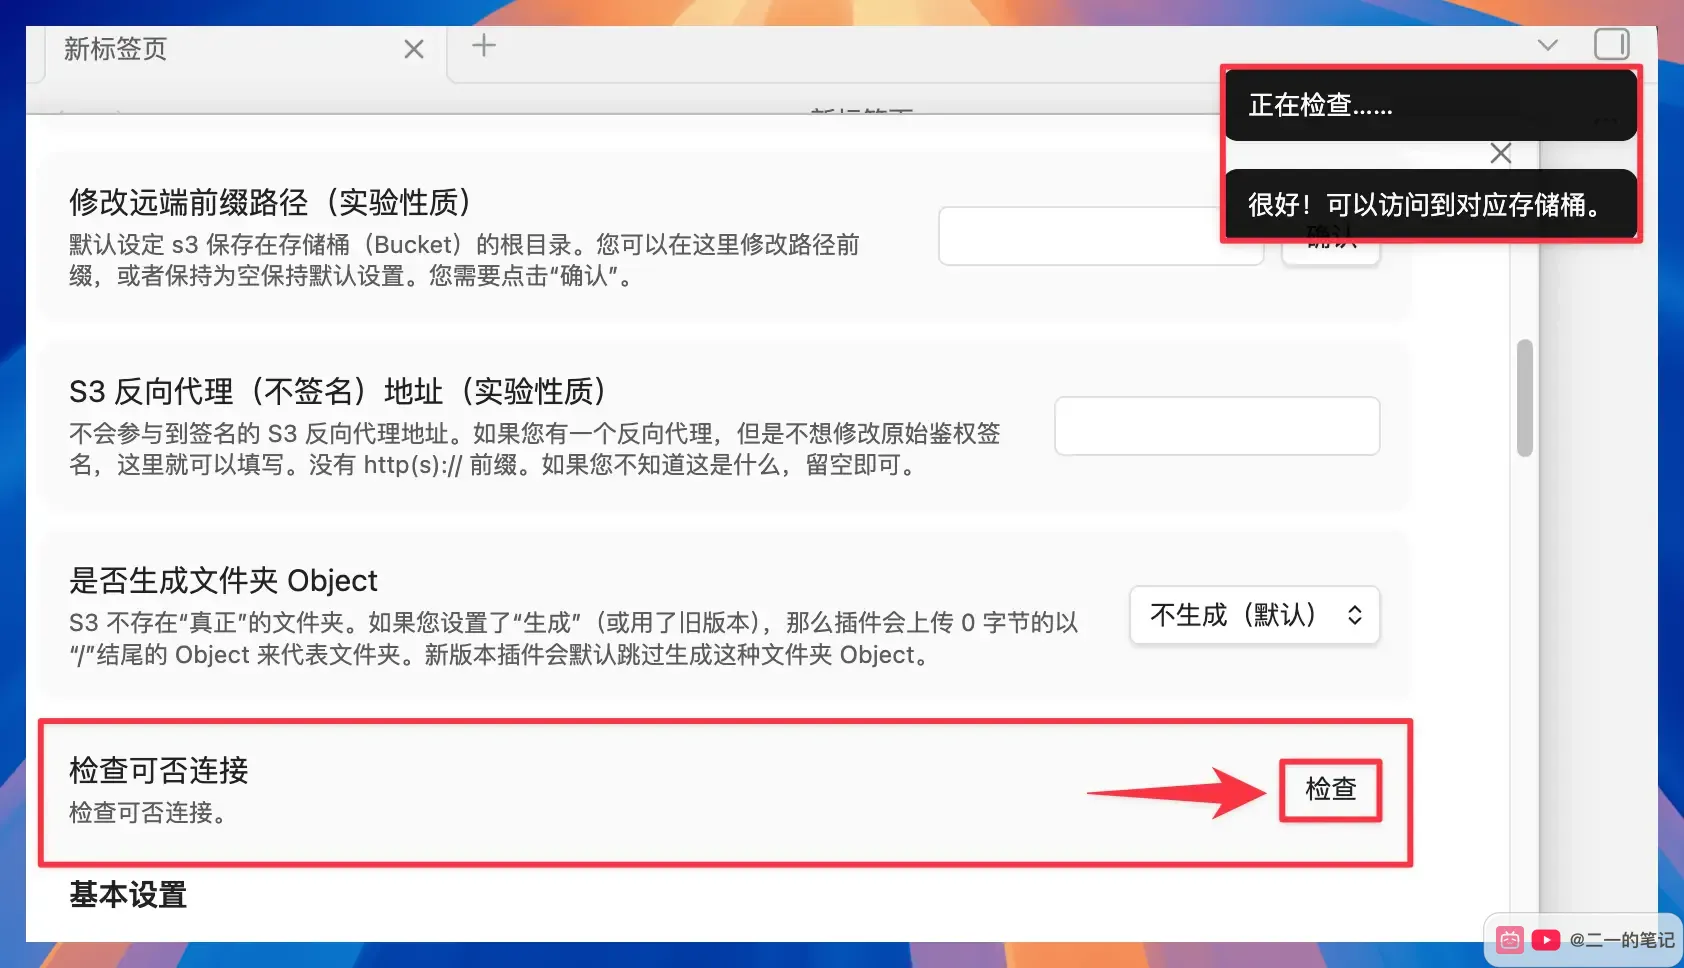
If "Good! You can access the corresponding bucket." appears in the upper-right corner, Remotely Save has connected to Tencent Cloud COS.
Once Tencent Cloud COS is configured as the sync relay, run the first sync test.
Synchronous testing
After the connection check passes, start with the simplest sync test.
Create a regular note in Obsidian. In this example, I created:
Synchronous testingThen click the Remotely Save icon in the left toolbar.
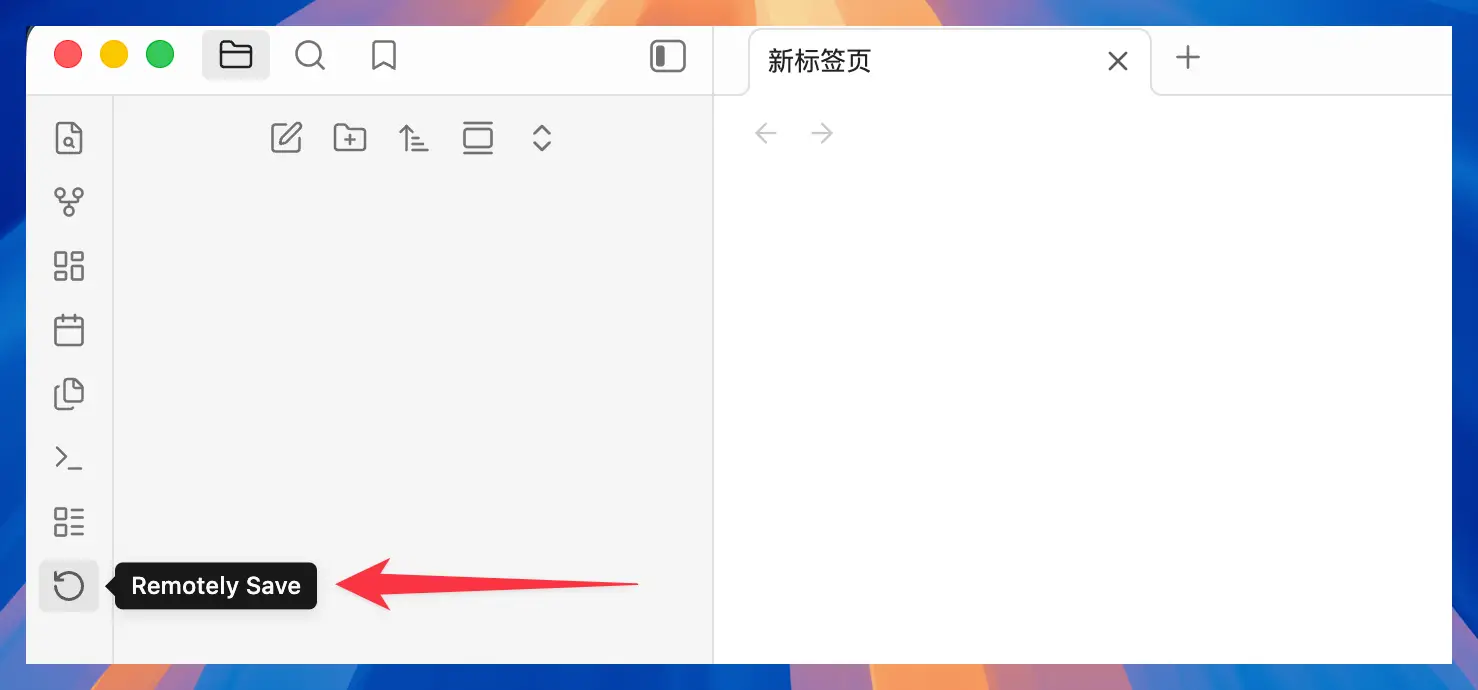
After you click it, Remotely Save starts syncing.
If "Start Sync" appears first in the upper-right corner, followed by "Sync Completed", the sync run has finished.
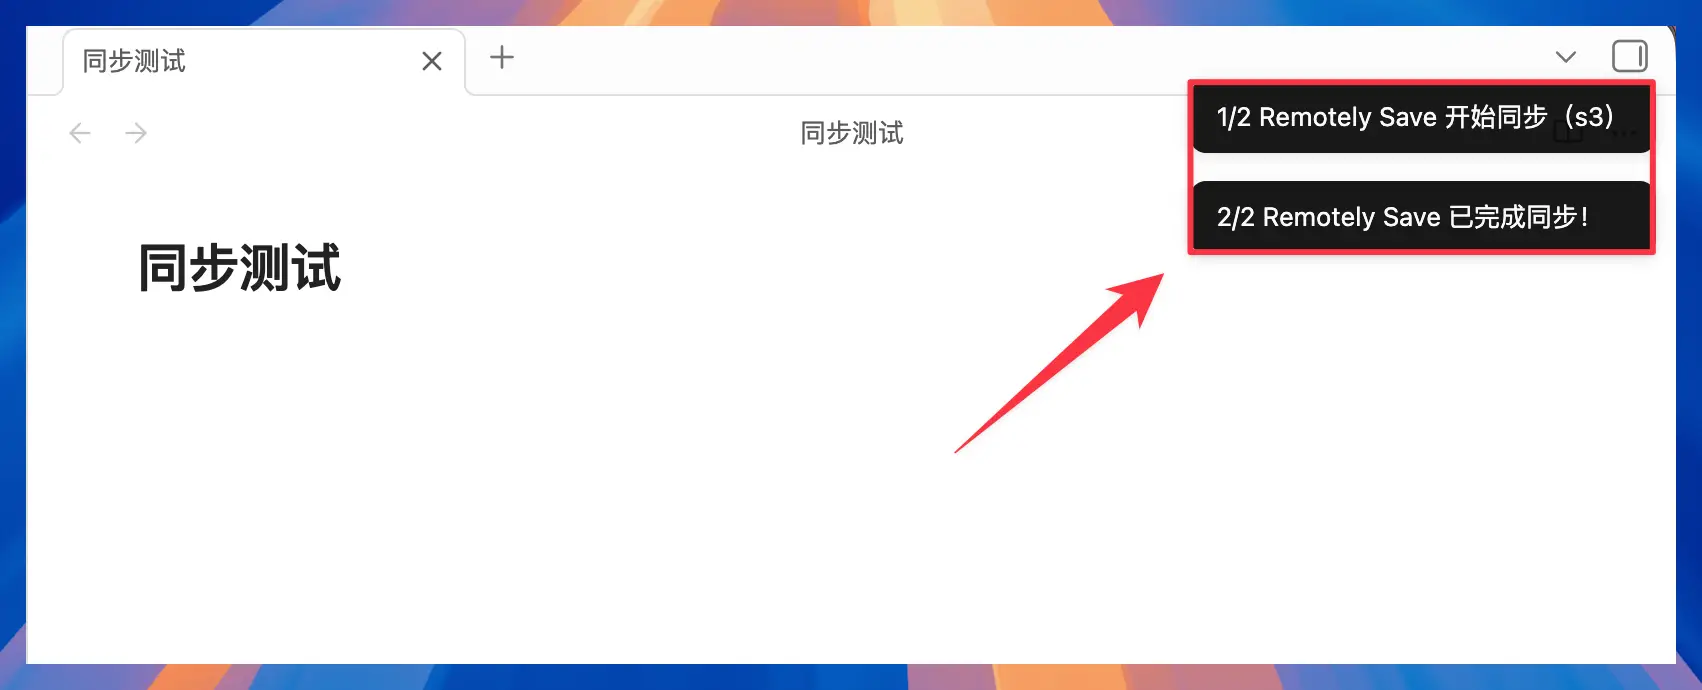
This only shows that the plugin thinks the sync finished. To confirm the file was uploaded to Tencent Cloud, return to the Tencent Cloud COS console and check once.
Open the bucket you just created and enter "File List". The newly created test note should appear in the bucket.
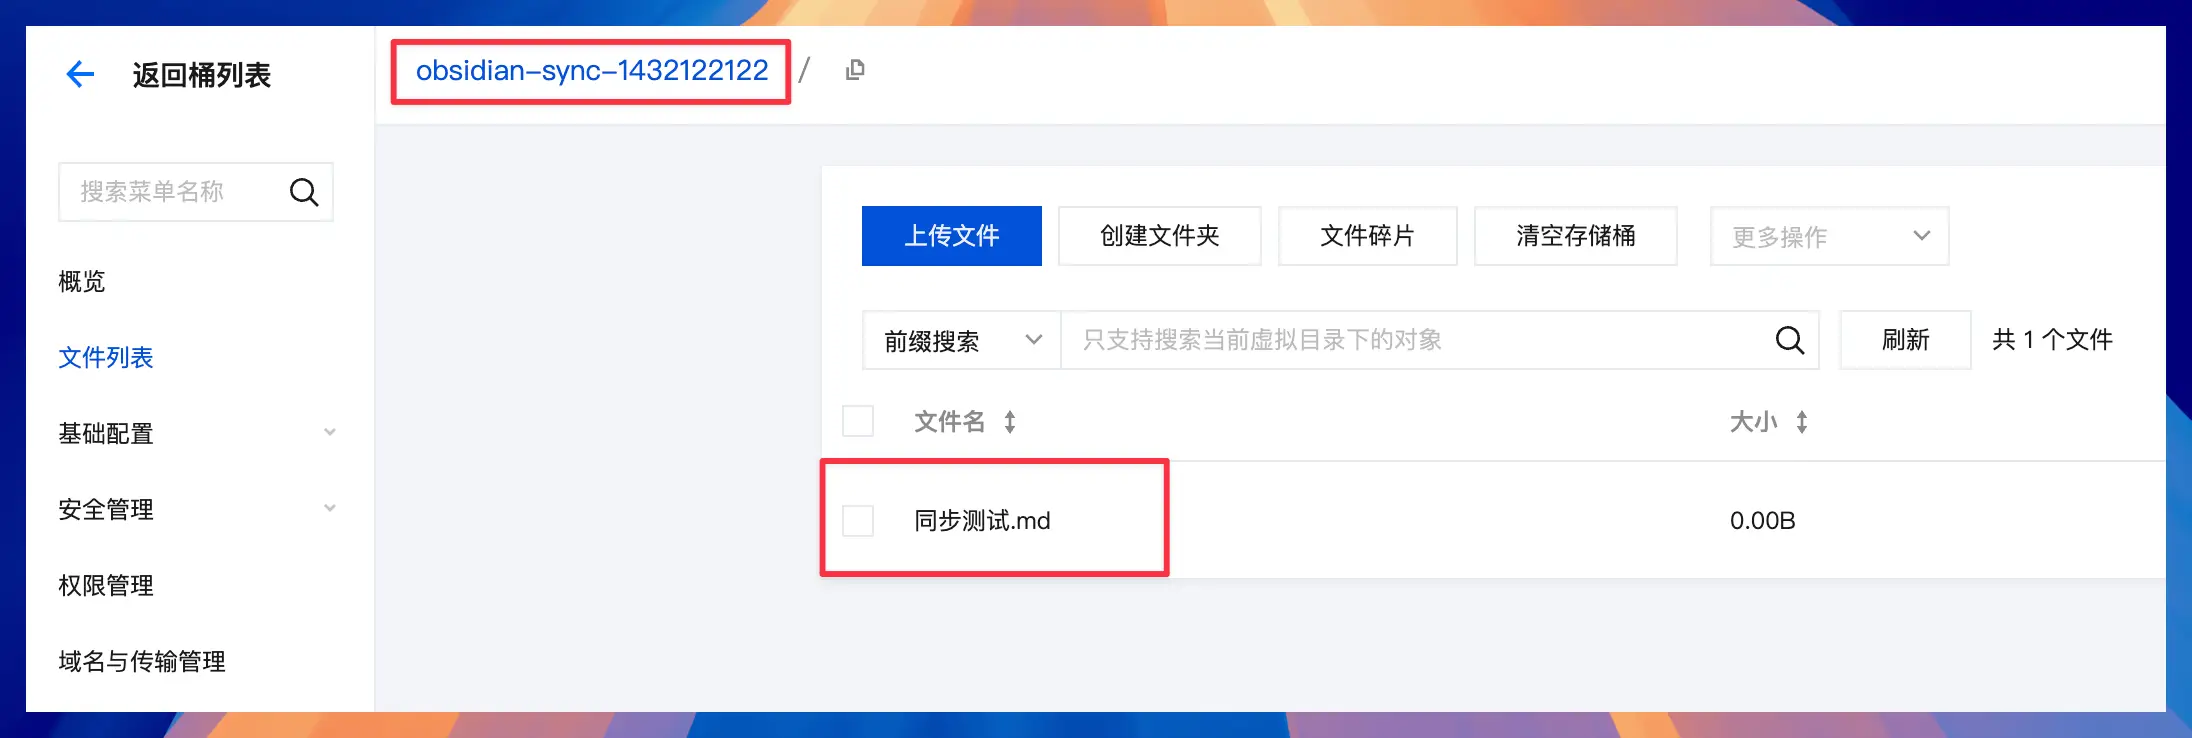
Here you can see:
synchronous test.mdThat confirms Obsidian has synced the file to Tencent Cloud COS.
After the sync test works, go back to the basic Remotely Save settings and adjust automatic sync for your own usage.
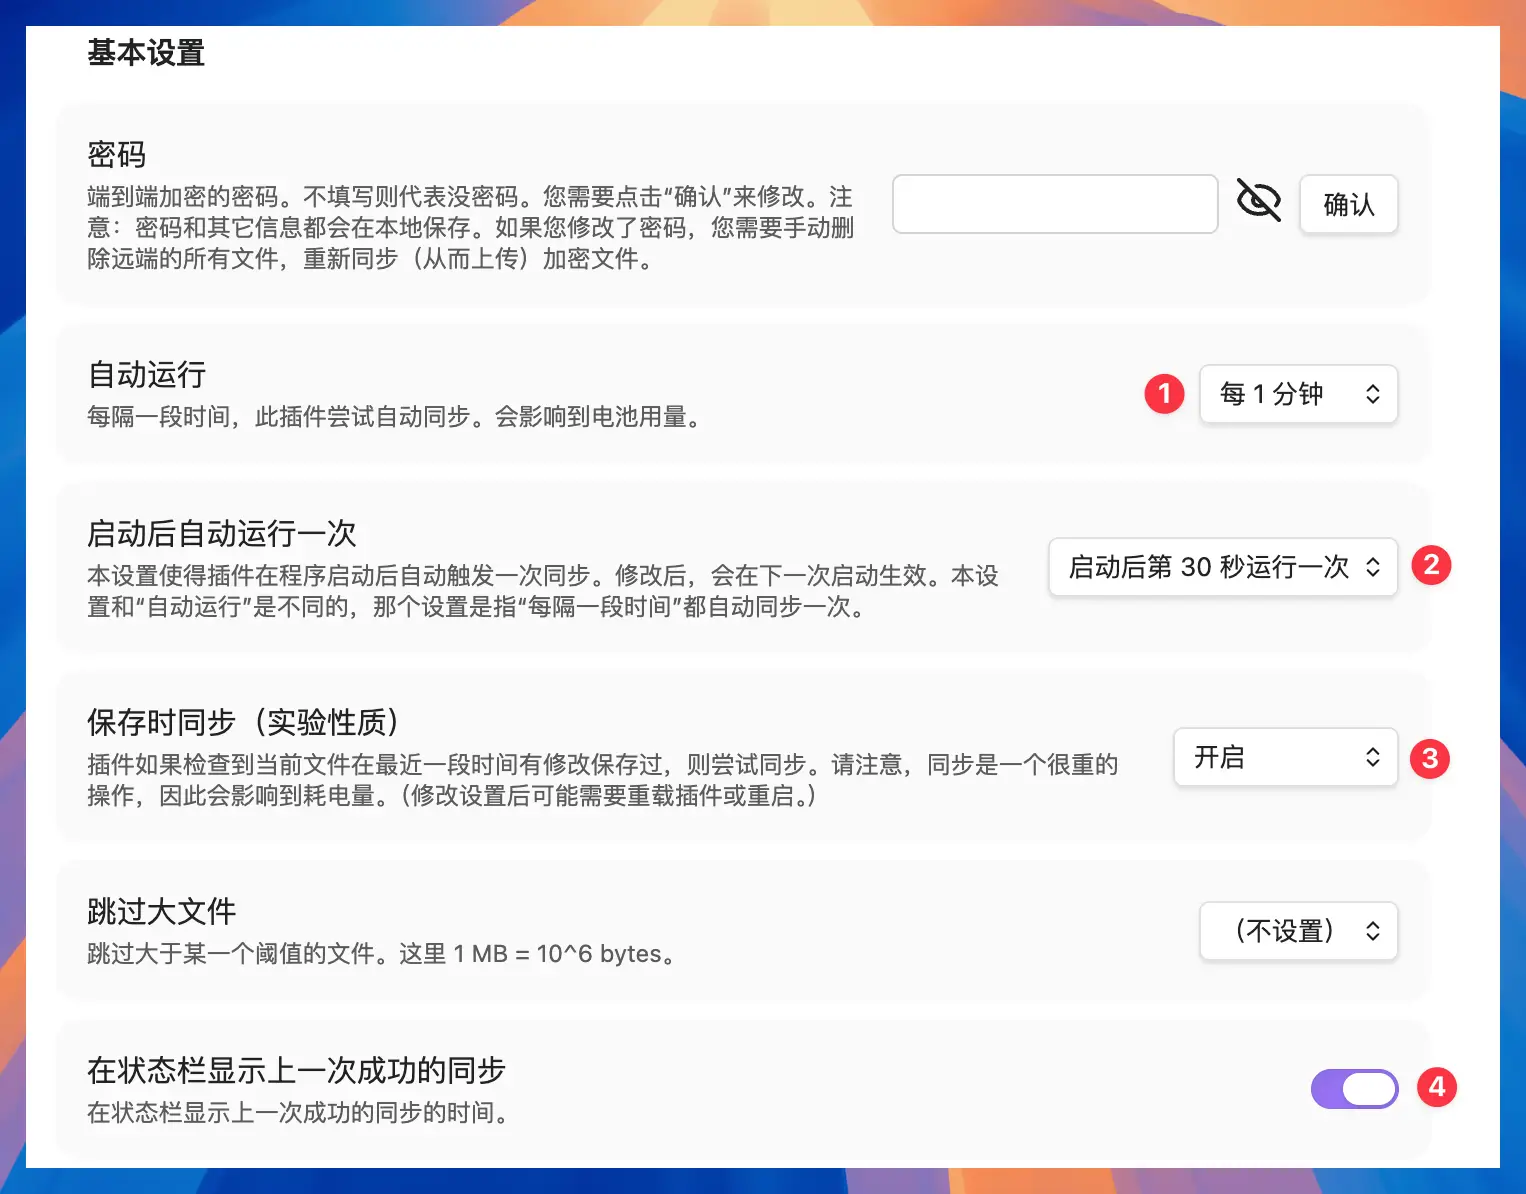
These options are worth checking:
- Automatically run
You can set it to automatically sync every once in a while. The setting in the screenshot is "every 1 minute". If you are worried about battery consumption or frequent requests, you can also change to a longer interval, such as 5 minutes or 10 minutes.
- Automatically run once after startup
I recommend turning this on. Each time you open Obsidian, the plugin syncs once and reduces content differences between devices.
- Sync on save
You can turn this on. When the plugin detects that a file was recently saved, it attempts to sync automatically. Sync uses battery and network traffic, so adjust it on mobile devices as needed.
- Display the last successful synchronization in the status bar
I recommend turning this on so you can quickly see whether the latest sync succeeded.
After desktop Obsidian is connected to Tencent Cloud COS, configure the same relay on mobile and pull down the cloud content.
Pull synced content on mobile
After desktop sync succeeds, pull the cloud content down on your phone.
Use a new empty vault for testing first. Do not start with a phone vault that already contains many notes, so a wrong setting will not affect your existing content.
When you open Obsidian on your phone for the first time, tap "Create Empty Vault".
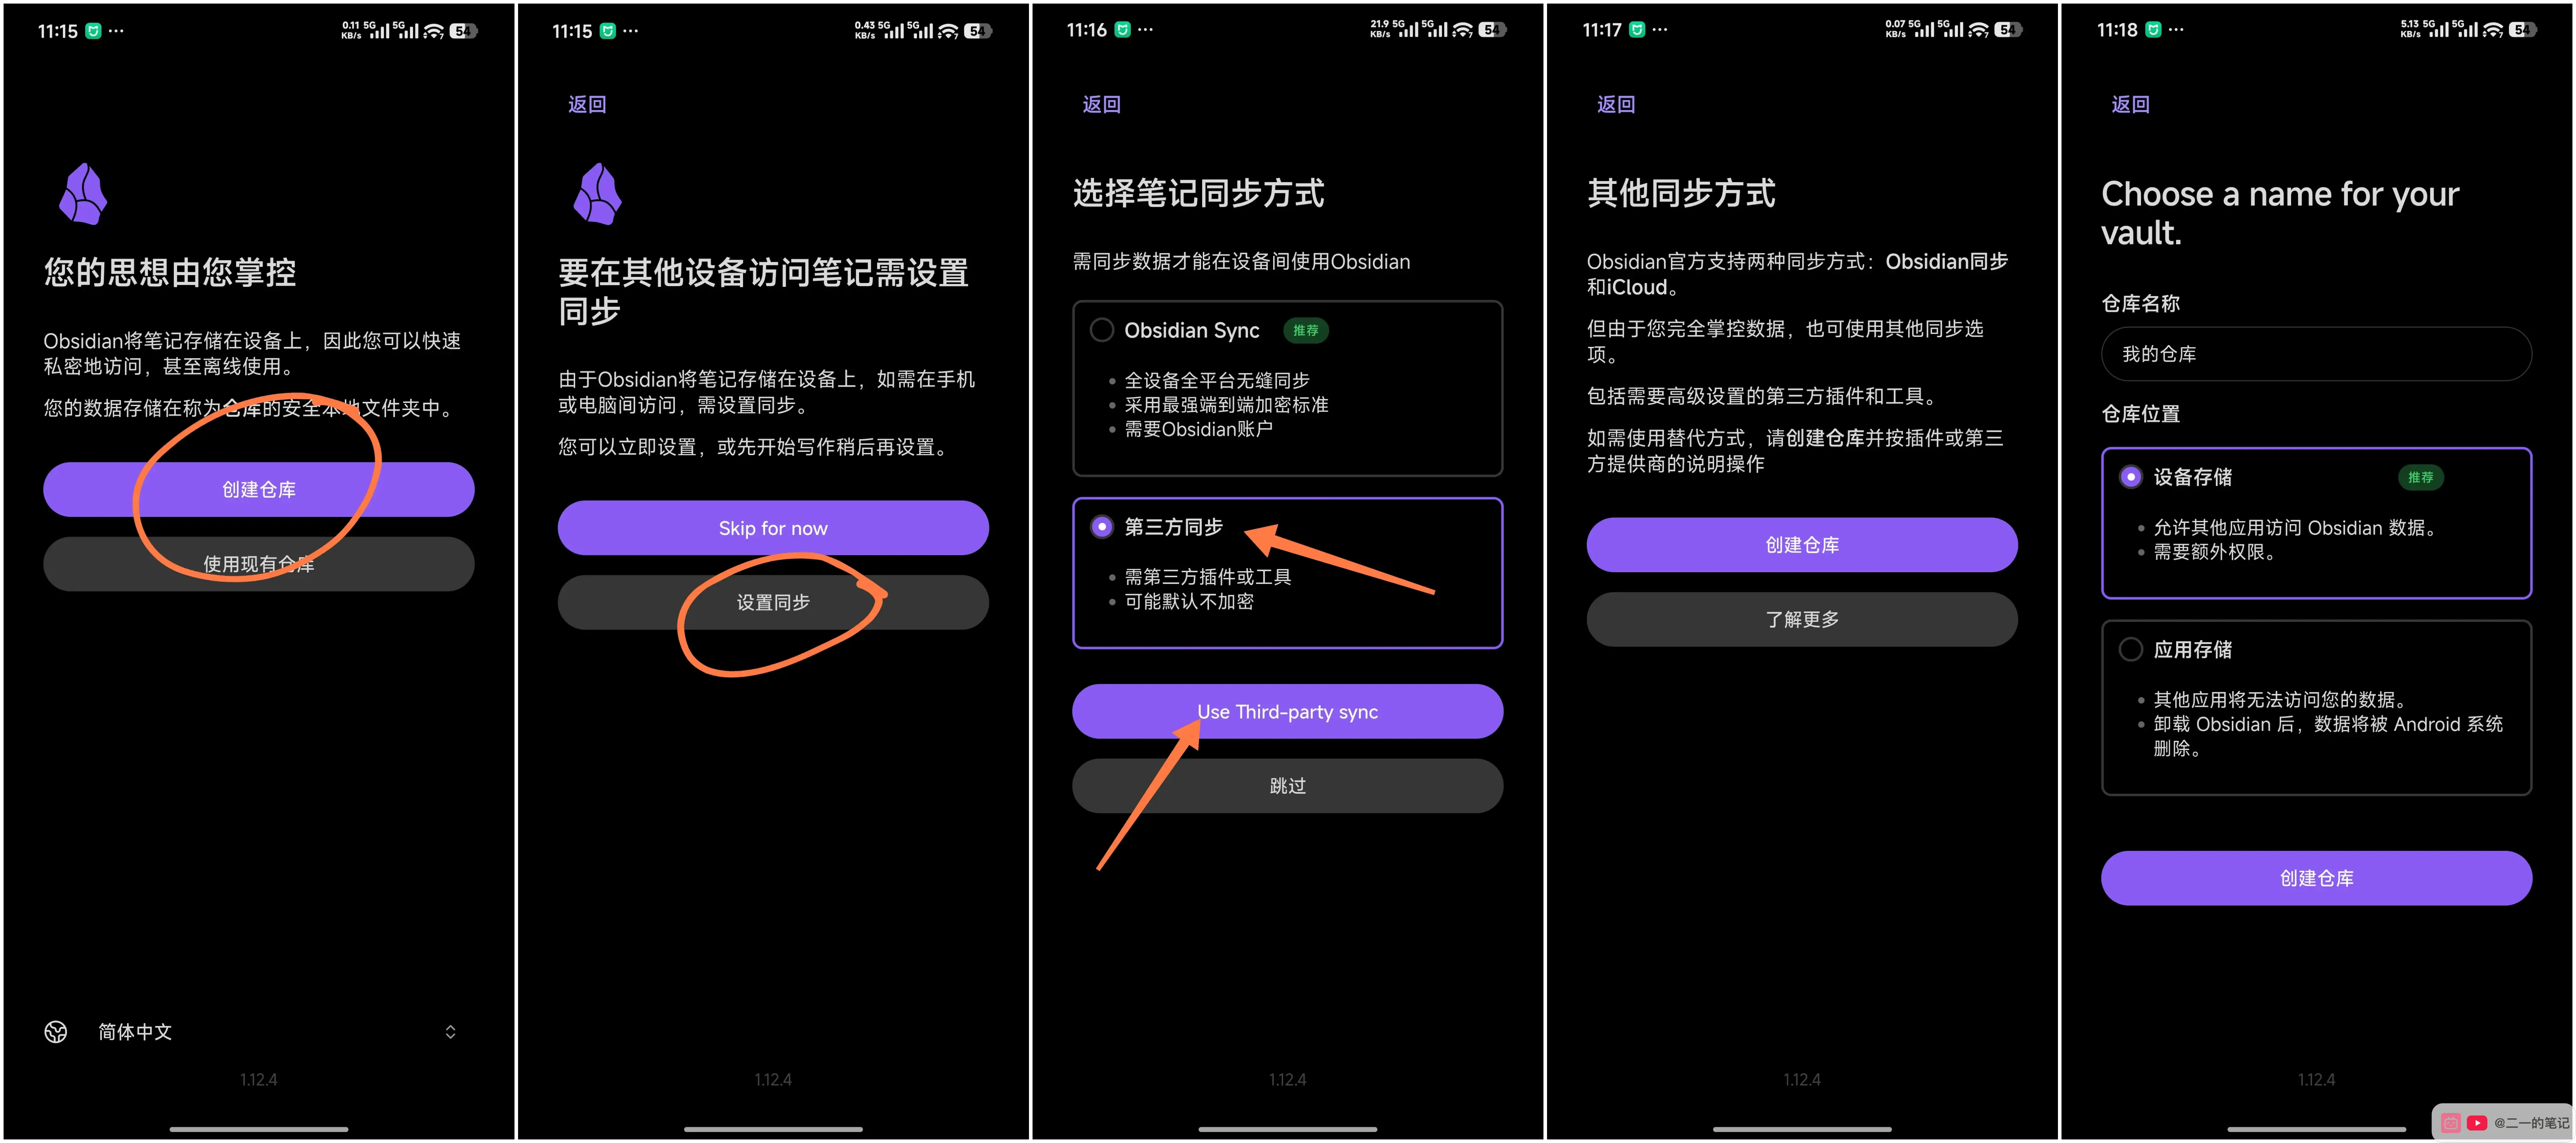
If Obsidian prompts "To access notes on other devices, you need to set up synchronization," do not select Obsidian Sync here. This tutorial uses Remotely Save, so select "Third-party synchronization" and continue creating the vault.
For the vault name, choose any test-friendly name, such as:
my vaultFor the vault location, select "Device Storage".
After creating the vault, Obsidian requests file access. Tap "Start File Access", then create or select the folder Obsidian will use in the system file manager.
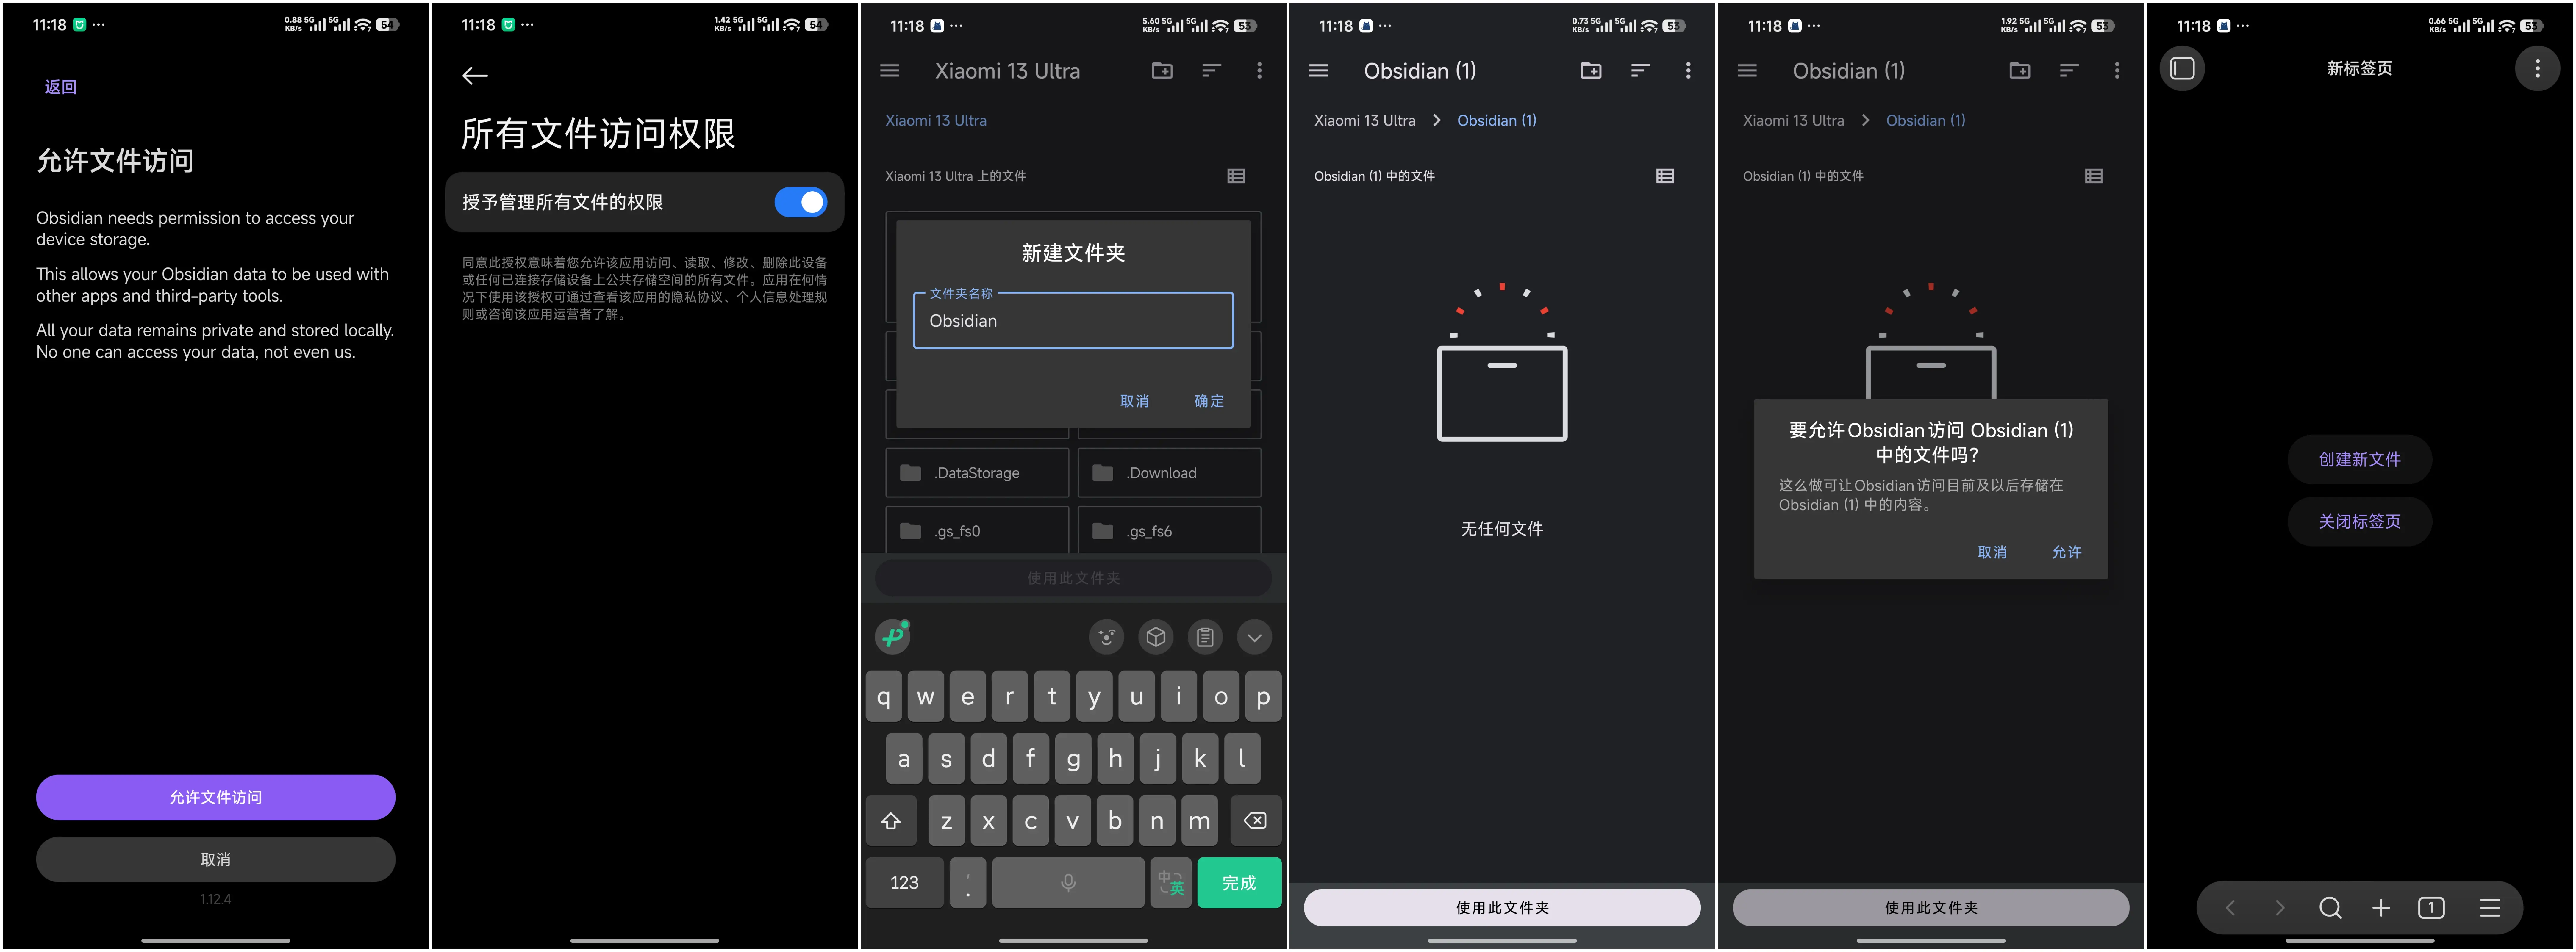
On Android, Obsidian requires you to manually authorize a folder. Here I created an Obsidian folder and clicked "Use this folder".
The system may ask again whether Obsidian can access this folder. Tap "Allow". Once authorization is complete, Obsidian opens an empty vault.
Next, install the Remotely Save plugin.
Tap the settings button in the lower-right corner, enter "Settings", and find "Third-Party Plug-ins".
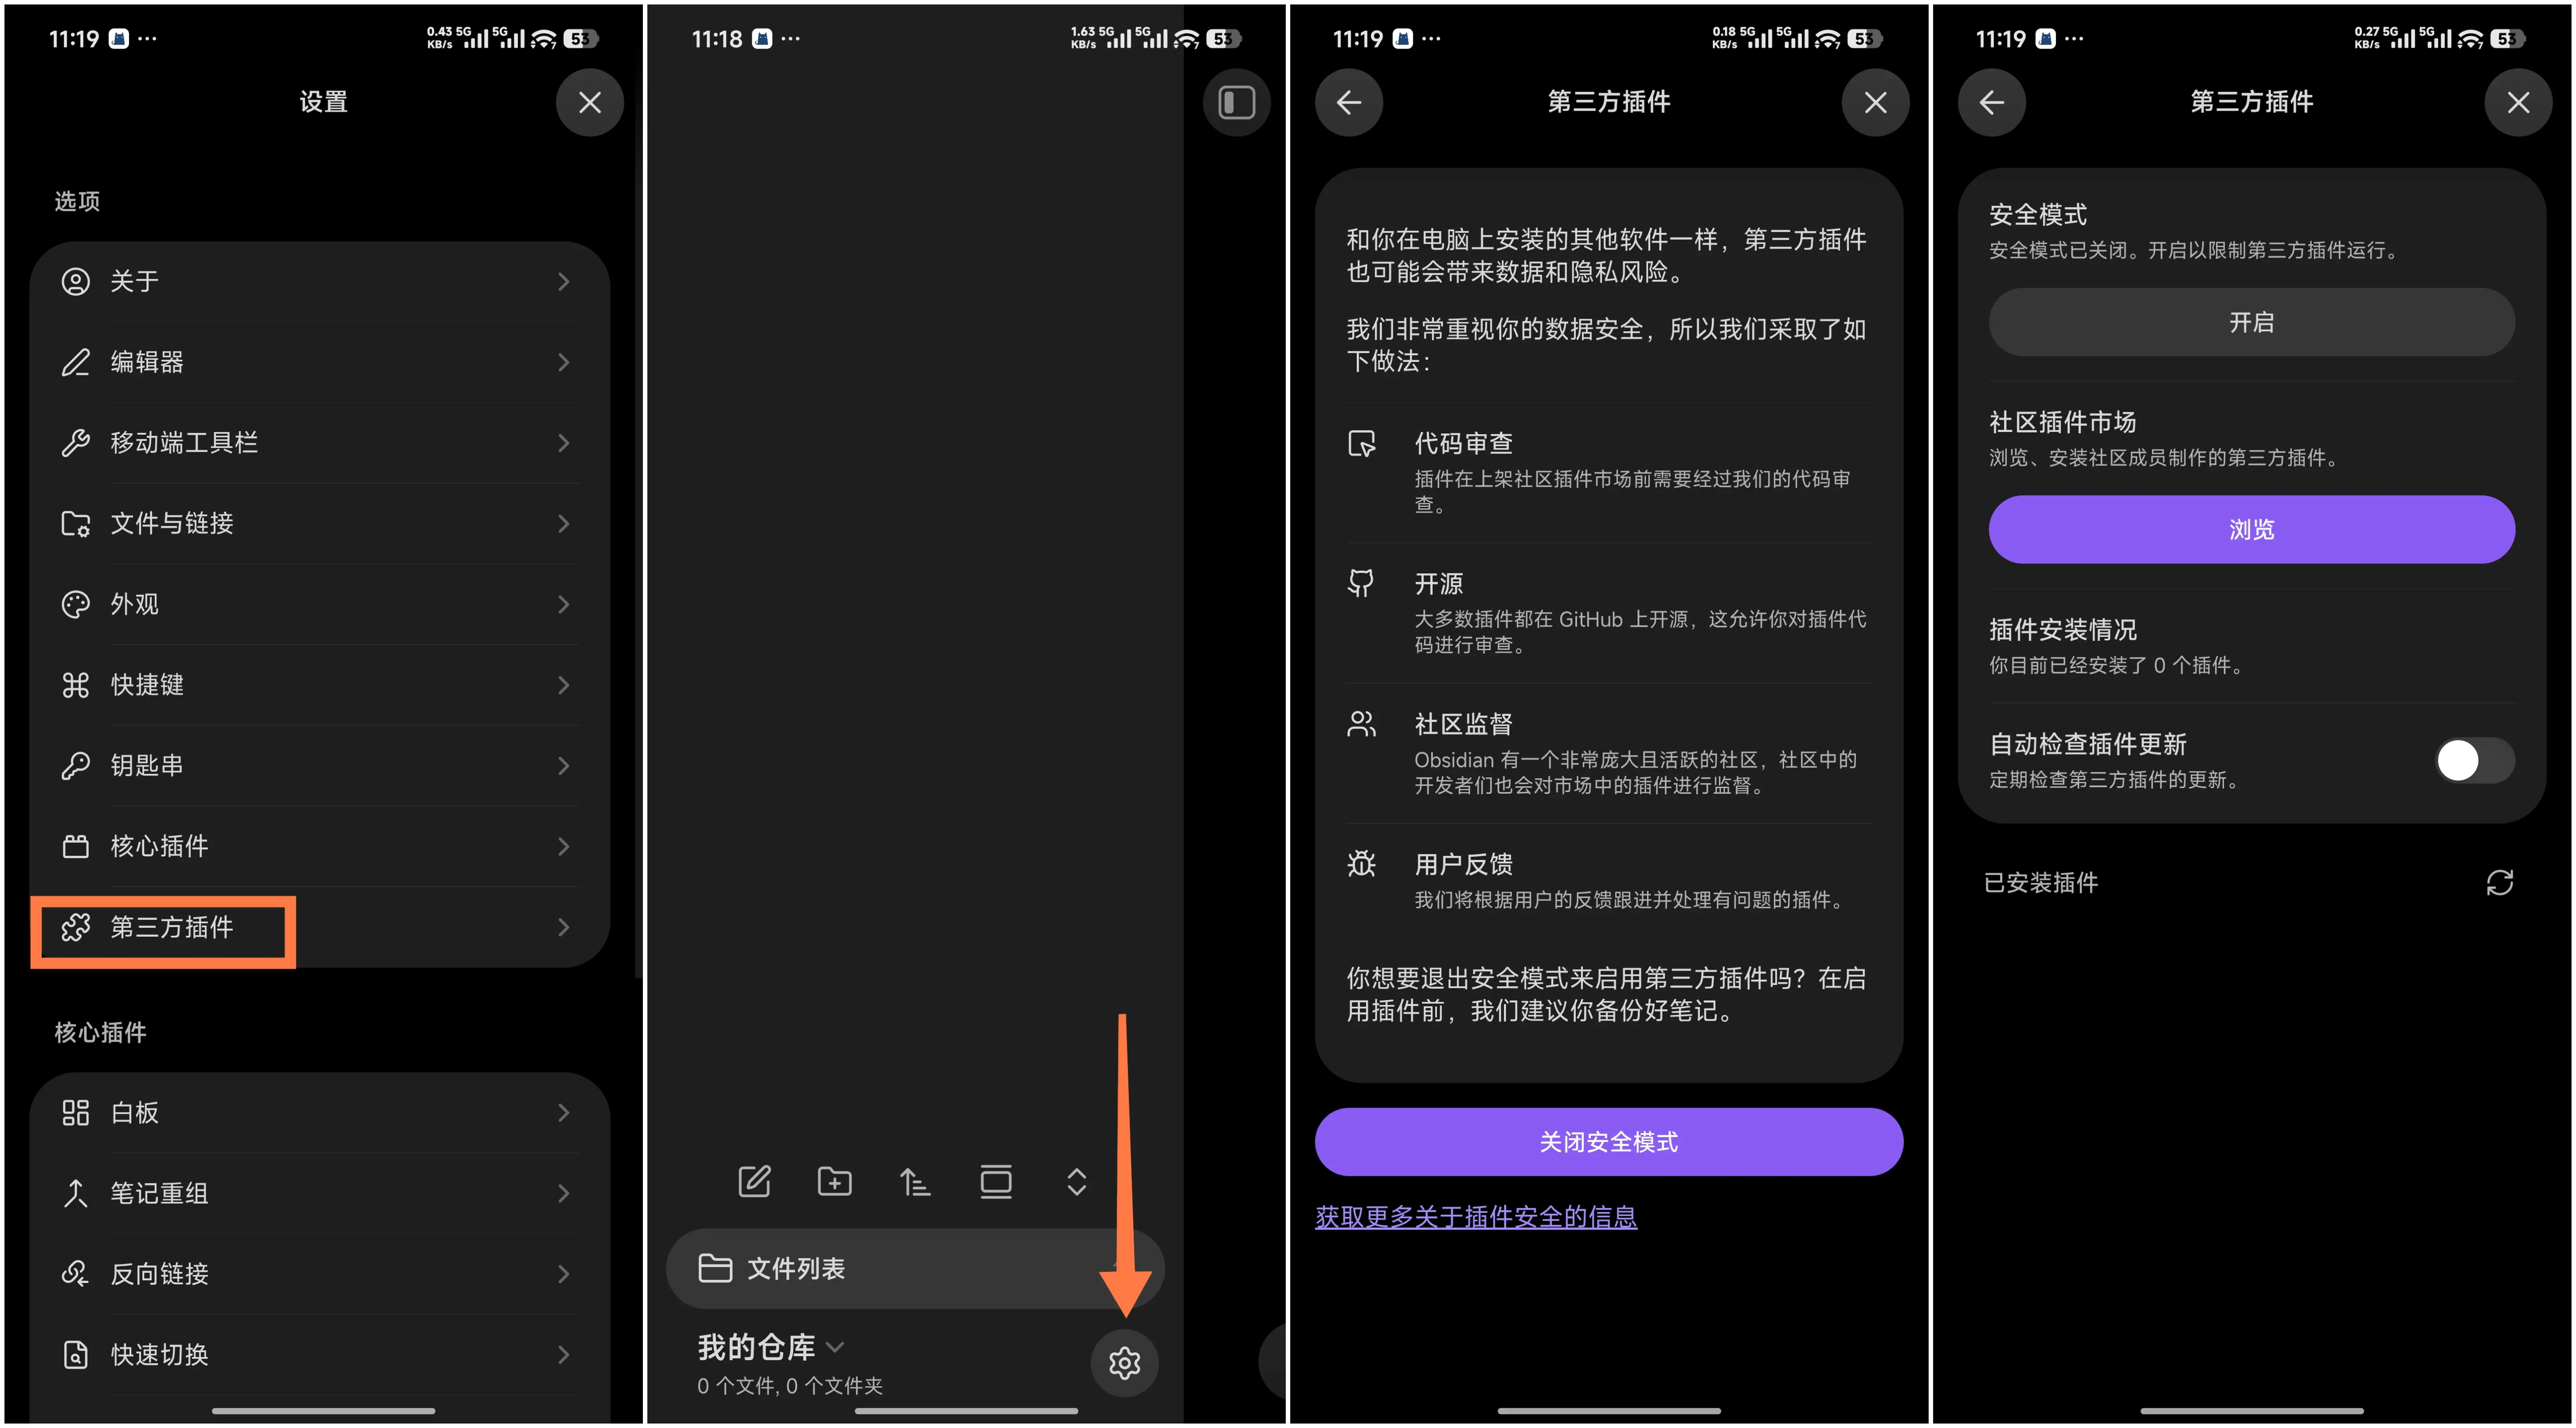
Safe mode is enabled by default on mobile. Turn it off first, then enter the community plugin market.
Search in the community plugin market:
remotely saveOnce you find the Remotely Save plugin, tap Install.
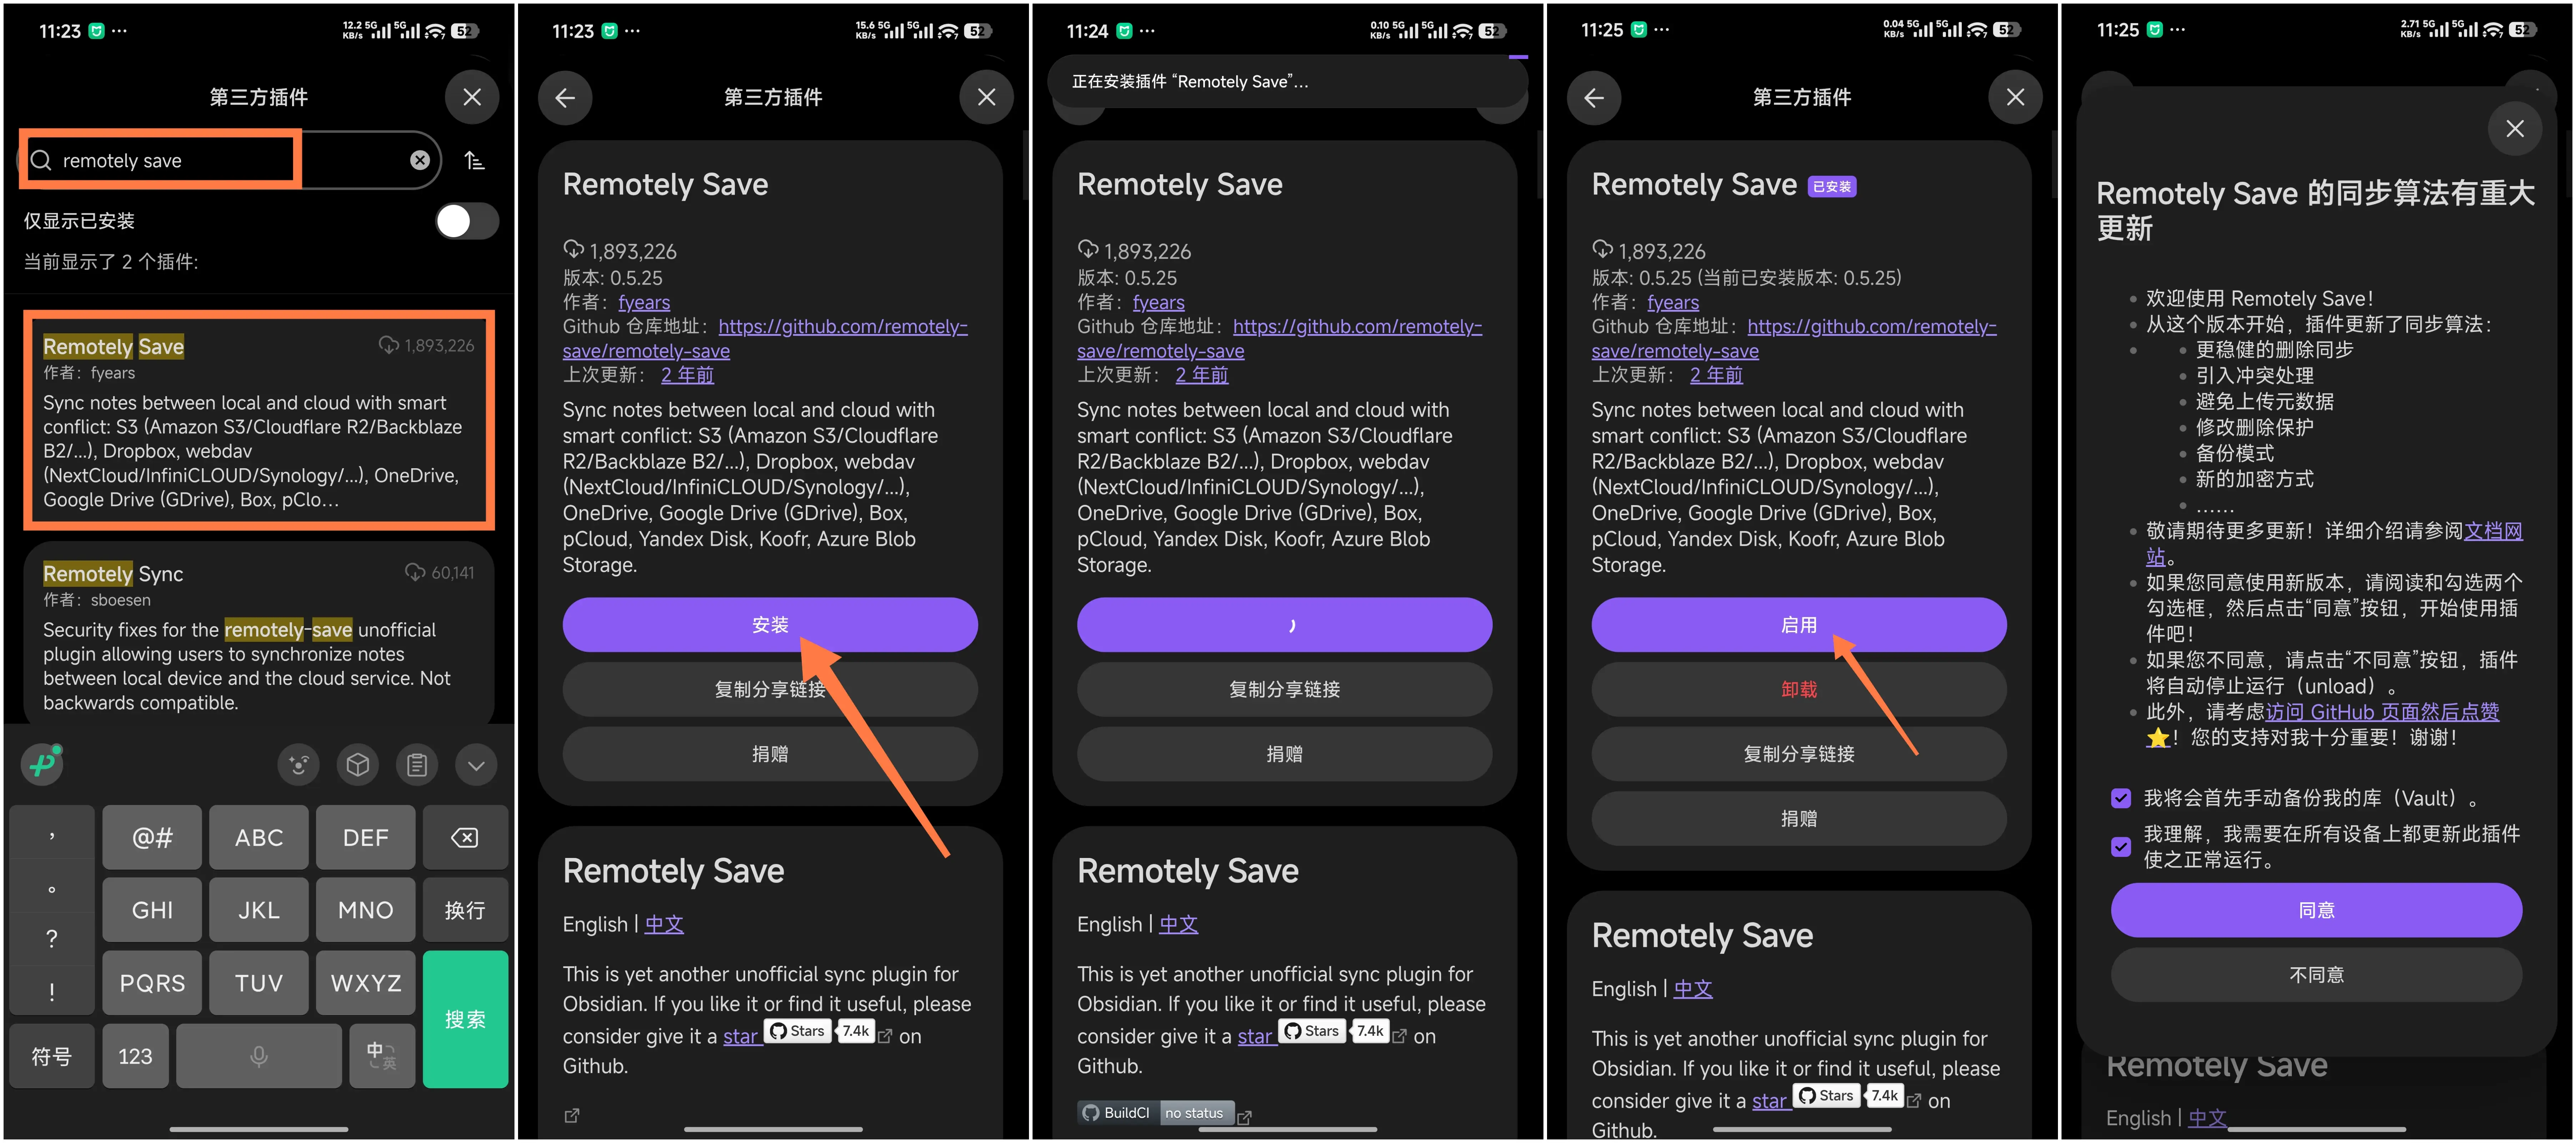
After installation, tap "Enable". If a sync algorithm update prompt appears, check the box to confirm and continue.
After enabling the plugin, enter Remotely Save "Options" and fill in the Tencent Cloud COS information.
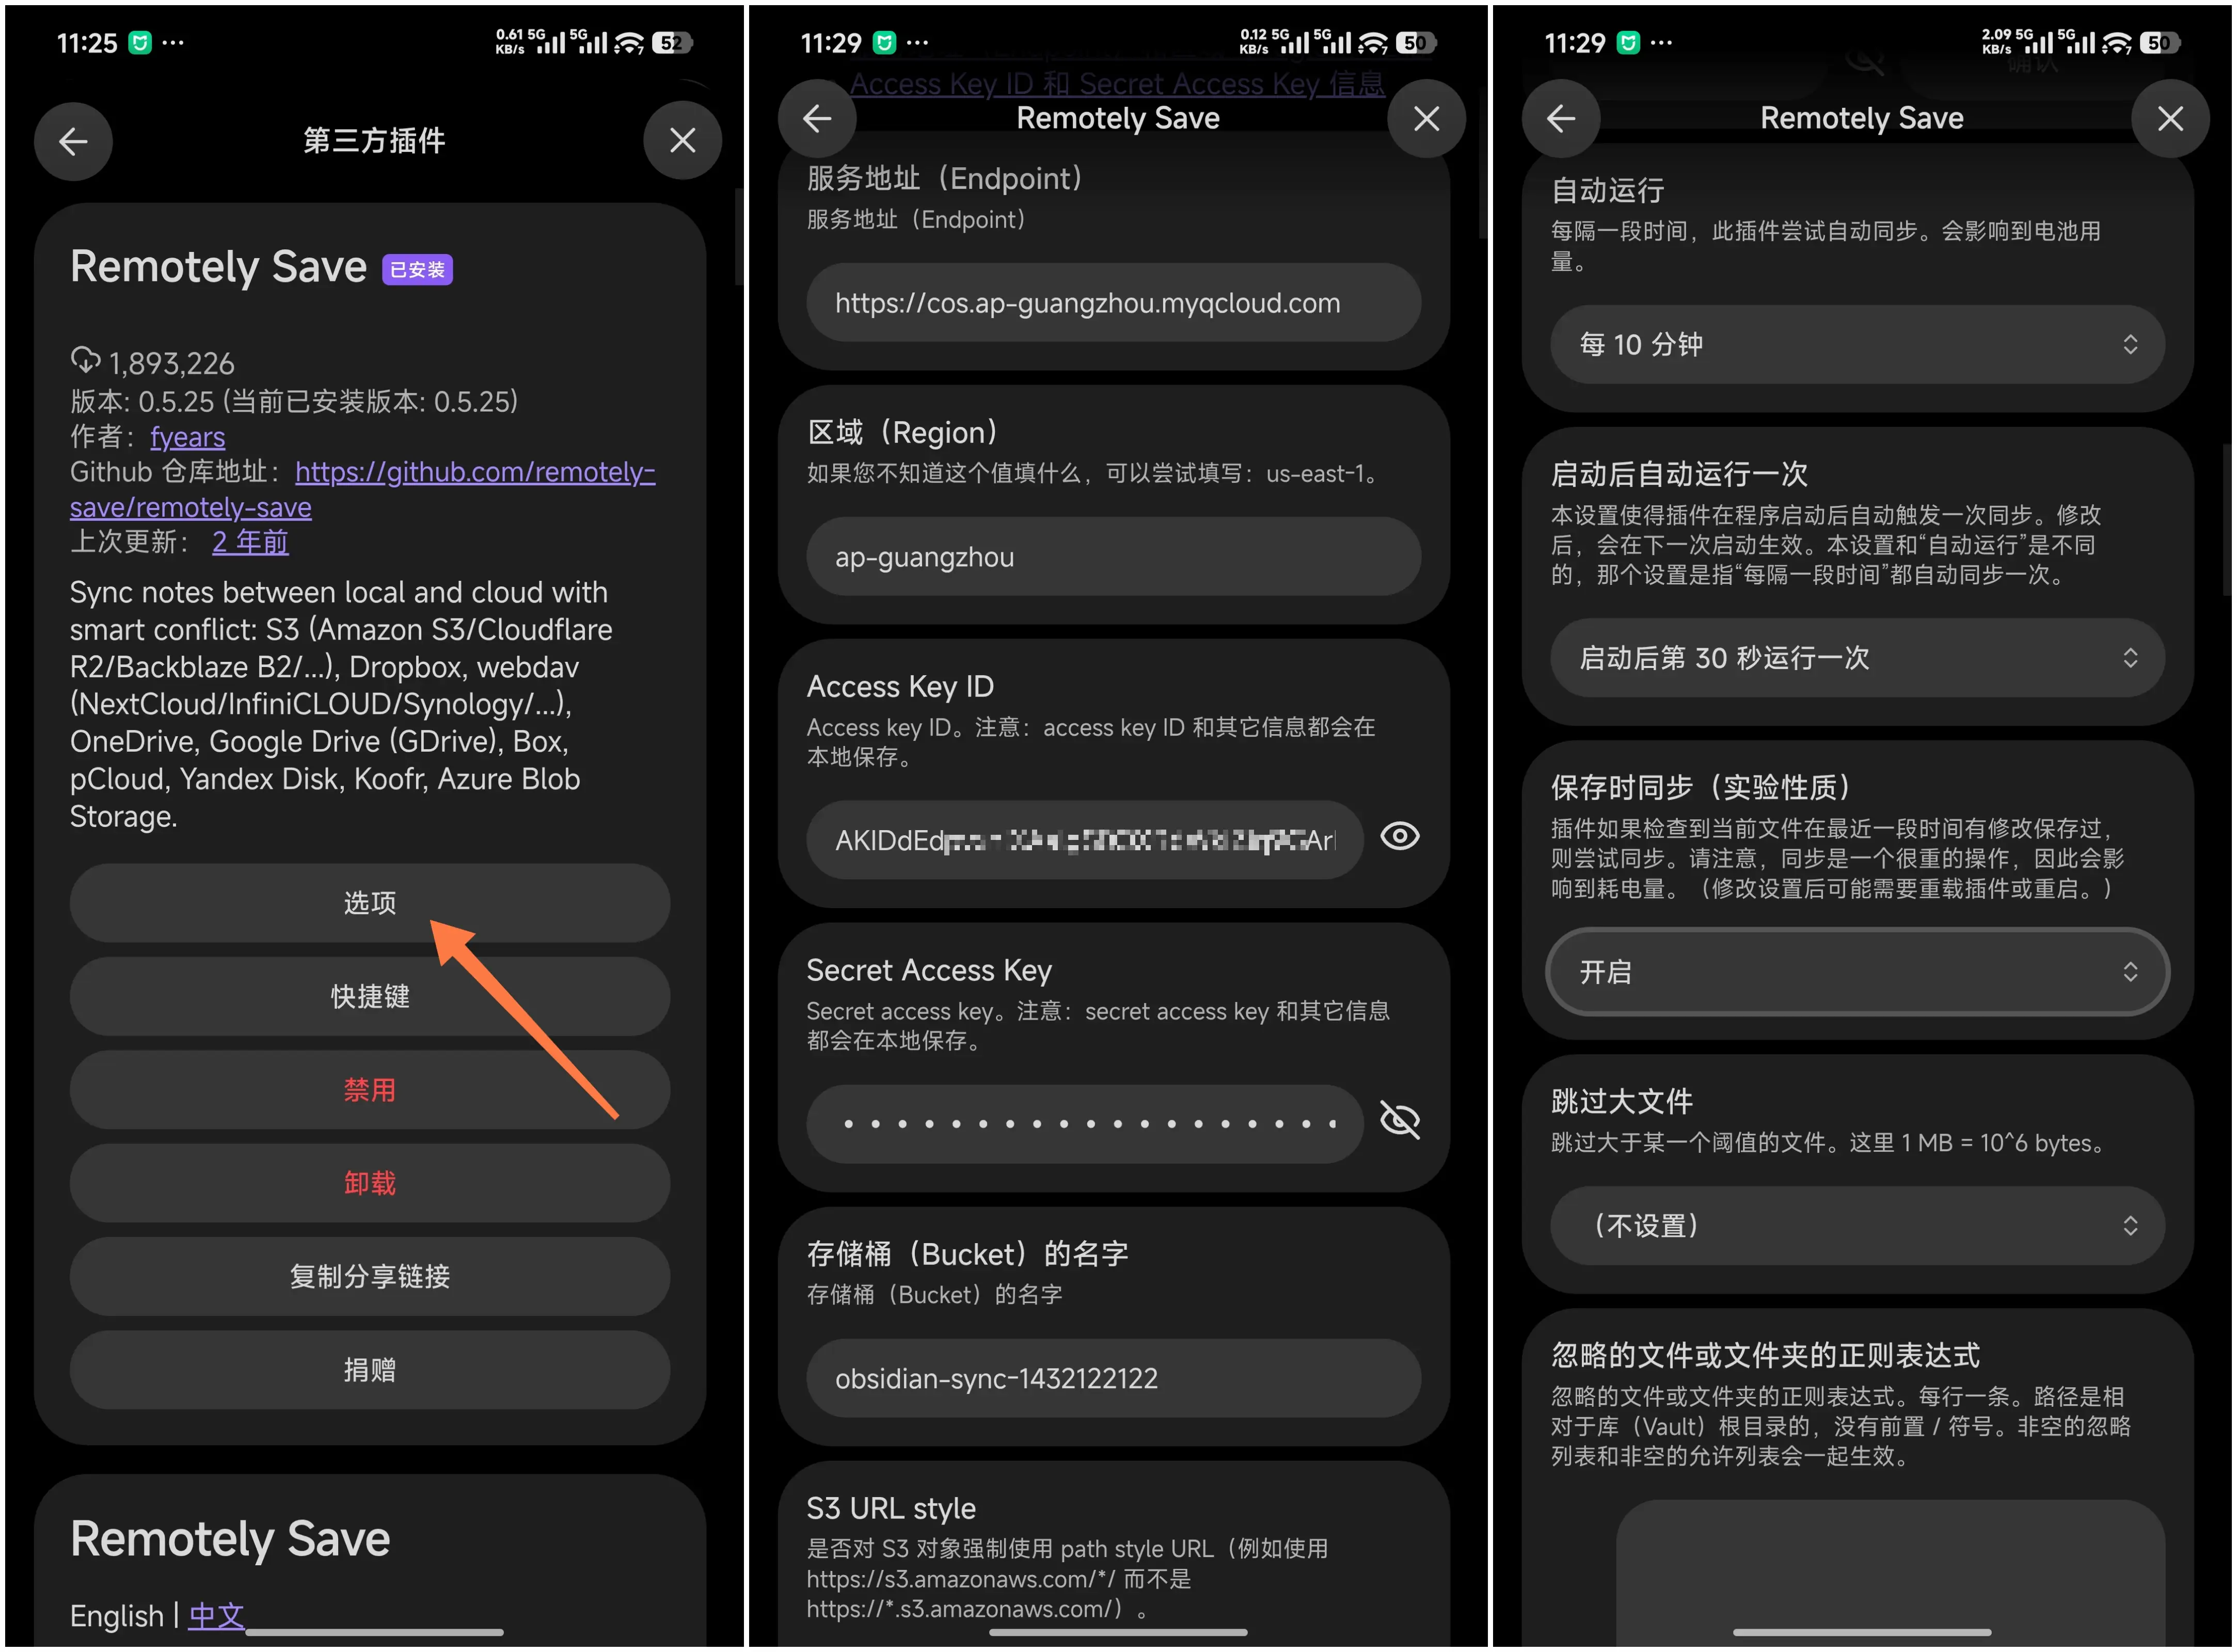
The mobile fields are the same as desktop. Fill in your own Tencent Cloud information here too. Do not copy the bucket name or keys from the tutorial screenshot.
Service address (Endpoint): https://cos.ap-guangzhou.myqcloud.com
Region: ap-guangzhou
Access Key ID: Your own Tencent Cloud SecretId
Secret Access Key: Your own Tencent Cloud SecretKey
Bucket name: your own full bucket name
The basic settings can also match desktop, for example:
Automatically run: every 10 minutes
Automatically run once after startup: Run once every 30 seconds after startup
Sync on save: On
Skip large files: not set
Phones are more sensitive to battery and network conditions, so the automatic sync interval does not need to be too short. During testing, you can sync manually first and enable automatic sync only after everything works.
After configuration is complete, return to the Obsidian main screen. On mobile, you can trigger sync from the command palette. Press and hold the screen, then swipe down to open it.
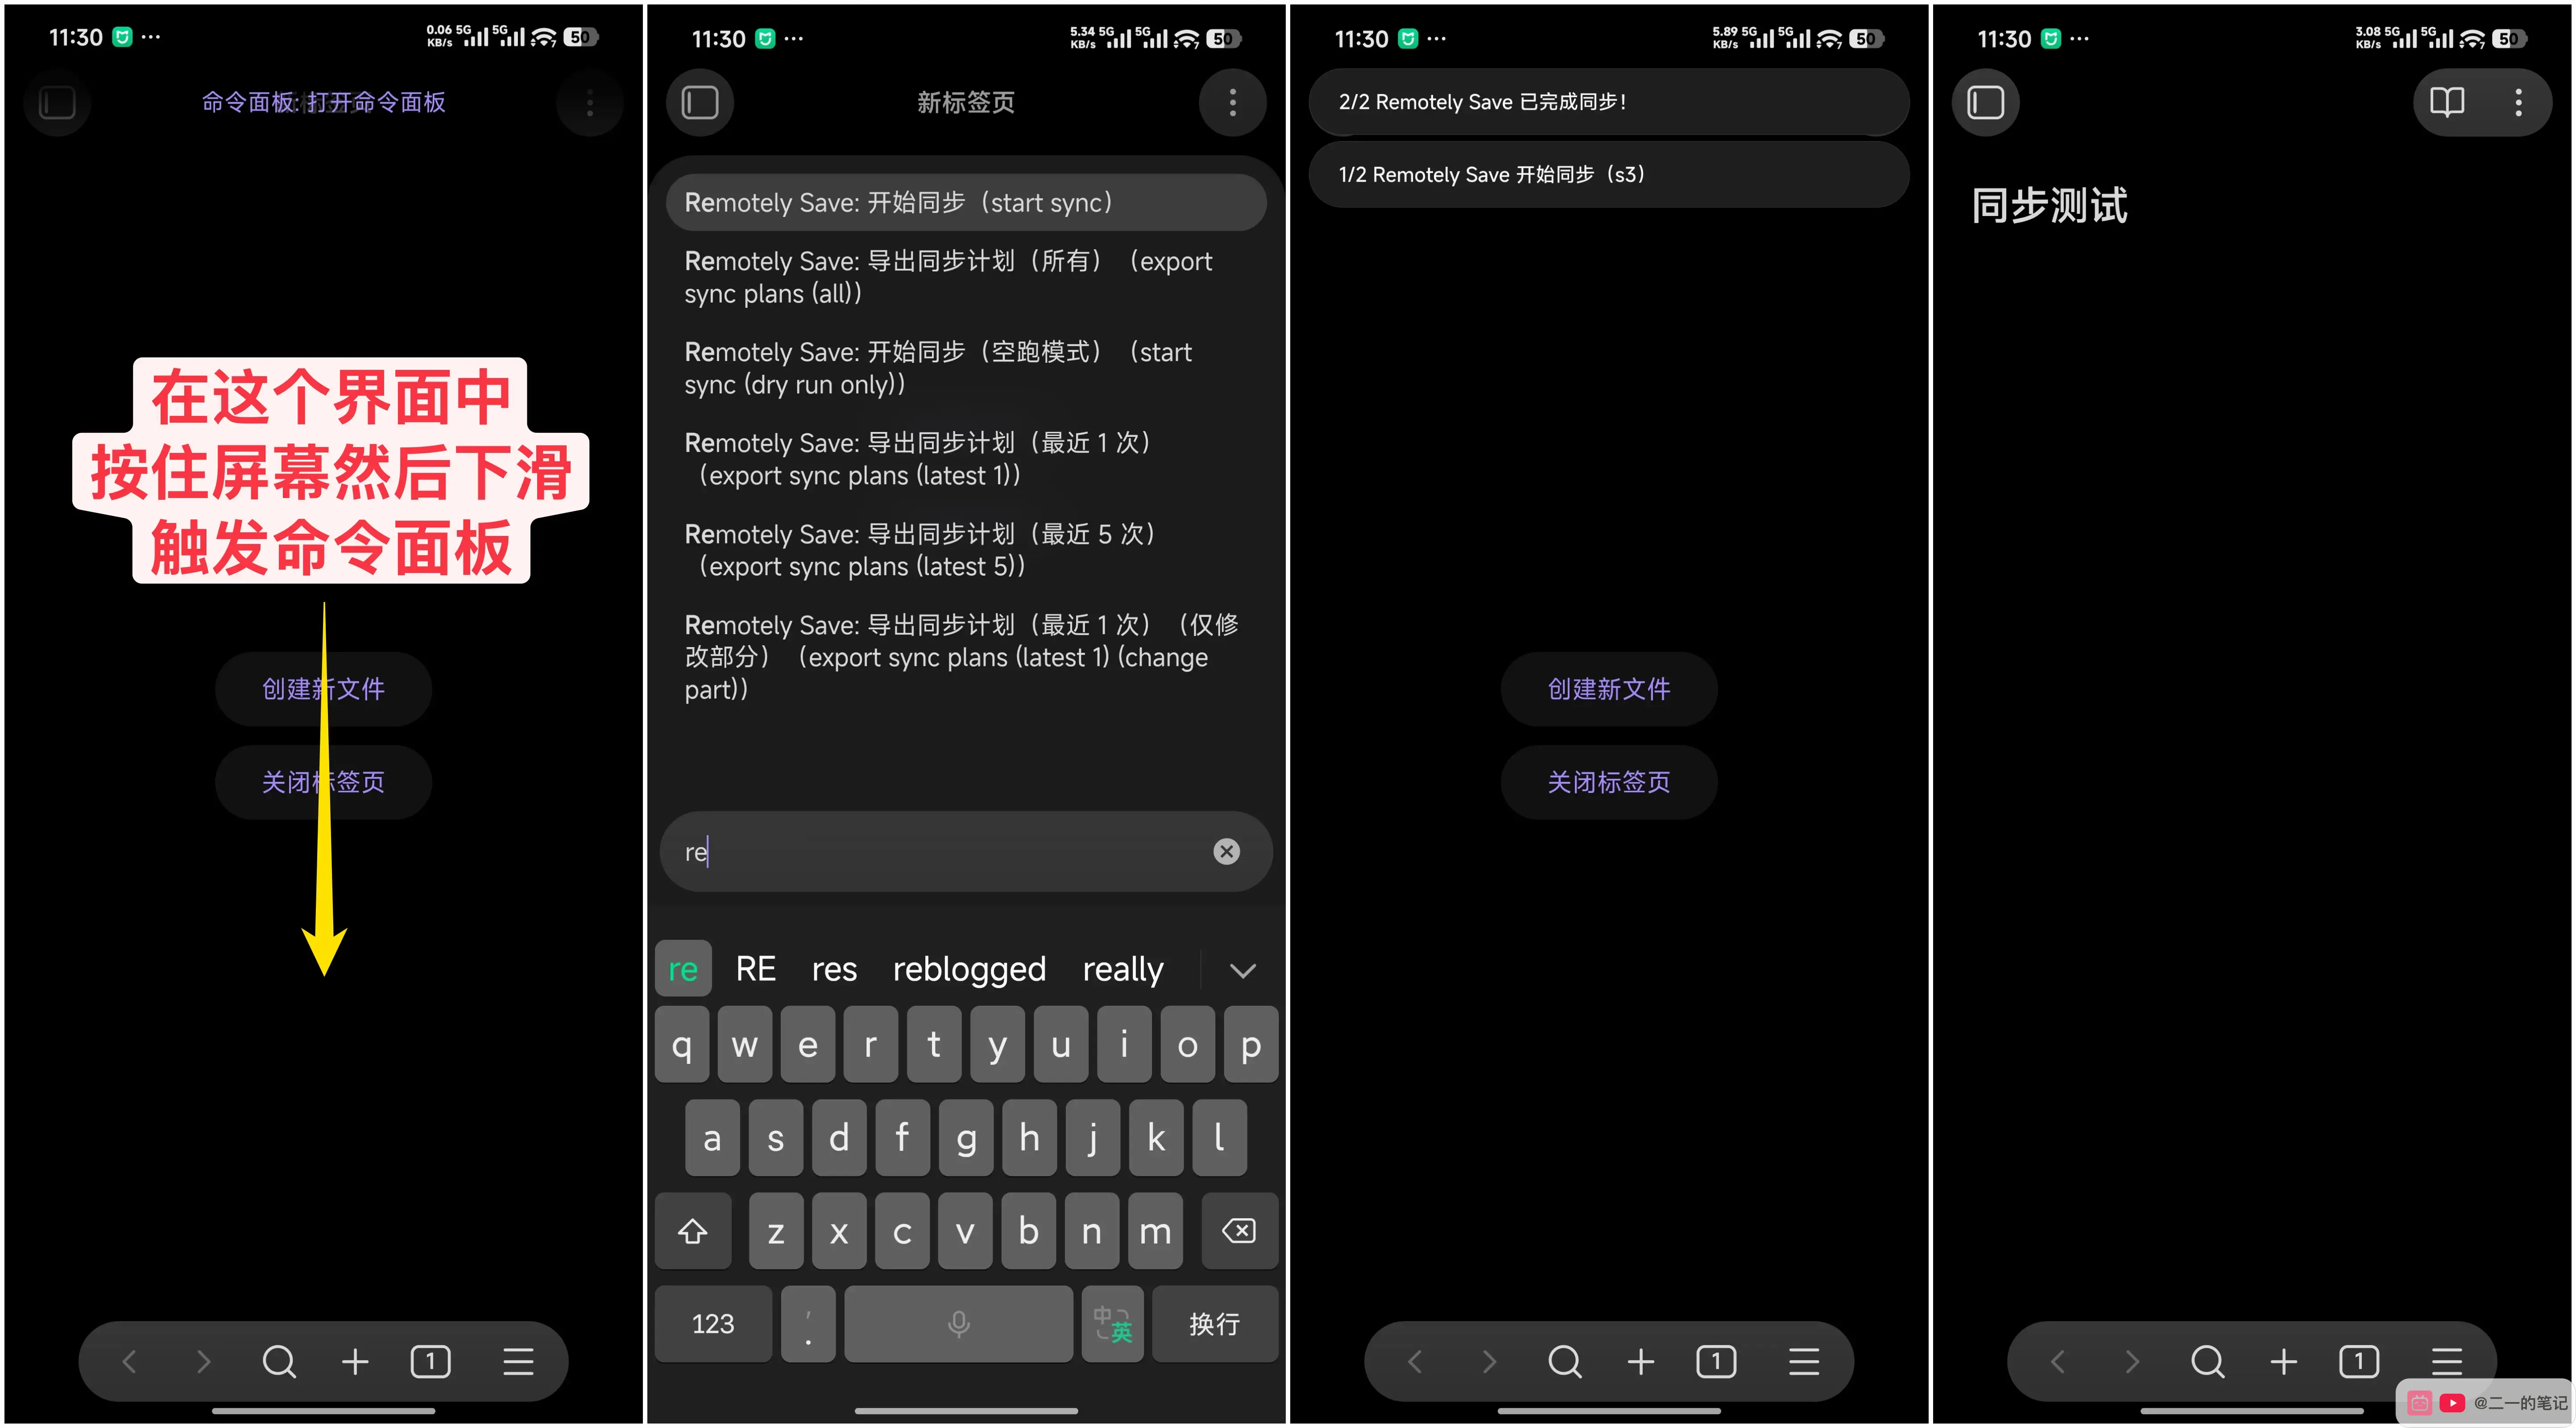
Search the command palette for:
Remotely SaveChoose:
Remotely Save: Start synchronizationAfter tapping it, a sync prompt appears in the upper-right corner. When you see "Synchronization Completed", return to the file list. The test note uploaded from the computer to Tencent Cloud should now appear on the phone.
In this example, it shows:
Synchronous testingThat confirms the phone has pulled the note uploaded from the computer through Tencent Cloud COS.
The complete sync path is now working:
Computer Obsidian uploaded to Tencent Cloud COS
Mobile phone Obsidian is pulled back from Tencent Cloud COS
That finishes the Tencent Cloud COS setup.
Tencent Cloud COS free quota and fee description
The Tencent Cloud COS free quota is not permanent. According to Tencent Cloud's official docs, individual users usually receive a 50GB standard storage package after activating COS for the first time. It is valid for 6 months, or 180 days. Enterprise users may receive a larger quota, but it also has an expiration date.
This free quota mainly covers "standard storage capacity". Request counts, internet egress traffic, and other fees may not be included. A normal Obsidian vault usually does not sync much data, but it is still worth understanding the billing logic.
After the free quota expires, there are two options:
- Continue to use Tencent Cloud COS
You can buy a COS resource package or let it switch to pay-as-you-go. Resource packages are better for long-term use, while pay-as-you-go charges based on actual usage. For ordinary Obsidian note sync, storage usage is usually small if you do not have many attachments.
- No longer using Tencent Cloud COS
If you are only testing and do not plan to keep using it, migrate the data first, then delete the bucket or at least disable the API key created earlier to avoid further charges.
You can check whether the free quota is still valid in the "Resource Package Management" of the Tencent Cloud COS console. When expiration is approaching, decide whether to purchase a resource package, continue to pay as you go, or migrate to another synchronization plan.
Reference: Tencent Cloud official COS free quota description and COS Billing Overview.
Here is a rough cost estimate for a typical Obsidian user. Tencent Cloud COS mainly charges for storage capacity, internet egress traffic, and request counts. In Tencent Cloud's official Guangzhou pricing example, standard storage is about 0.118 yuan/GB/month, internet egress traffic is about 0.5 yuan/GB, and requests cost about 0.01 yuan per 10,000 requests.
For ordinary Obsidian sync, uploading to Tencent Cloud usually does not generate internet ingress traffic fees. The easier place to incur fees is internet egress traffic when downloading from Tencent Cloud to a phone, tablet, or another computer.
Use this rough range:
Mainly text-only notes: usually a few cents to less than 1 yuan per month
There are a small number of pictures and attachments: usually around 1 to 5 yuan per month
A large number of pictures, PDFs, recordings or frequent multi-device synchronization: it may cost more than ten yuan per month or even more
For a more concrete example, if your Obsidian vault is 2GB and your phone and computer download 5GB of data in total during one month, plus some sync requests, the rough cost may be around 3 yuan. The actual bill depends on attachment size, sync frequency, and device count.
Tencent Cloud COS is usually inexpensive for ordinary note sync, but it is not completely free. When you start using it, turn on cost alerts in the Tencent Cloud console or check the bill regularly to confirm your actual usage.
If you only want to test sync, run through the process with a small test vault first. After it is stable, sync your main vault.
This article currently covers Tencent Cloud COS. Later guides will cover Cloudflare R2, WebDAV, OneDrive, and other platforms. Registration steps, keys, and address formats differ by platform, but the overall idea stays the same: prepare the cloud relay, then enter the same sync information on every device.
Once sync is working, your vault stays consistent across devices. If you want that vault to start with a clear structure for projects, tasks, and notes, see the FLO.W Obsidian template install guide and add the template to your already-synced vault.
Author

Categories
More Posts
我如何改造 Obsidian|模板开发日志(三)
Obsidian Git Sync Tutorial: GitHub Backup, Plugin Setup, and Multi-device Pull Workflow
This tutorial shows how to sync an Obsidian vault with GitHub and the Obsidian Git plugin, then pull the same vault on Windows, Android, and iPhone.
Obsidian 剪藏插件的常见问题与解决方法
整理 Obsidian Web Clipper 找不到保管库、保存位置不对、只有标题没有正文,以及 iPhone、iPad 无法剪藏的检查步骤。