Obsidian LiveSync self-hosted sync tutorial: run CouchDB on a NAS with Docker
Obsidian LiveSync self-hosting guide: deploy CouchDB with Docker on a Feiniu NAS; also works on Synology, QNAP, UGREEN and other Docker-capable NAS devices.
Introduction
There are many ways to sync Obsidian.
The simplest option is Obsidian Sync. It works well across desktop and mobile, but it is a subscription service. If you already own a NAS, paying again every year for sync may feel unnecessary.
Some people use iCloud, Jianguoyun, OneDrive, or Baidu Netdisk Sync Space (Chinese). These tools are easy to start with, but they can create conflicts when multiple devices edit at the same time. Mobile behavior can also be unstable. Obsidian vaults contain many Markdown files, config files, plugin files, and attachments, so ordinary cloud-drive sync often runs into delay, duplicates, and inconsistent settings.
Remotely Save with WebDAV, S3, or a cloud drive usually starts with one remote storage location and the same connection details on every device. That path is clear enough, but the sync experience depends heavily on the backend service. We recommend Nutstore (Jianguoyun) WebDAV for paid users or users starting with a new vault containing few files. Free accounts allow 600 requests per 30 minutes and paid accounts 1500; bulk initial sync of an existing vault can trigger 503 errors and failed syncs on either plan. Other cloud-drive backends can have different platform support across desktop and mobile systems. The more devices and operating systems you use, the more these details matter.
Self-hosted LiveSync takes a different path. It uses CouchDB to sync changes between devices, instead of treating the whole vault as a folder that a cloud drive has to mirror. You can run CouchDB on your own NAS, then connect your Mac, Windows PC, and phone to that server. It supports end-to-end encryption and is fast enough for daily writing.
Many people also sync Obsidian with Git because it keeps history, makes rollback easy, and works well as version management or backup. When Git becomes the daily sync workflow, commit, push, and pull become part of writing. That is fine on a computer, but setup, performance, and conflict handling become more noticeable on phones and tablets. LiveSync is more focused on continuous multi-device sync, with several devices exchanging changes through the same sync service.
This guide uses the Docker app on Feiniu NAS as the example. The same idea also applies to Synology, QNAP, UGREEN, TerraMaster, and other NAS devices as long as they support Docker.
This setup is not the easiest Obsidian sync option. You need to understand Docker, ports, CouchDB, local network addresses, and plugin settings. A wrong choice can make the connection fail, or even overwrite newer data with older data from another device. Back up your Obsidian vault before using it with a real vault.
This article first focuses on local-network sync, where your computer and NAS are on the same network. Public access, mobile HTTPS access, and remote access through services such as FN Connect should be handled separately after the local setup works.
Local-network sync
Start with the most stable case: local-network sync.
Local-network sync means your computer, phone, and NAS are in the same home or office network. Obsidian no longer sends notes to a third-party cloud drive. Instead, it syncs data to CouchDB running on your NAS, and each device reads from and writes to that CouchDB server.
The benefit is speed and control. The NAS stays in your own network, and LiveSync can enable end-to-end encryption, so even the raw CouchDB data cannot be read as normal notes.
Syncthing is closer to peer-to-peer file sync between devices, and it fits people who are willing to maintain device connections and folder pairing. LiveSync puts CouchDB in the middle instead, so Mac, Windows, and phones all connect to the same sync center. The setup is harder, but adding new devices, checking sync status, and deciding sync direction become clearer later.
The limitation is also clear. If you only use local-network sync, devices must be able to reach the same network. When you are outside with mobile data, or your computer is away from home, it cannot reach the NAS. We will keep this section focused on local sync first.
Deploy CouchDB on Feiniu
Open the Docker app that comes with fnOS, then go to the image repository.
Search for couchdb and find the official couchdb image.
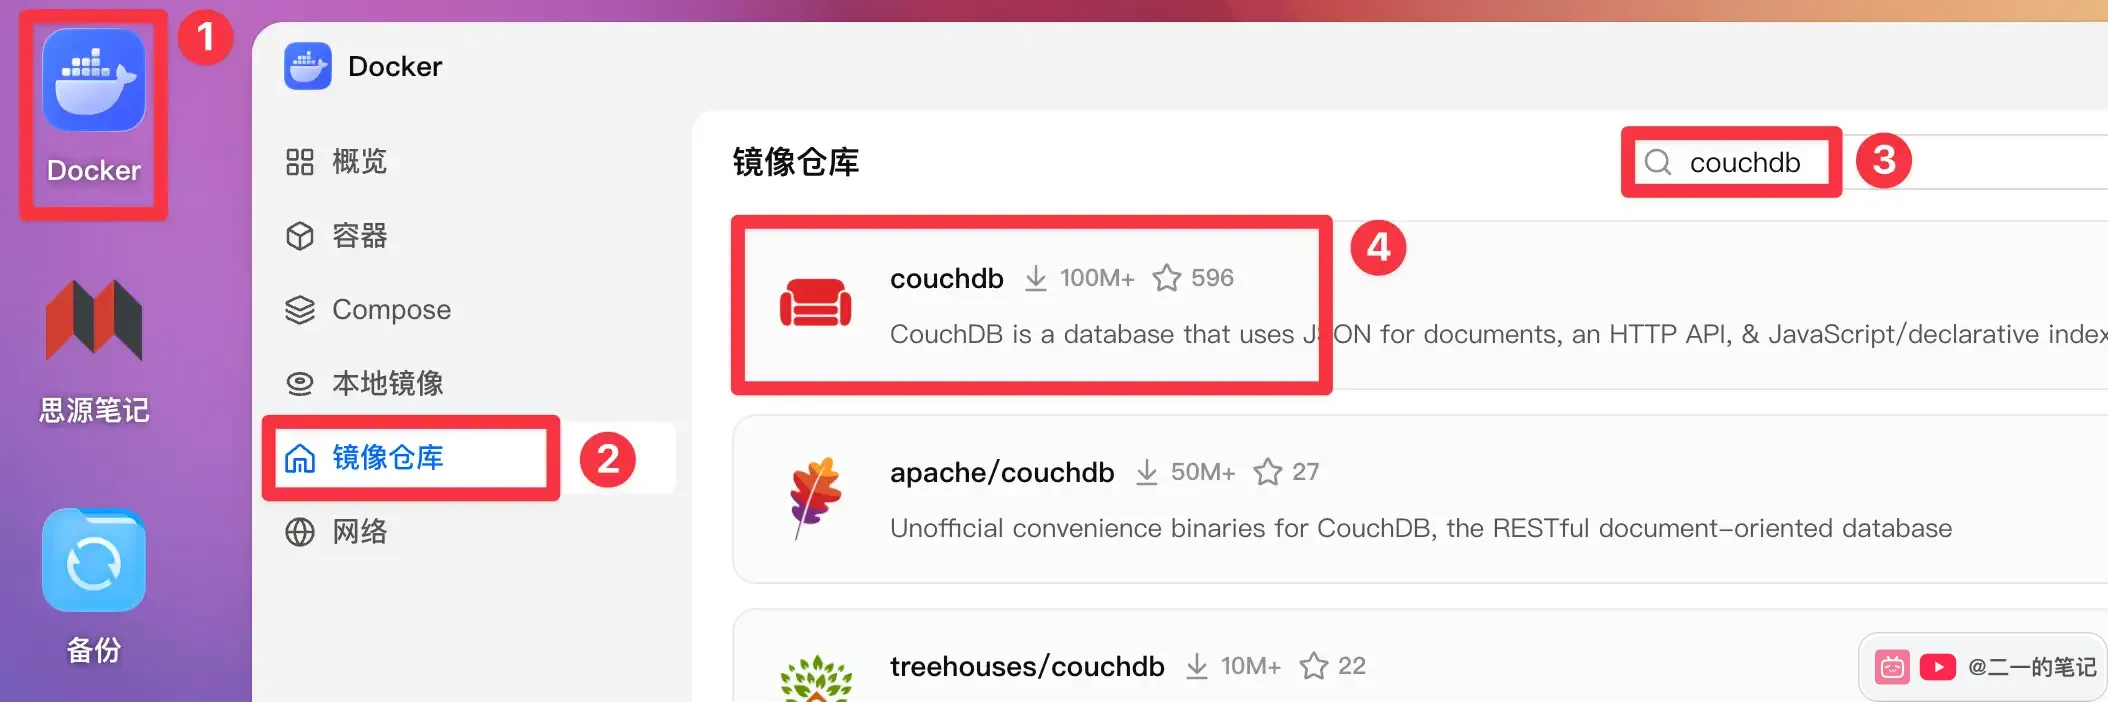
Click the download button. Keep the tag as latest.
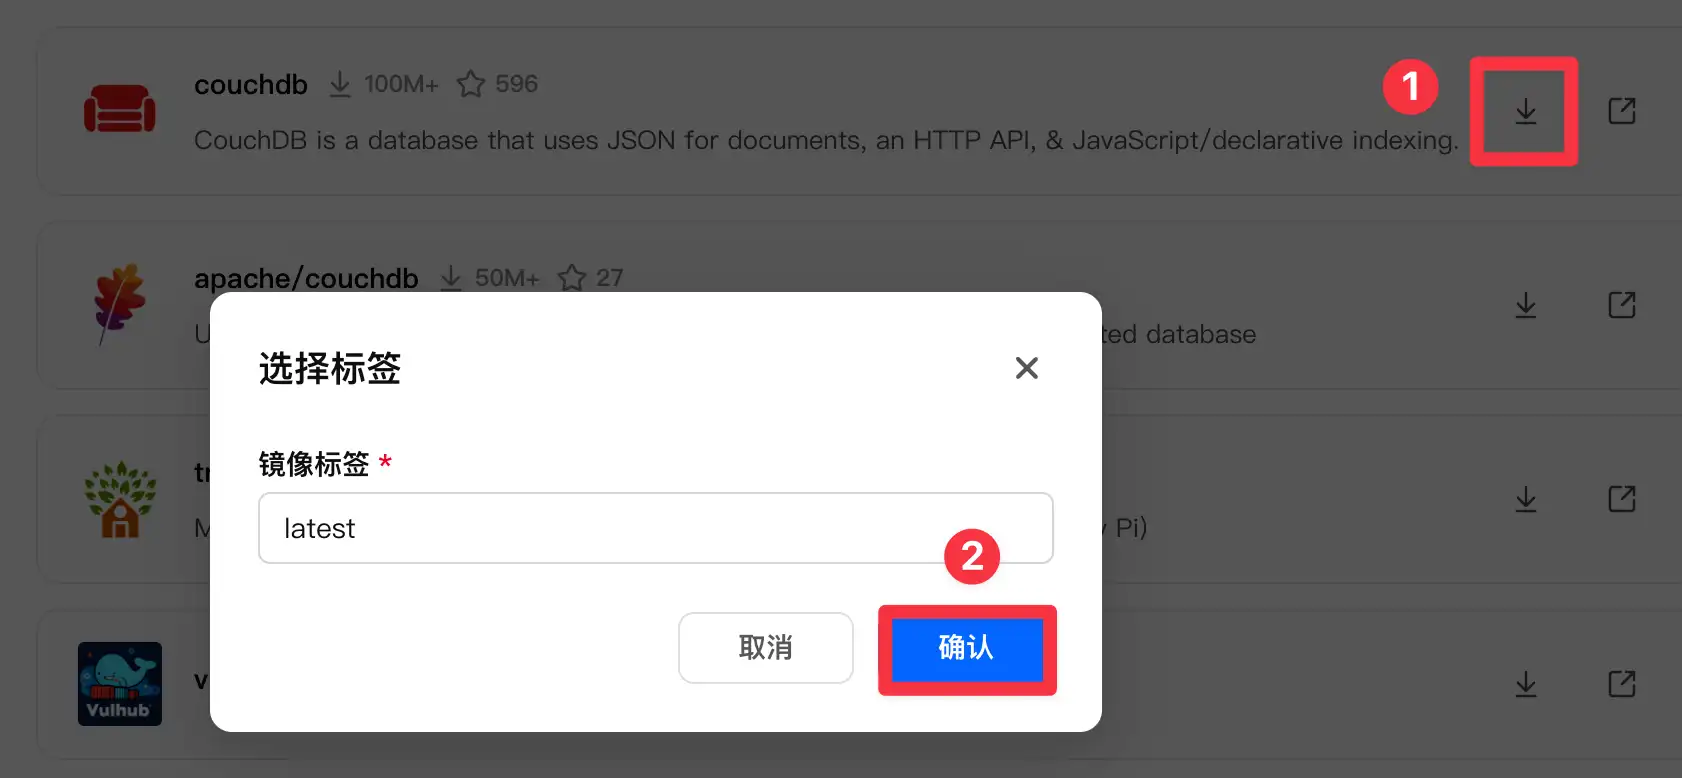
Confirm, and Feiniu will create the image download task.
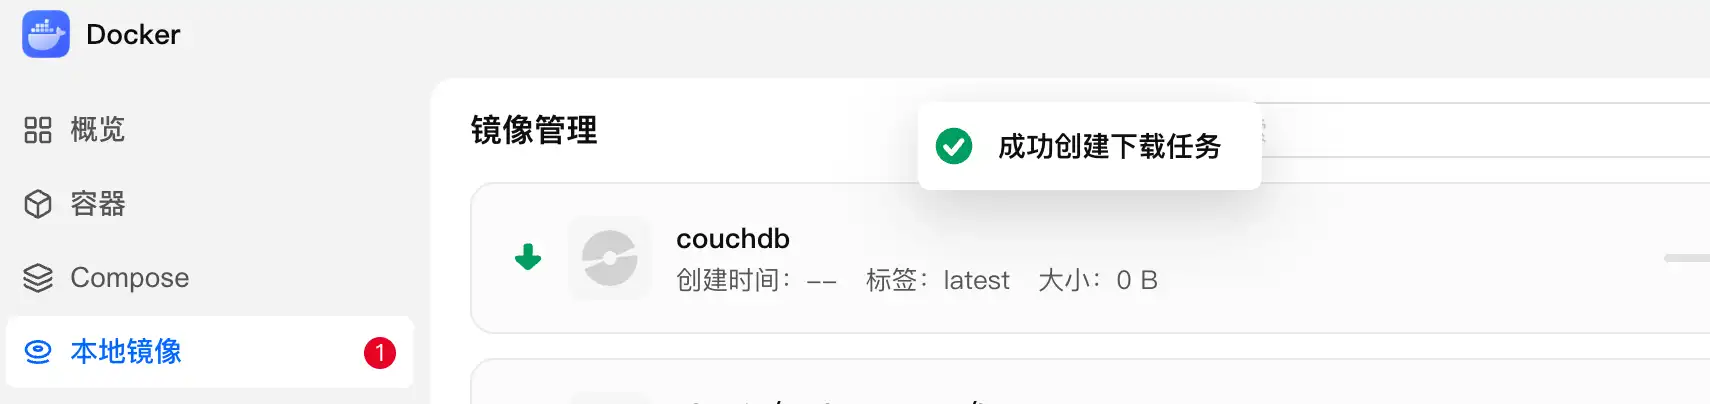
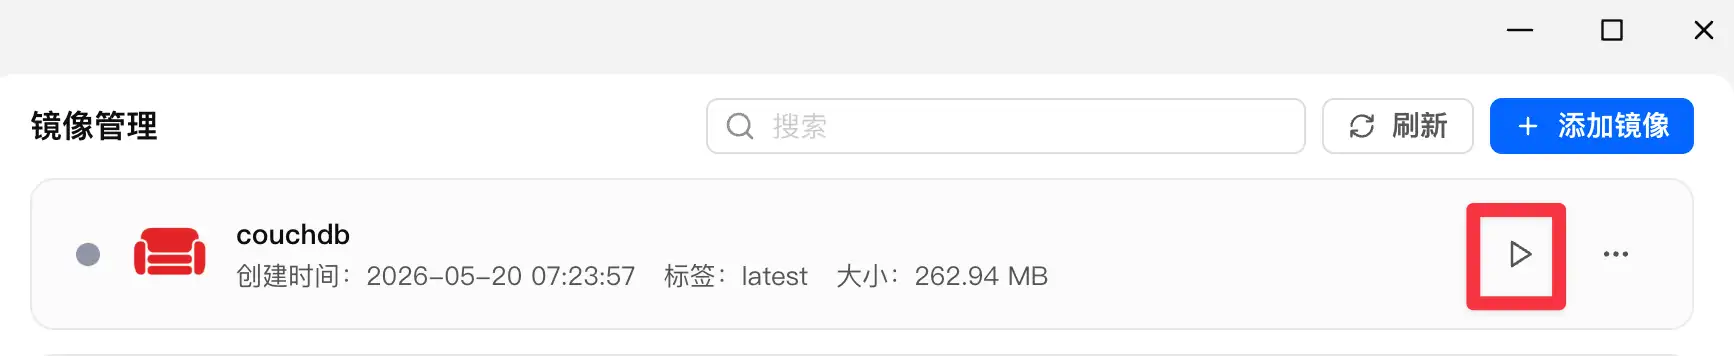
After the download finishes, switch to local images and find couchdb.
Click the start button to create a container.
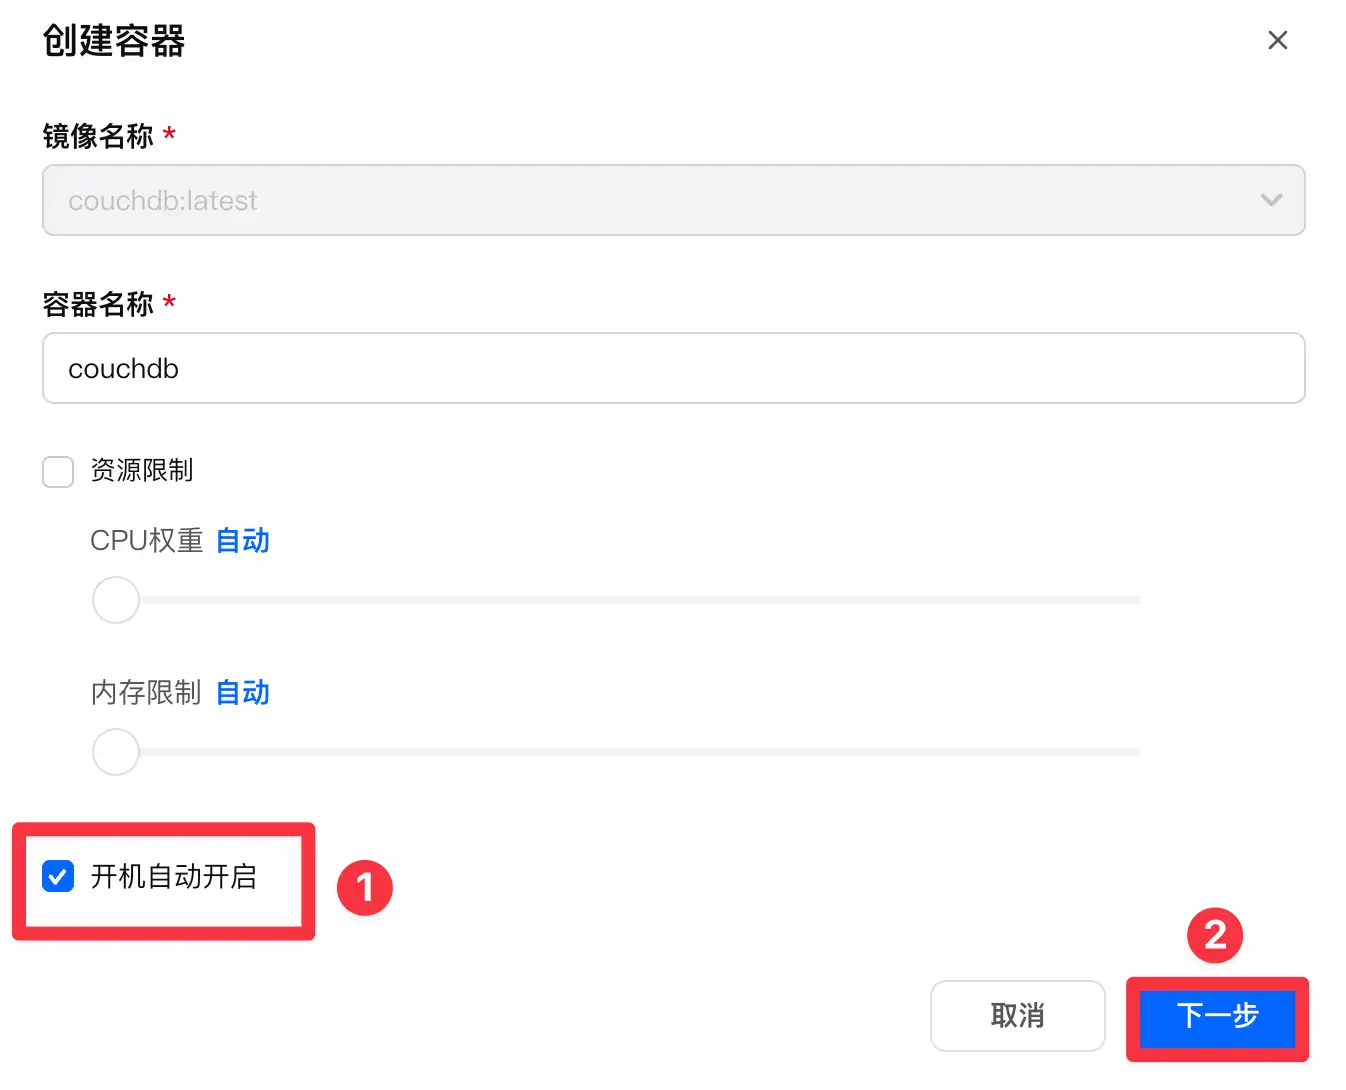
You can name the container couchdb.
Leave CPU and memory limits off unless you have a specific reason to set them. I recommend enabling auto start, so CouchDB starts again after the NAS reboots.
Then click Next.
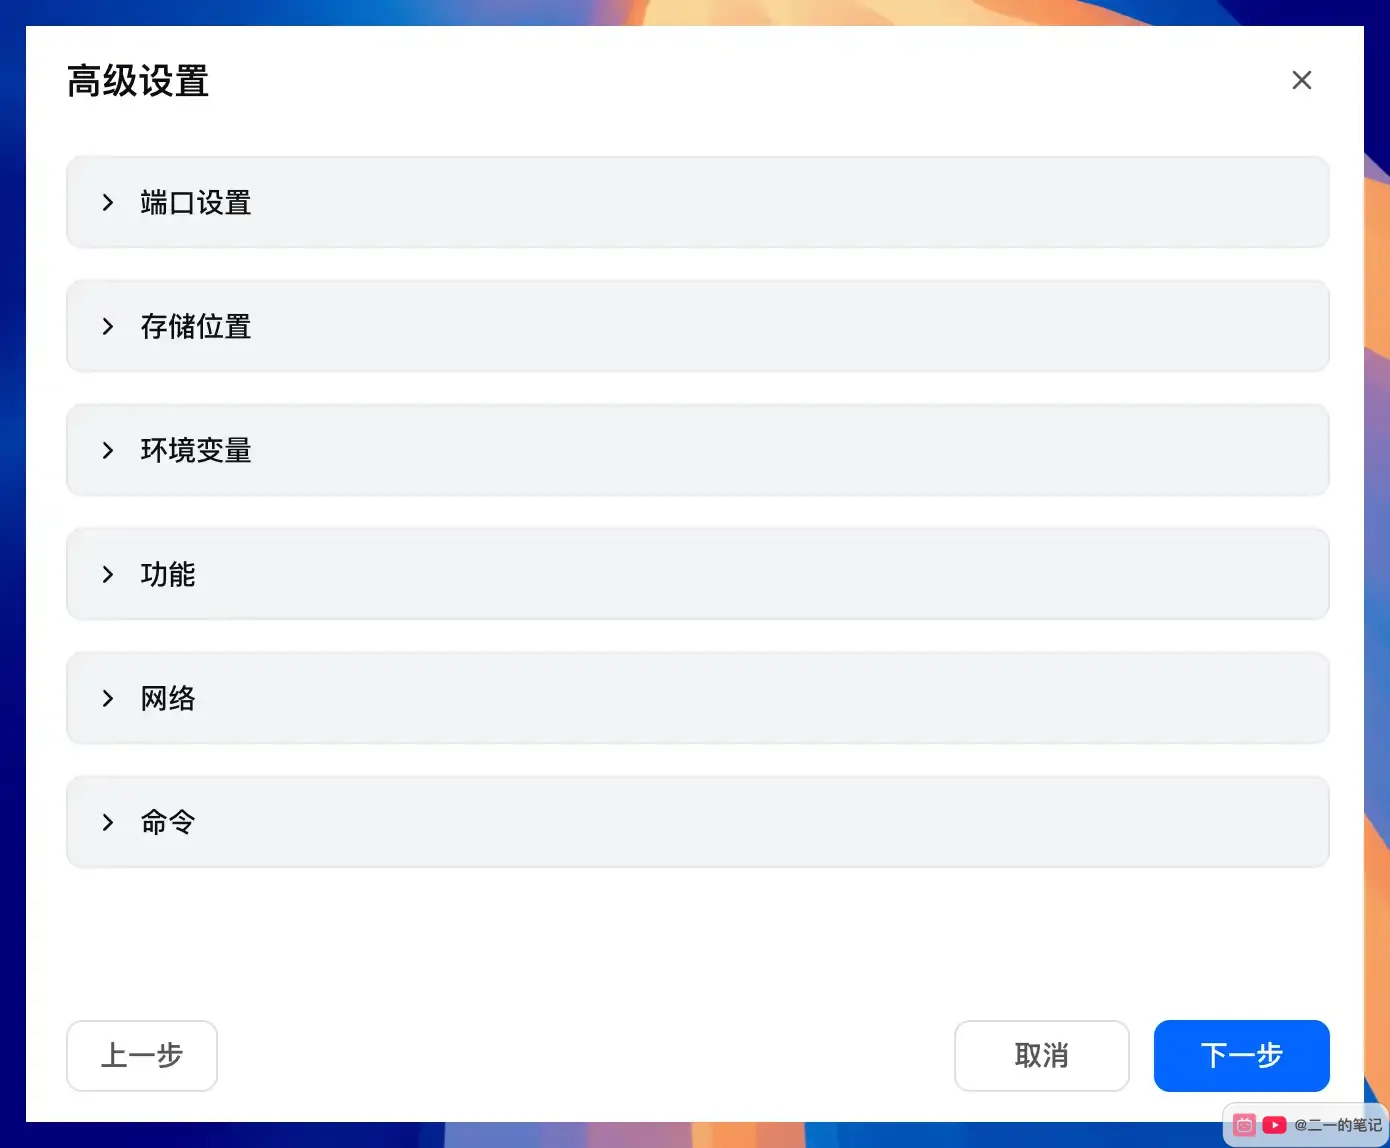
Next you will enter Advanced Settings.
There are many options on this page, but the important parts are ports, storage paths, and environment variables. Keep the rest as default.
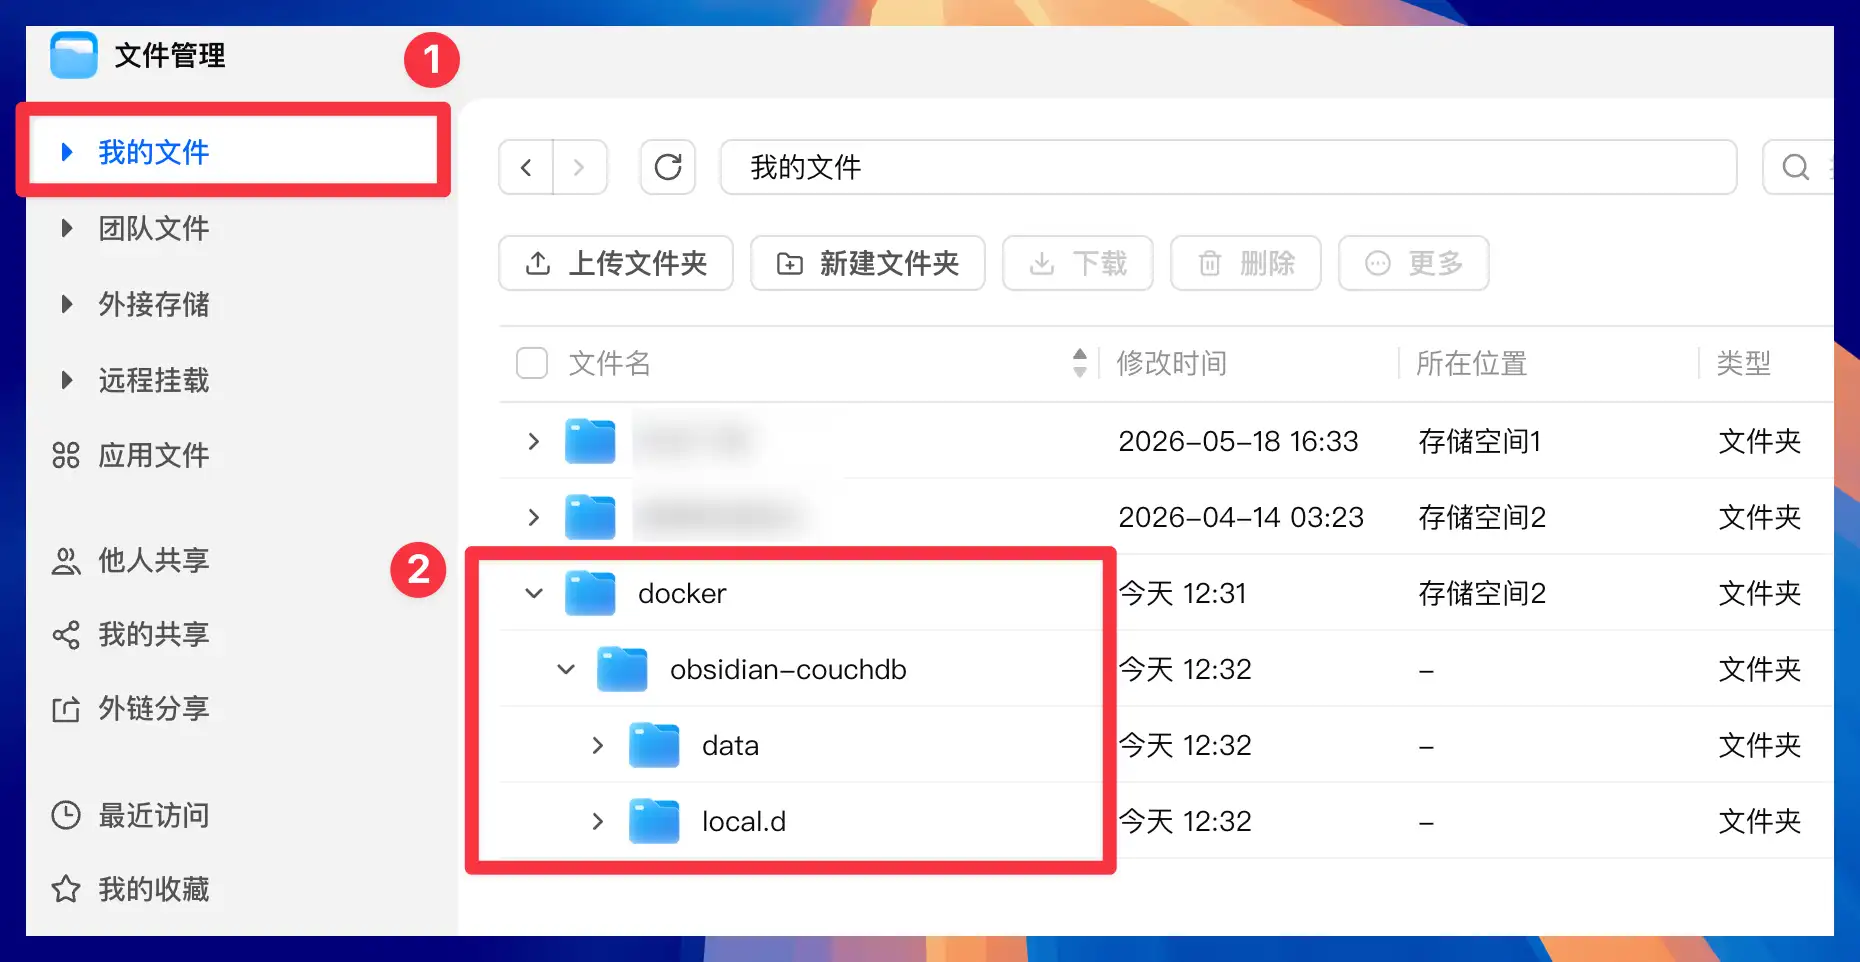
Before configuring storage, open Feiniu File Manager and create the folders CouchDB will use.
I recommend putting them under the docker folder:
docker/obsidian-couchdb/Create two subfolders inside it:
data
local.d
data stores CouchDB data. local.d stores CouchDB config files.
Use only English letters, numbers, and ordinary hyphens in folder names. Avoid Chinese characters, spaces, or copied special dashes. Otherwise, Feiniu may reject the container storage path.
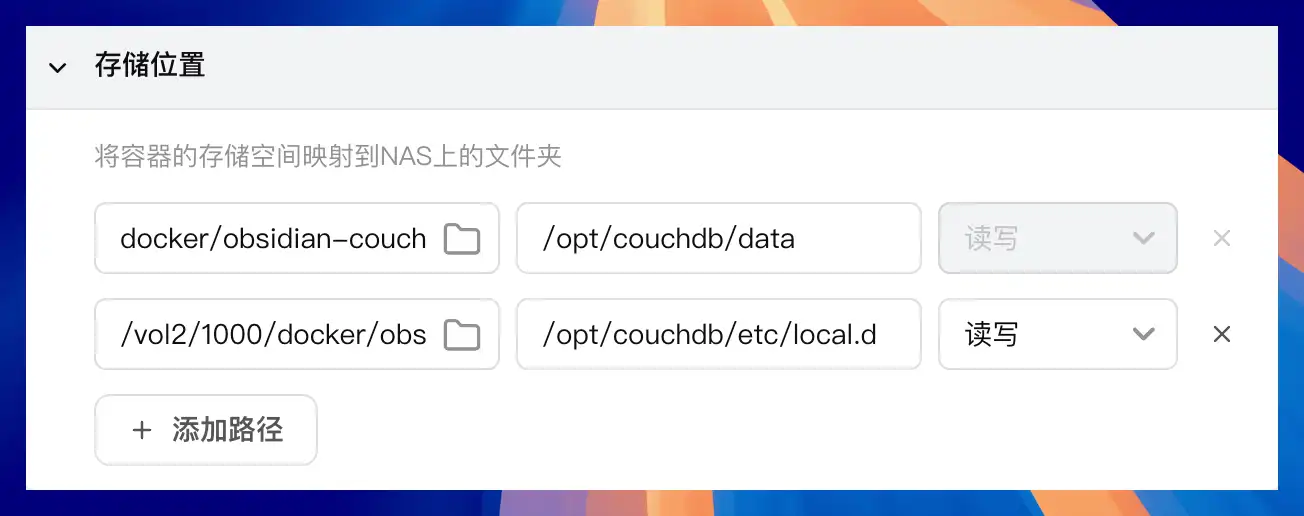
Back in Docker Advanced Settings, expand Storage.
Add these two mappings:
/docker/obsidian-couchdb/data    -> /opt/couchdb/data
/docker/obsidian-couchdb/local.d -> /opt/couchdb/etc/local.d
The left side is the folder on Feiniu. The right side is the path inside the container.
Do not type the left-side paths manually. Click the folder icon and choose the data and local.d folders you just created. This avoids path-format mistakes.
Now prepare the CouchDB config file.
Create a plain text file on your computer and paste this content:
[couchdb]
single_node = true
max_document_size = 50000000

[chttpd]
require_valid_user = true
max_http_request_size = 4294967296
enable_cors = true

[chttpd_auth]
require_valid_user = true
authentication_redirect = /_utils/session.html

[httpd]
WWW-Authenticate = Basic realm="couchdb"
enable_cors = true

[cors]
origins = app://obsidian.md,capacitor://localhost,http://localhost
credentials = true
headers = accept, authorization, content-type, origin, referer
methods = GET, PUT, POST, HEAD, DELETE
max_age = 3600
Save it as:
local.iniMake sure the file extension is .ini. Do not leave it as local.ini.txt.

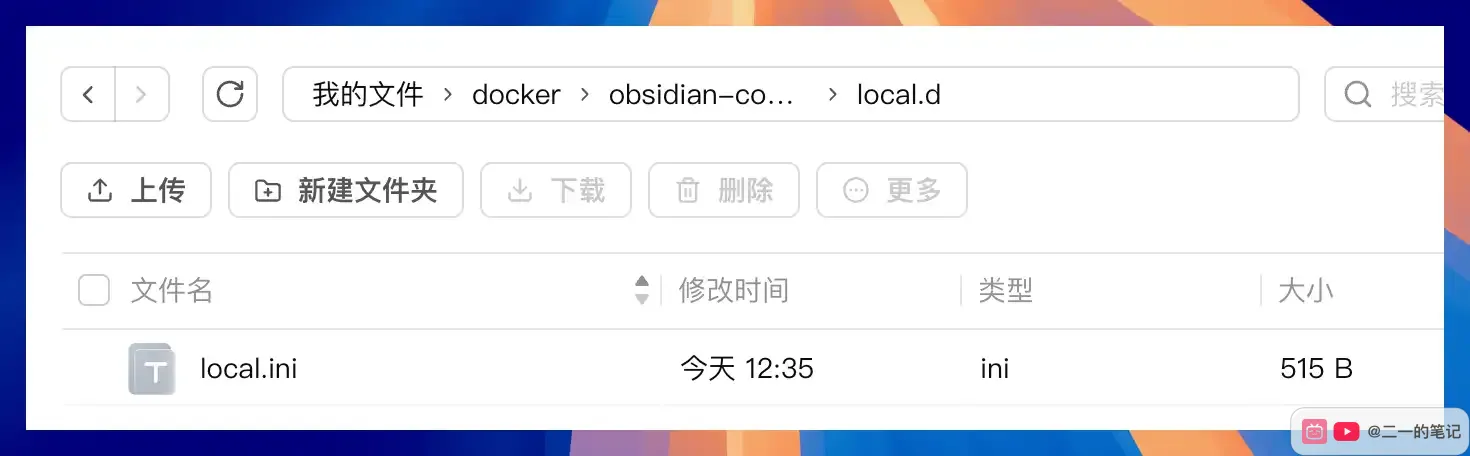
Upload local.ini to the local.d folder.
After uploading, you should see local.ini inside local.d.
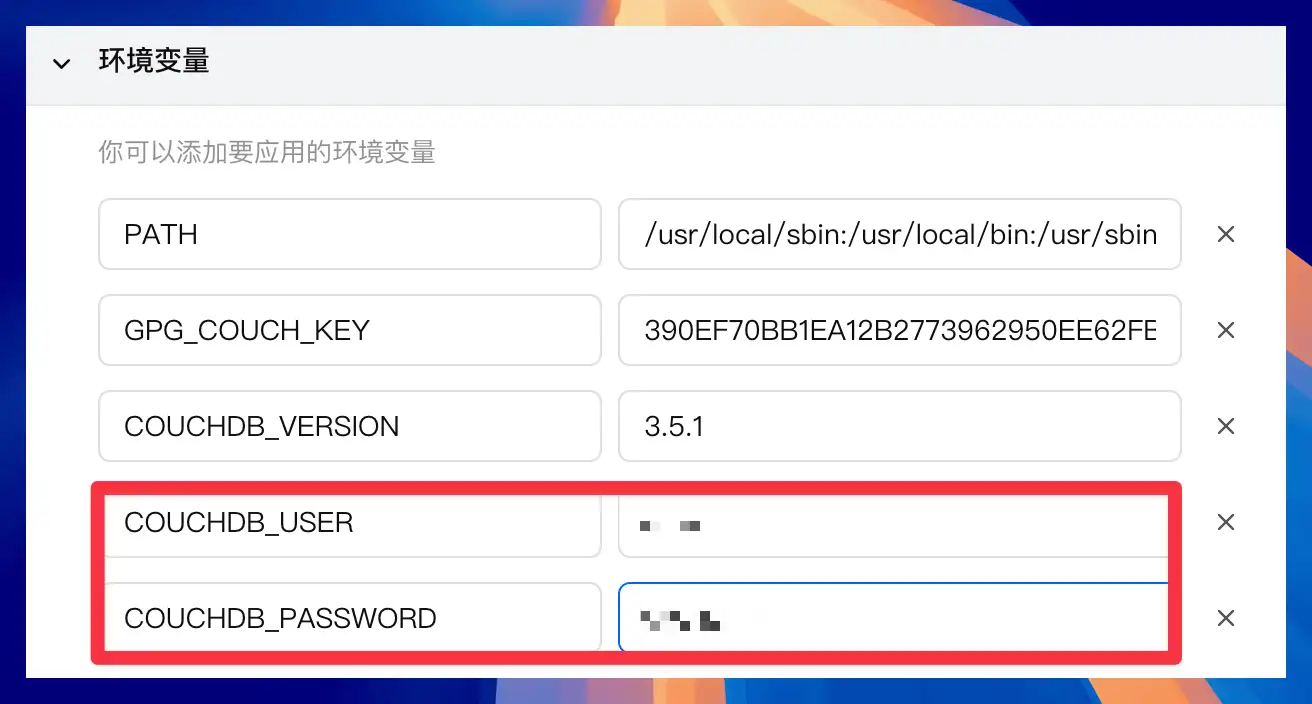
Back in Docker Advanced Settings, expand Environment Variables.
Add these two variables:
COUCHDB_USER=your_username
COUCHDB_PASSWORD=your_strong_password
Choose your own username. Use a strong password and avoid weak values such as admin or 123456.
Also check the port mapping.
CouchDB uses port 5984 inside the container. To reduce confusion, use 5984 as the local port too:
Local port: 5984
Container port: 5984
Protocol: TCP
Then the CouchDB web UI will be:
http://your Feiniu LAN IP:5984/_utilsIf another service already uses local port 5984, you can change only the local port, for example:
Local port: 9100
Container port: 5984
Protocol: TCP
In that case, the Obsidian server address should also use port 9100.
The key point is that the container port must remain 5984.
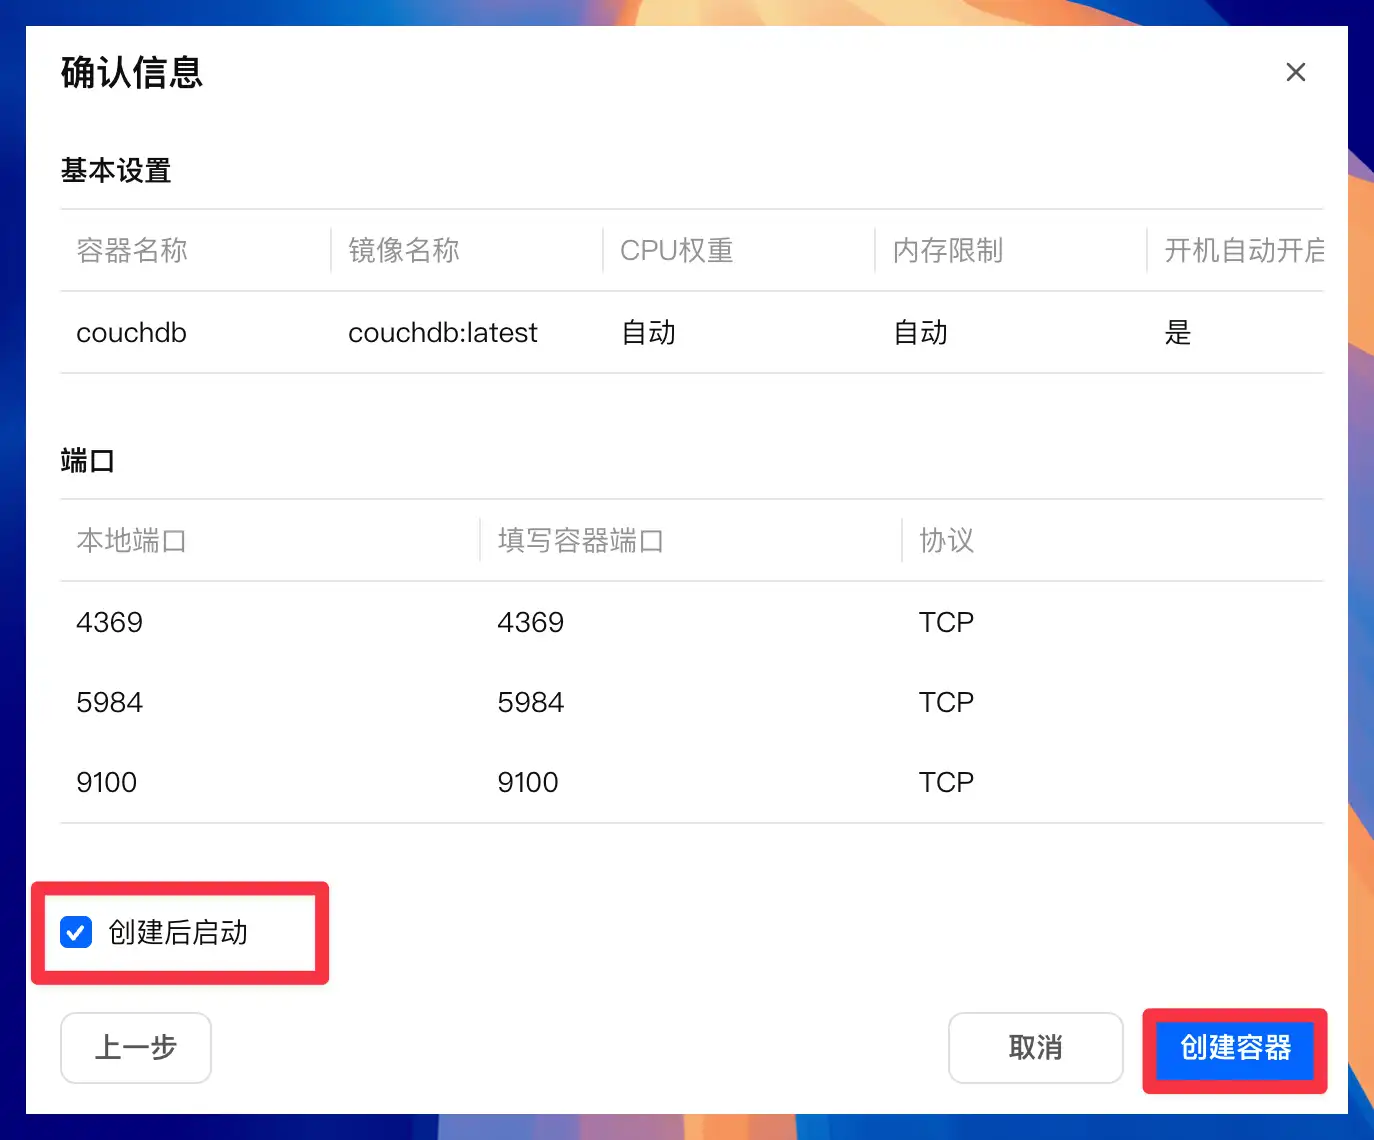
On the final confirmation page, check these items:
- Container name is
couchdb - Auto start is enabled
- Storage paths are mapped to
/opt/couchdb/dataand/opt/couchdb/etc/local.d COUCHDB_USERandCOUCHDB_PASSWORDare set- Container port is
5984
Then enable “start after creation” and create the container.
After the container is created, return to the Docker container list.
If couchdb shows a green status indicator and CPU or memory usage, CouchDB is running.

CouchDB is now deployed on Feiniu. Next, configure Self-hosted LiveSync in Obsidian.
Install the plugin on Mac
In Obsidian, open Settings and go to Community Plugins.
If you have not enabled community plugins before, turn off restricted mode and enter the plugin marketplace. If you need a full plugin installation walkthrough, see Obsidian plugin installation tutorial.
Search for:
livesyncFind Self-hosted LiveSync and install it.
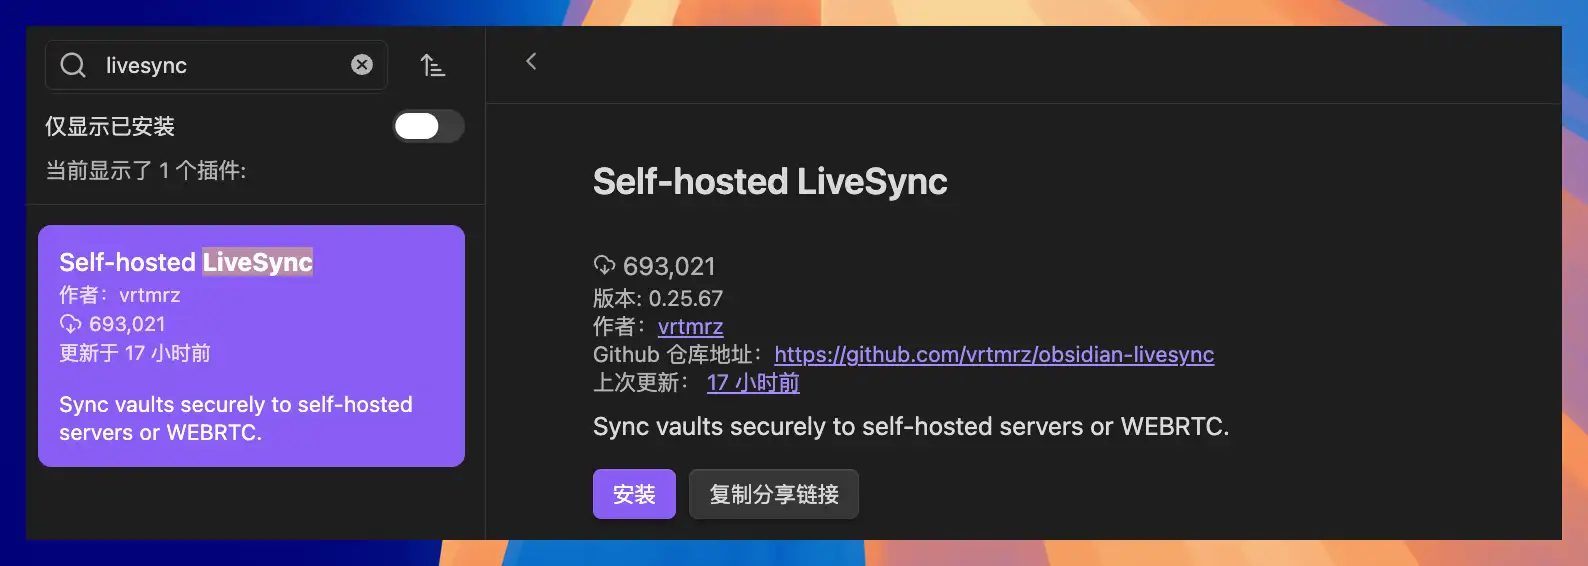
After installation, enable the plugin.
The first launch may show a translation prompt. Click OK; it does not affect the setup.
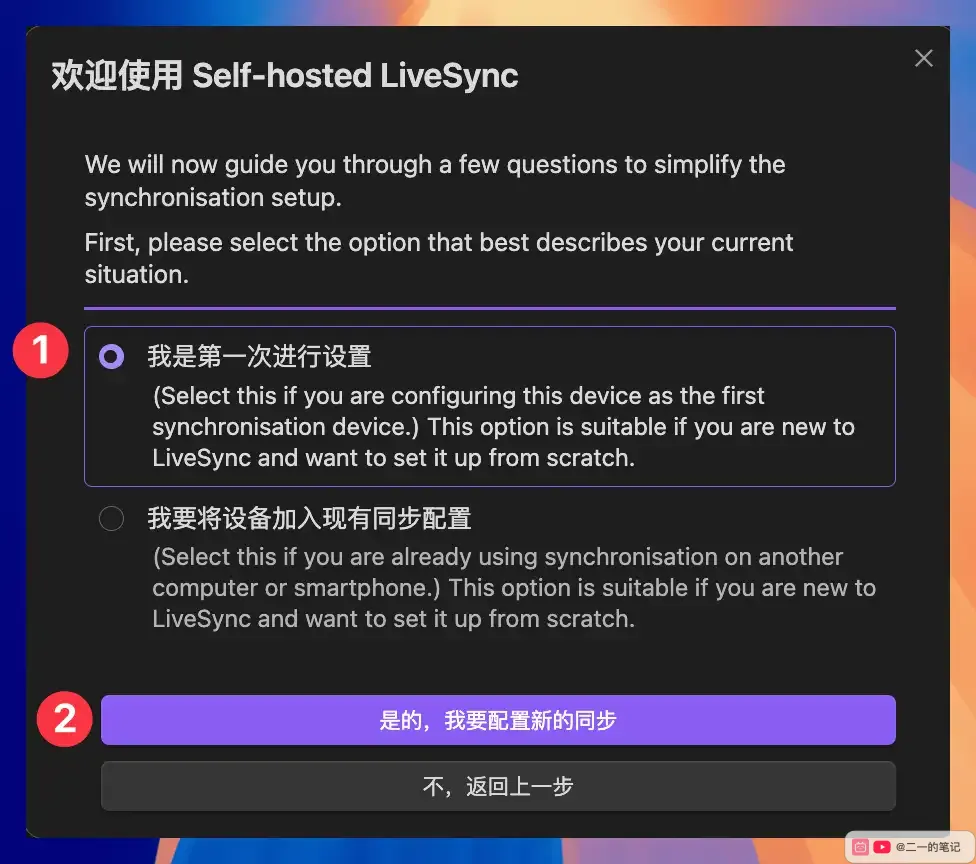
The Self-hosted LiveSync setup wizard will open.
Choose that this is your first setup and that you want to configure a new sync.
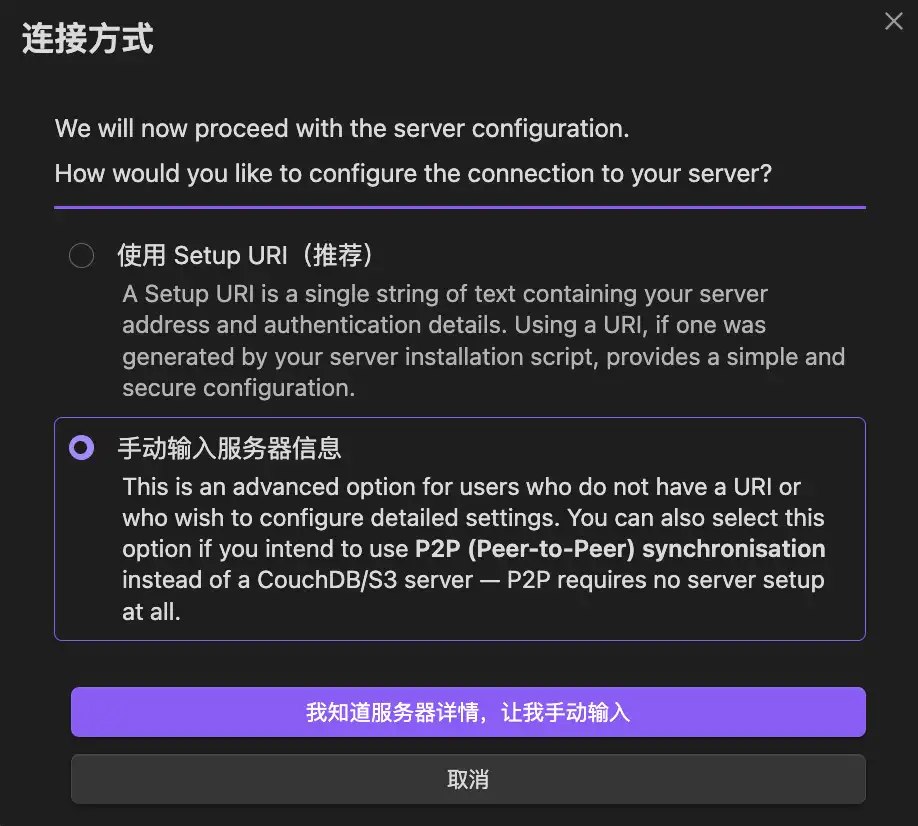
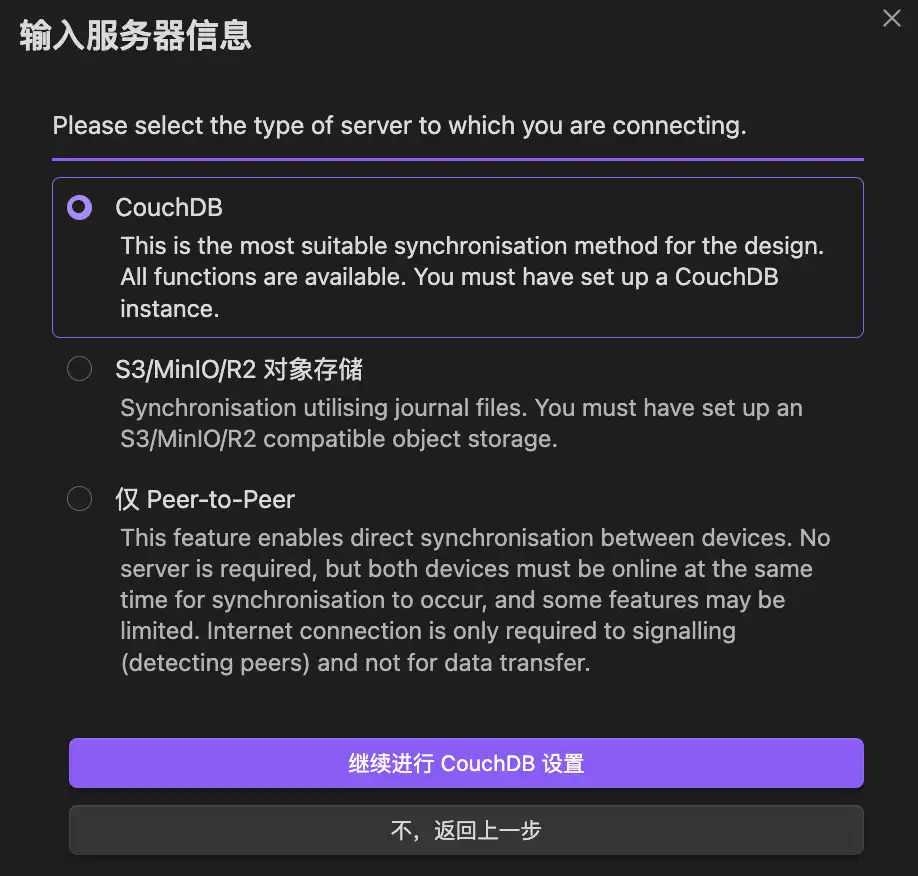
Next, choose how to connect.
Do not choose Setup URI here. A Setup URI is usually generated by another configured device or by an automated setup script. Since we are manually deploying CouchDB on Feiniu, choose manual server information.
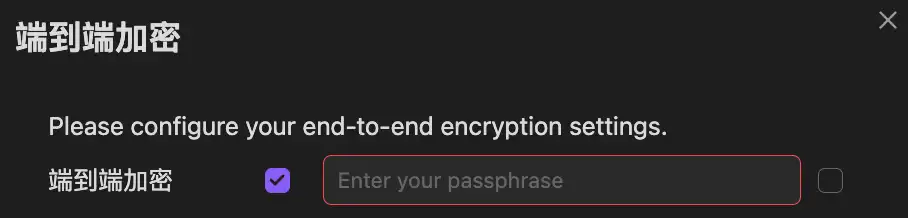
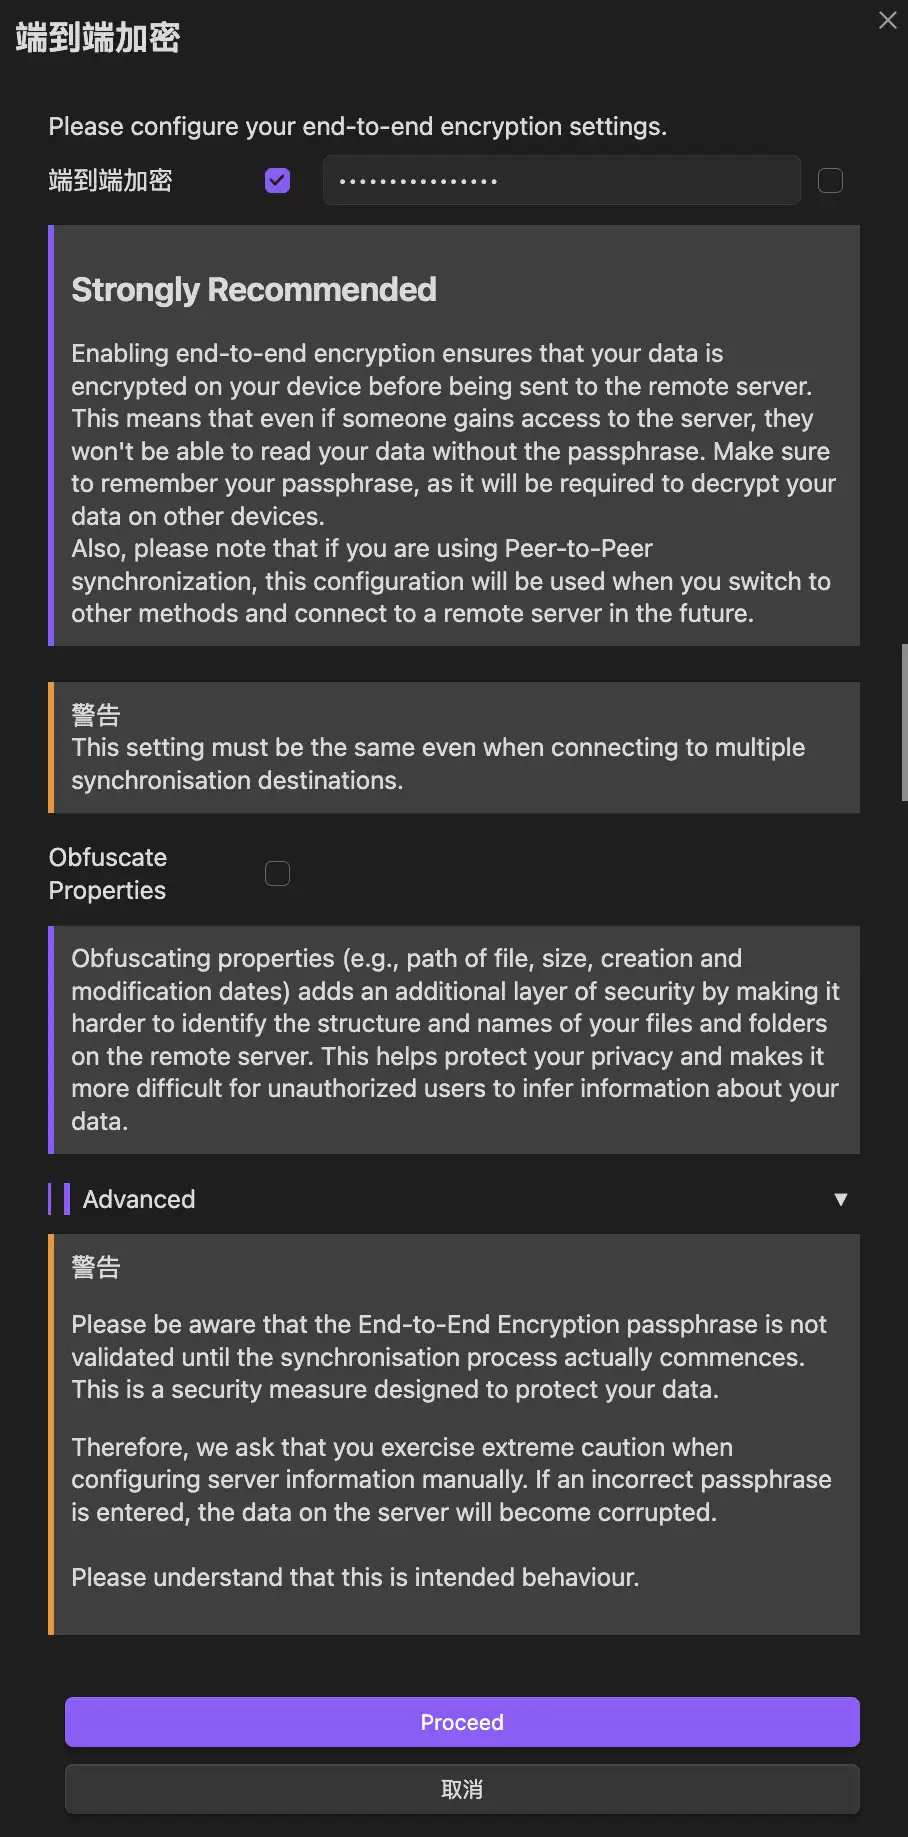
Now configure end-to-end encryption.
I recommend enabling it and setting a separate encryption passphrase. This is not the CouchDB login password. Other devices that join the same sync later must use the same encryption passphrase. Store it in a password manager, because server data cannot be decrypted if it is lost.
You will also see Obfuscate Properties.
This hides file paths, sizes, creation times, and modified times in the remote database. Enable it if you want the remote CouchDB data to expose less metadata.
Then click Proceed.
Choose CouchDB as the server type.
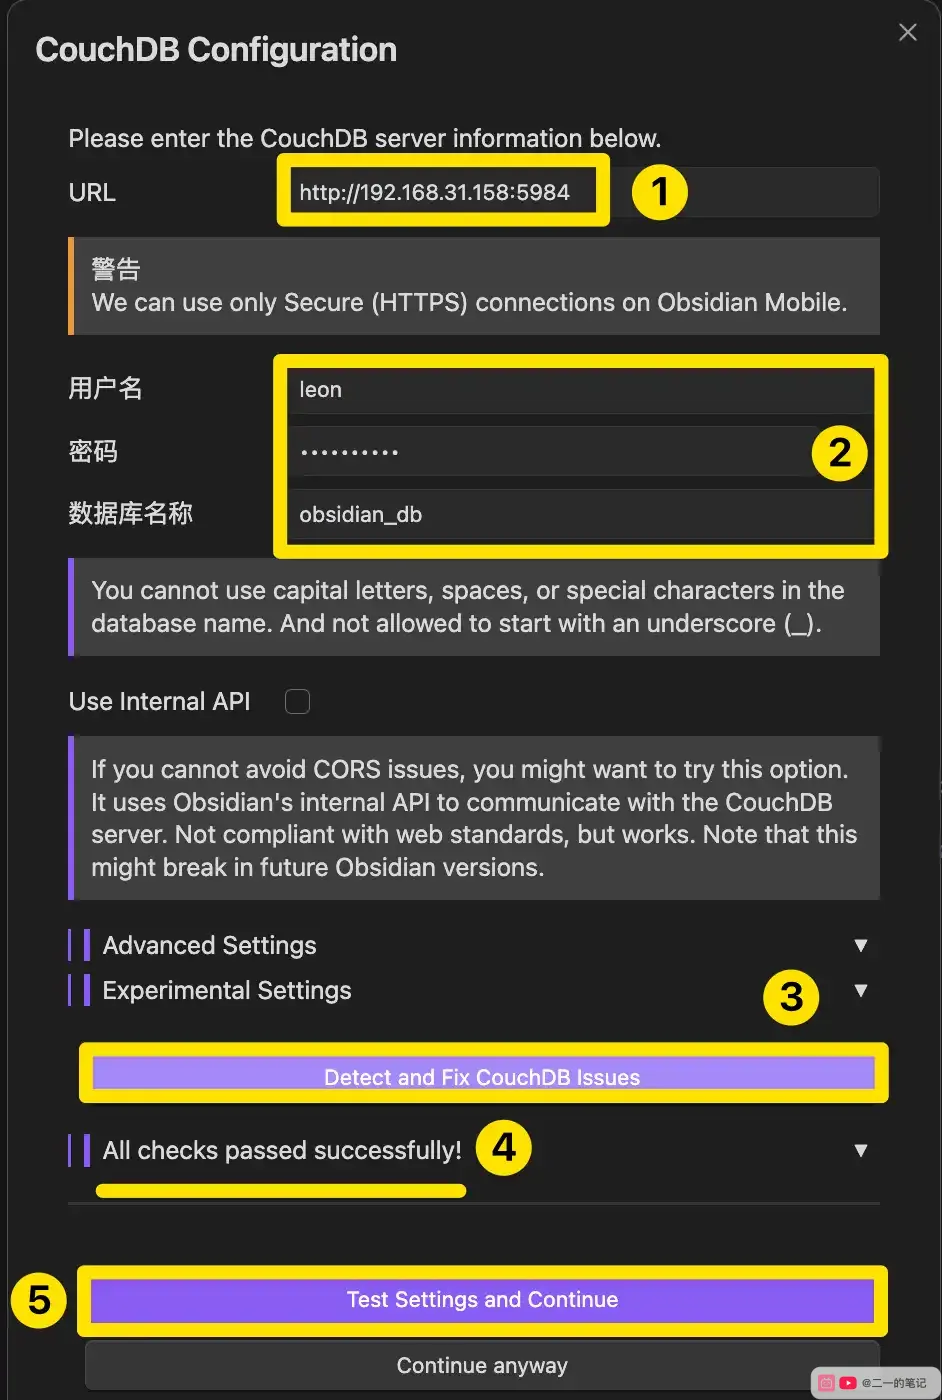
Enter the CouchDB connection details.
For a Mac test inside your local network, use the Feiniu LAN address:
http://your Feiniu LAN IP:5984In my test, the address was:
http://192.168.31.158:5984The wizard may warn that Obsidian Mobile only supports HTTPS. That matters later, but for now we only need to confirm the desktop setup works inside the local network.
Fill in the values you created in Docker:
Username: COUCHDB_USER
Password: COUCHDB_PASSWORD
Database name: obsidian_db
The database name can be custom, but avoid uppercase letters, spaces, special characters, and a leading underscore. I use:
obsidian_dbLeave Use Internal API off unless you hit a CORS problem that cannot be solved normally.
Click Detect and Fix CouchDB Issues.
If the check passes, you should see All checks passed successfully!. Then click Test Settings and Continue.
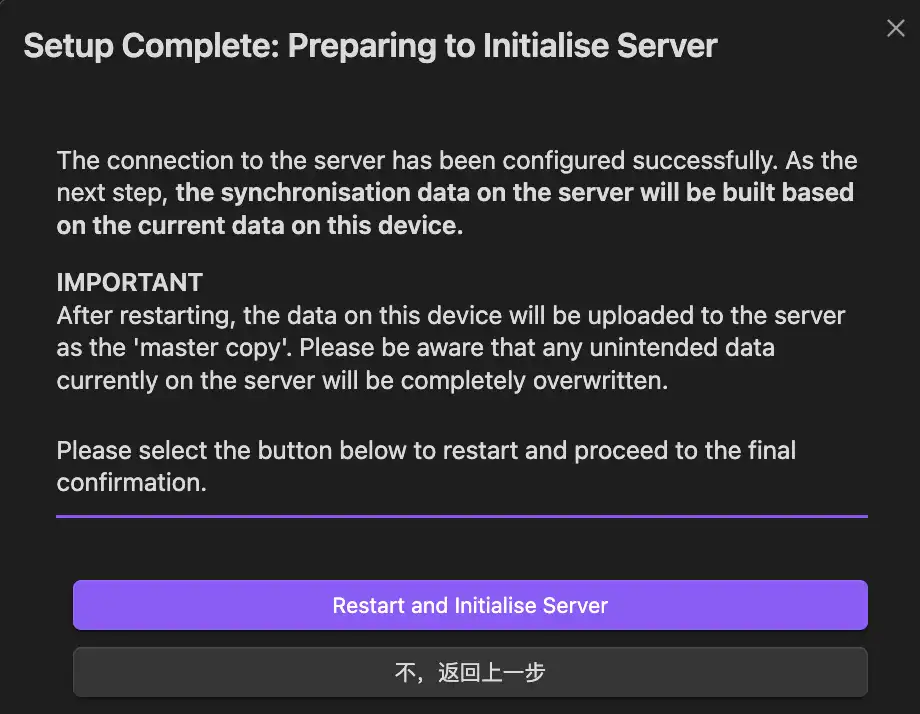
If the next prompt appears, the connection works and the plugin is ready to use the current vault as the first copy of data on the server.
Click Restart and Initialise Server.
You may see Fetch Remote Configuration Failed.
This is normal for a new empty server, because there is no remote LiveSync configuration yet.
Click Skip and proceed.
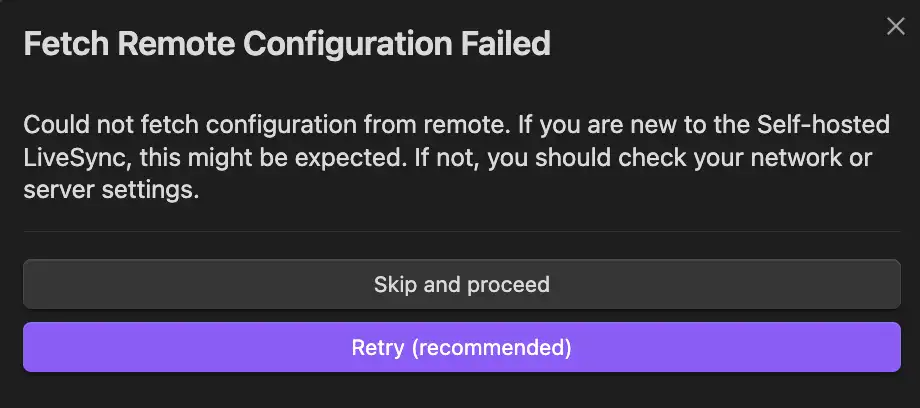
The plugin will restart the sync flow. You may see notifications such as:
Local Database Reset
SYNC DATABASE AND STORAGE
Remote database created or connected
As long as errors do not continue appearing, wait for the next dialog.
Apply the recommended LiveSync settings
After the basic connection is finished, LiveSync may run a configuration diagnosis.
Click OK.
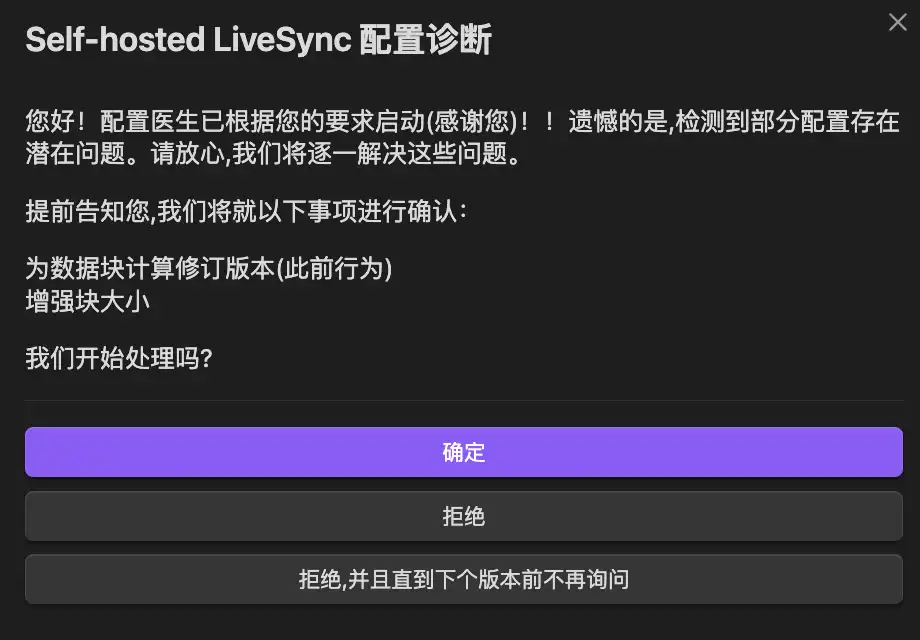
It may then show several recommended fixes. Apply all recommended fixes. After that, the plugin will ask you to confirm how to handle server data.
Initialise the server from the current device
This dialog means LiveSync will remove existing sync data on the server and rebuild it from the current Obsidian vault.
If this is a brand-new CouchDB database, this is expected.
If this CouchDB database already contains an active LiveSync vault, do not continue casually. This action can overwrite existing server-side sync data.
In this tutorial, we are using a new test vault, so it is safe to continue.
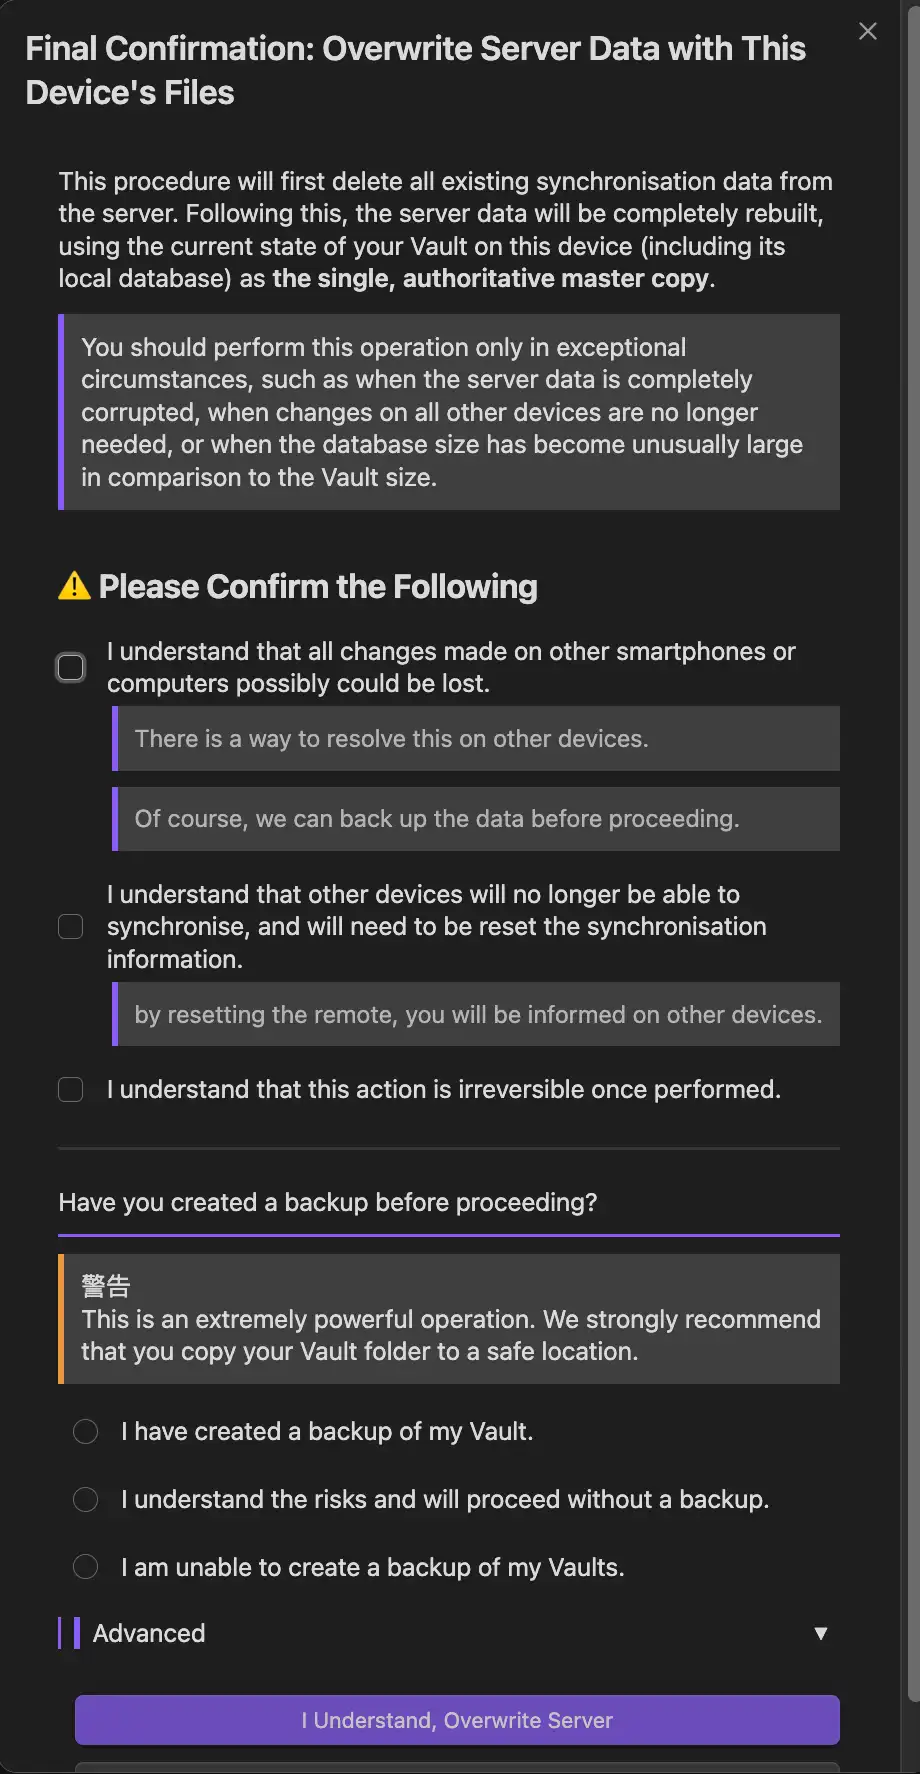
You need to check the three confirmation boxes:
- You understand changes on other devices may be lost
- You understand other devices will need to be reconfigured
- You understand the action cannot be undone
The plugin will also ask whether you have backed up your vault.
For a real vault, copy the whole vault folder first and choose that you have created a backup. For a test vault, you can choose to proceed without a backup.
Click I Understand, Overwrite Server.
If another prompt says local settings and server settings differ slightly, click OK.
If the plugin asks:
Do you want to send all chunks before replication?Choose yes for the first server initialization. This sends the current vault chunks before normal sync begins.
If you see a database-size notification, 2GB is fine for a self-hosted Feiniu CouchDB. It is only a notification threshold, not actual storage usage.
At this point, Self-hosted LiveSync is configured on the first Mac.
After the first sync finishes and the plugin stops showing repeated errors, the current device can write data to CouchDB on the NAS.
Add Windows to the existing sync
The Mac has created the first server copy. Windows should not initialise the server again. It should join the sync that already exists.
On the configured Mac, open Self-hosted LiveSync settings and go to the quick setup page with the small wizard icon.
In the “setup another device” area, click the button that copies the current settings as a Setup URI.
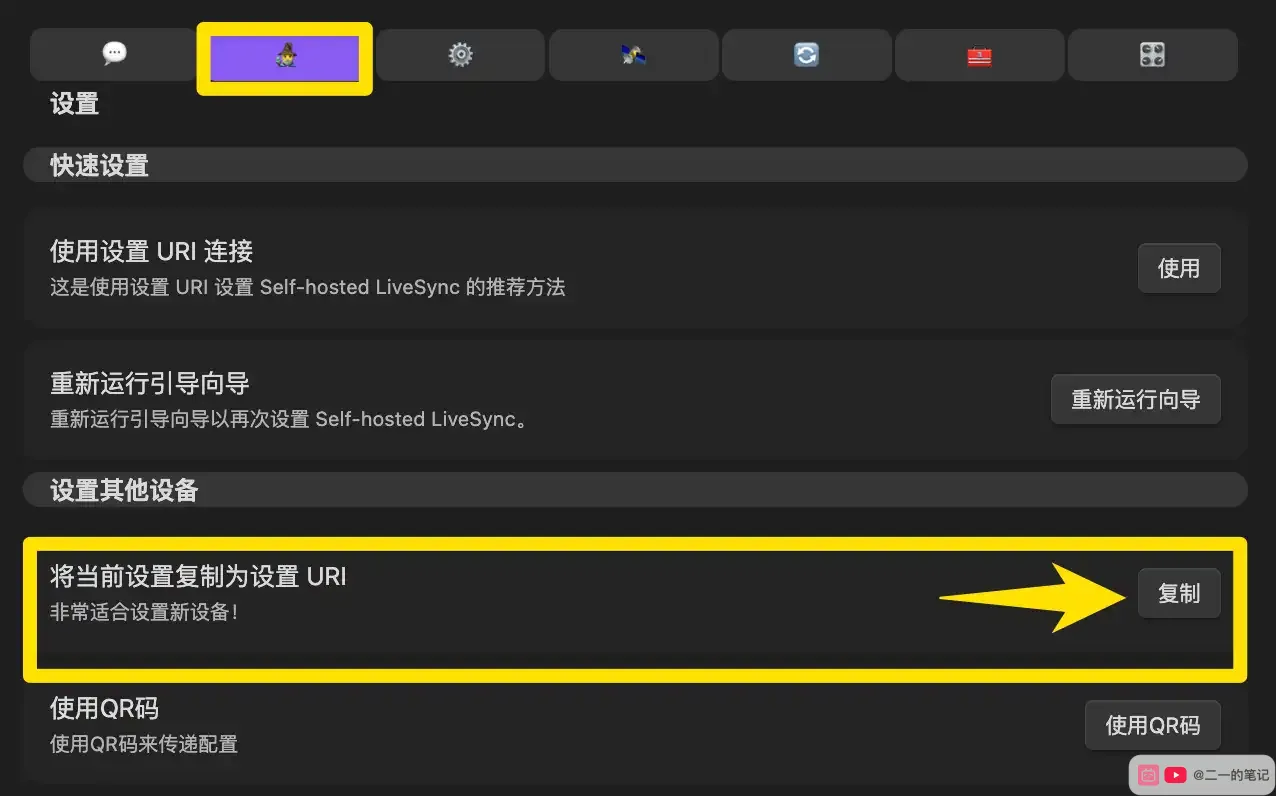
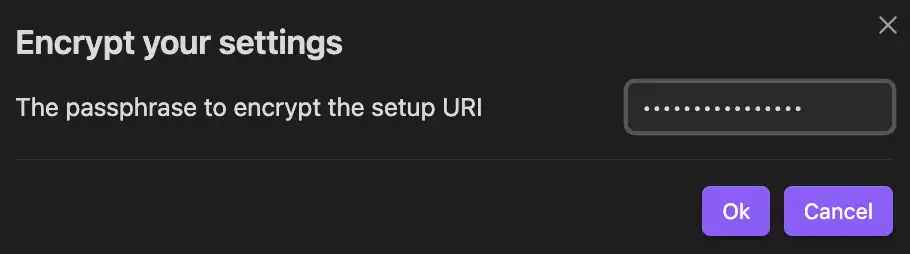
If end-to-end encryption is enabled, the plugin asks for a password to protect the Setup URI. To avoid confusion, you can use the same passphrase you set earlier. Windows or mobile devices will need this same password when importing the URI.
When the plugin says Your Setup URI is ready to be copied, the Setup URI is already in the clipboard.
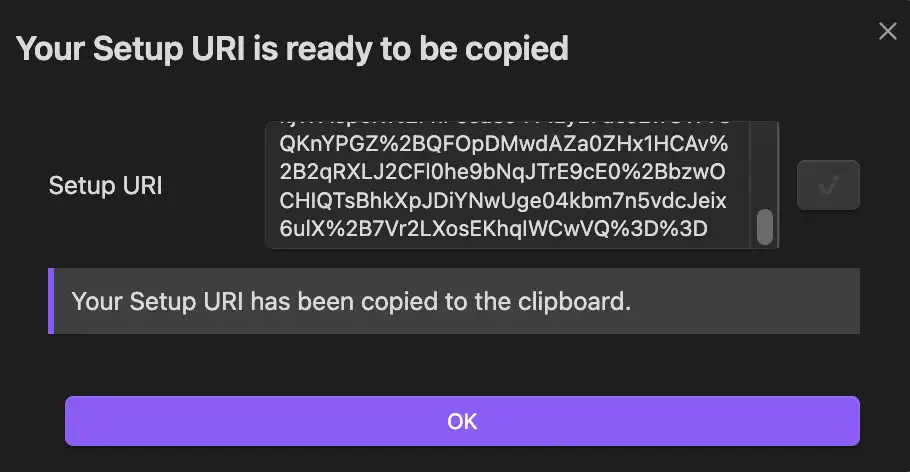
Send this Setup URI to Windows through a private channel, such as local file transfer, a trusted chat app, clipboard sync, or a temporary text file. It contains the information needed to connect to the server, so do not publish it anywhere.
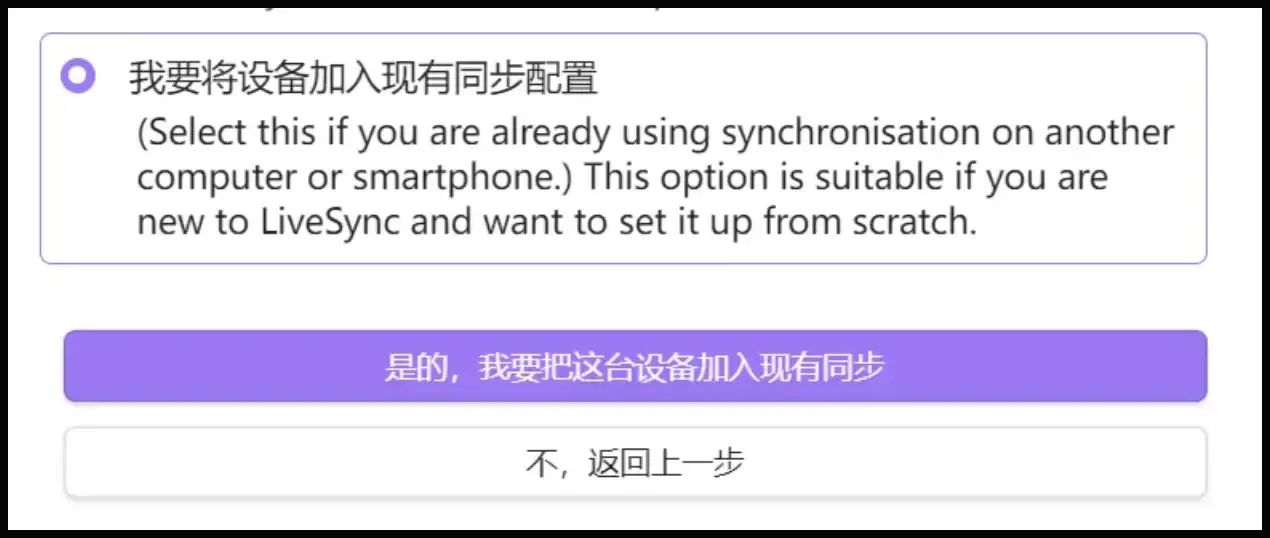
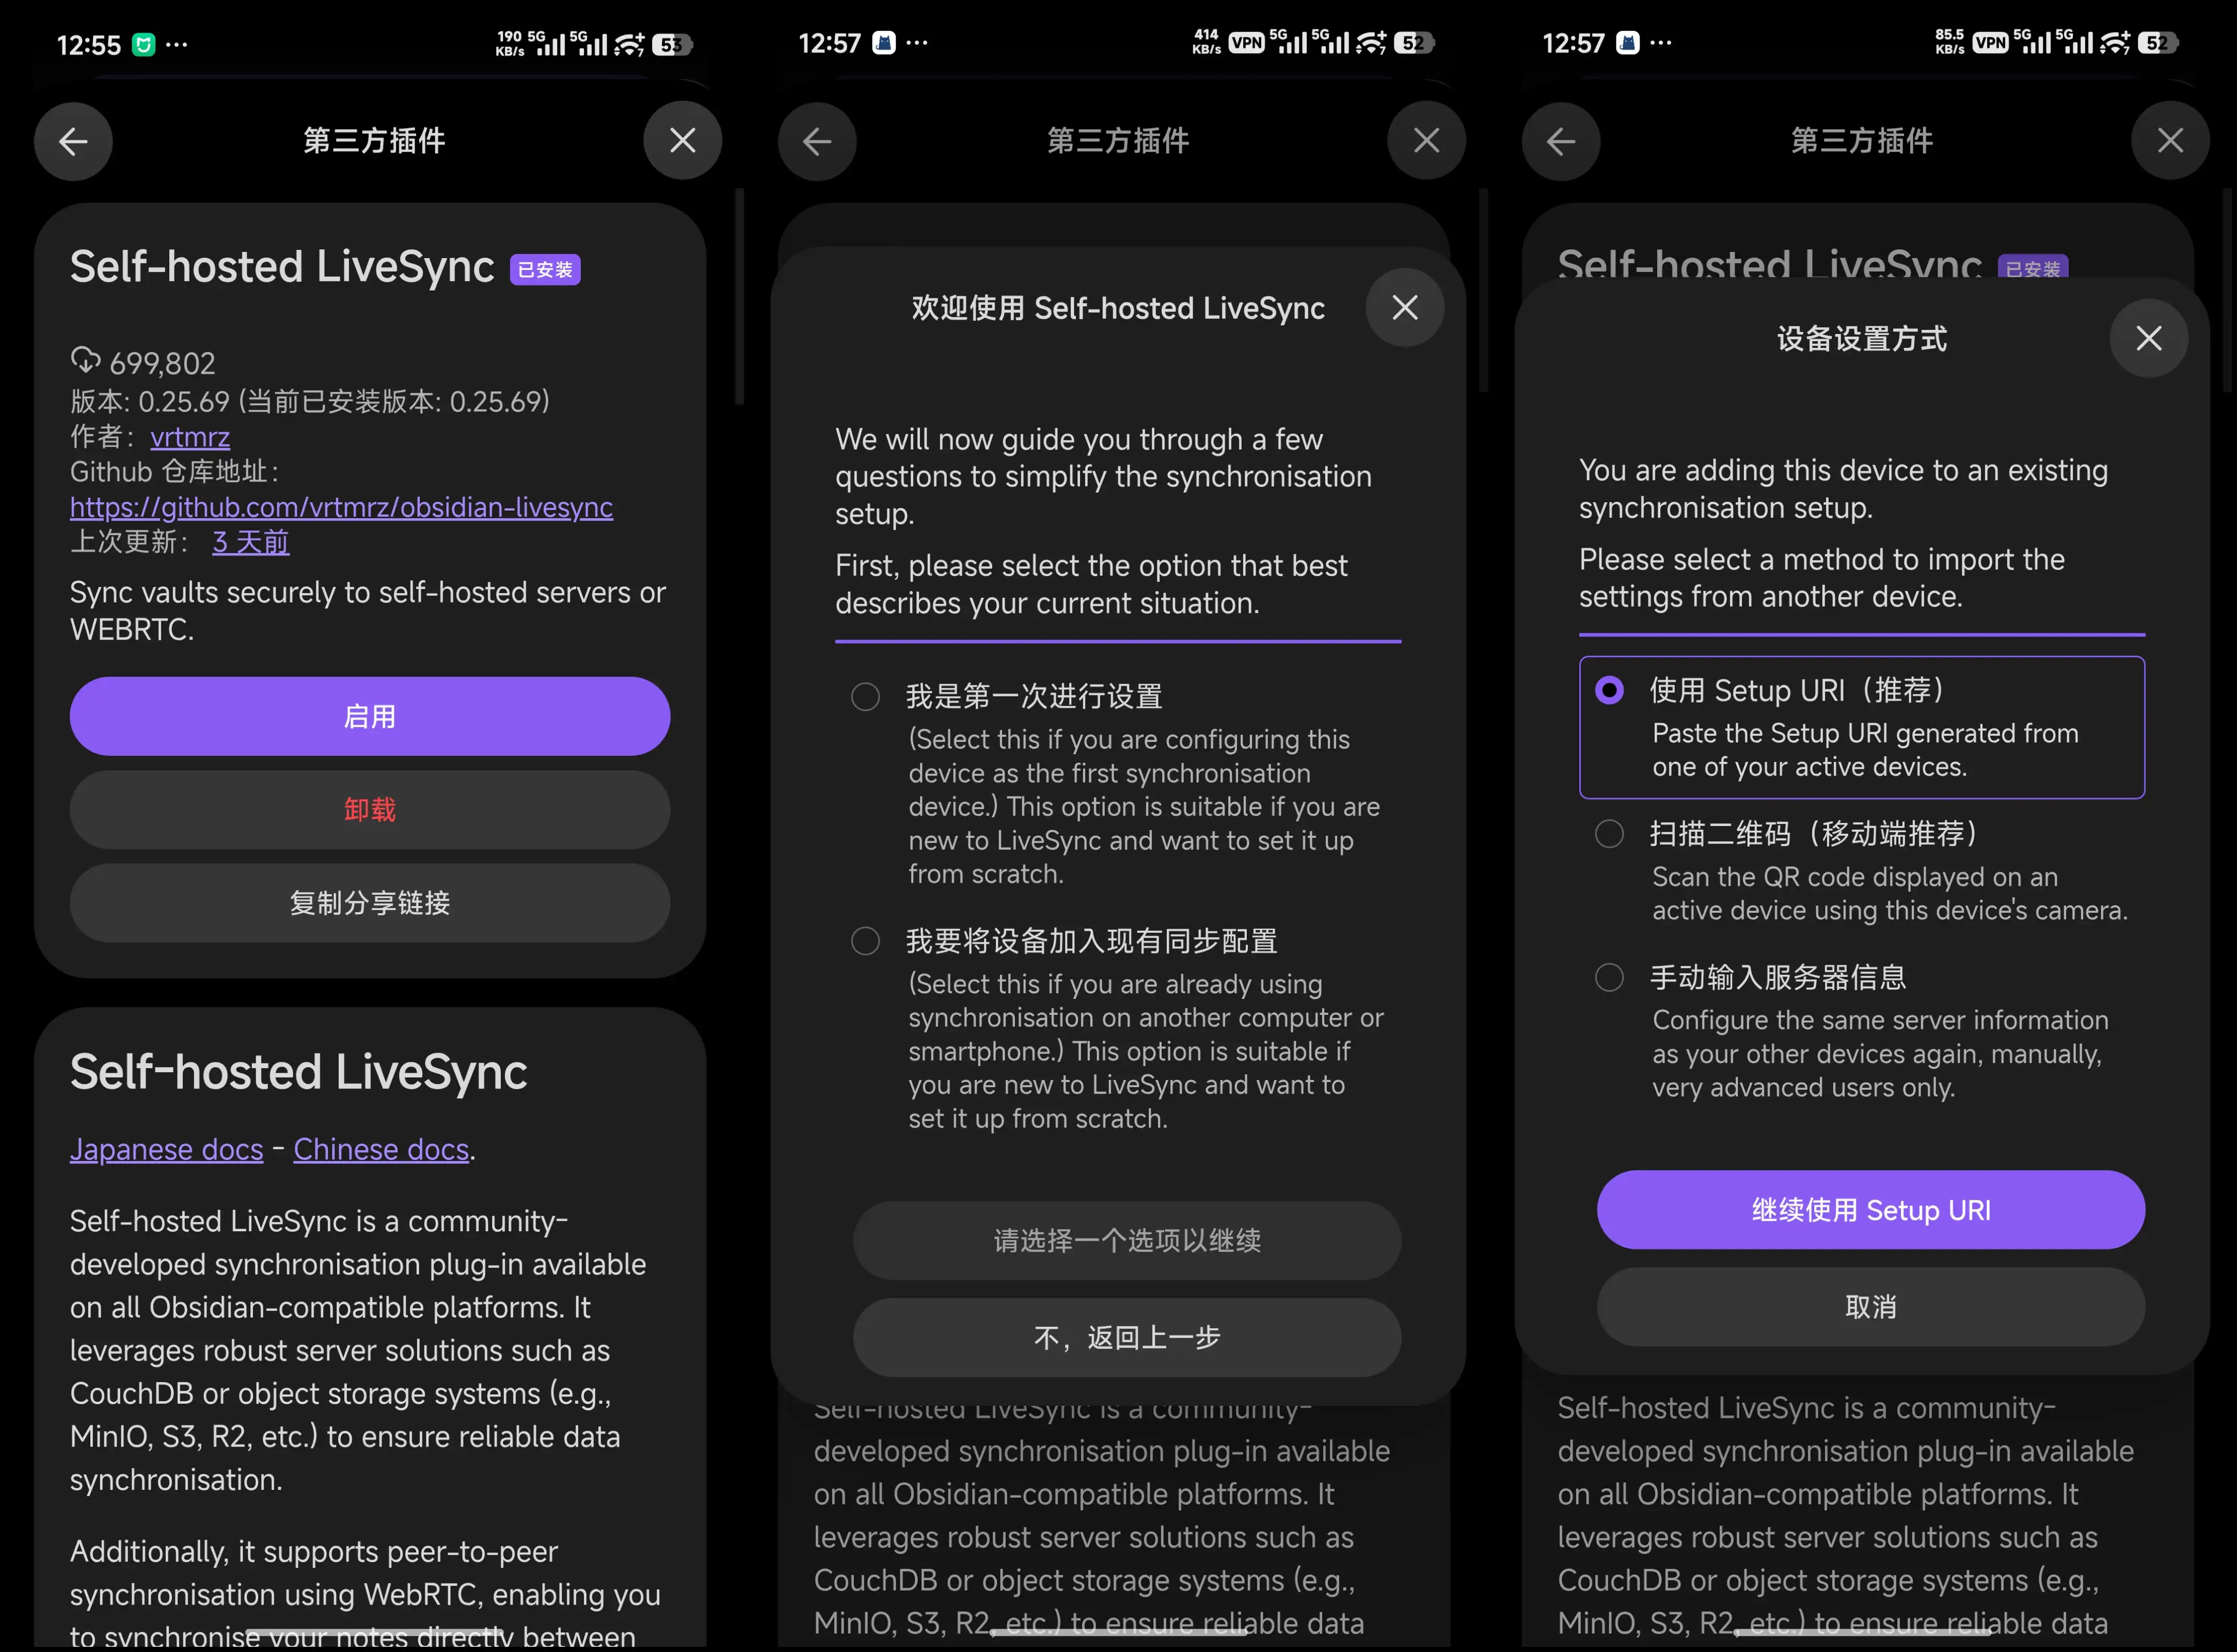
On Windows, install and enable Self-hosted LiveSync. In the first wizard, choose to add this device to an existing sync setup.
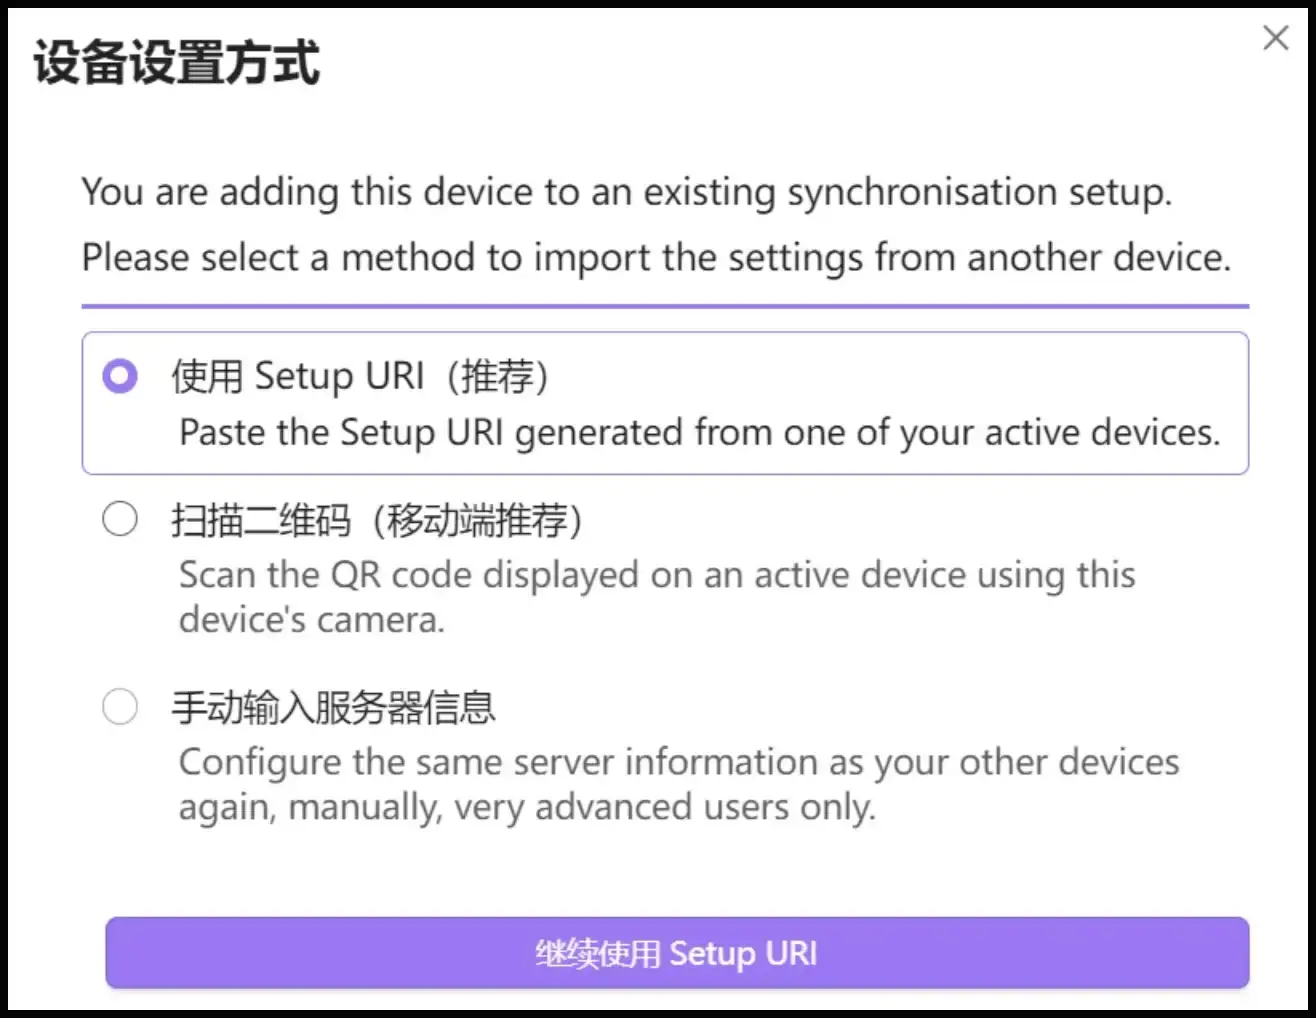
Next, choose the import method.
I recommend Setup URI. It brings over the server address, database name, username, and other settings at once, so there is less room for manual input errors.
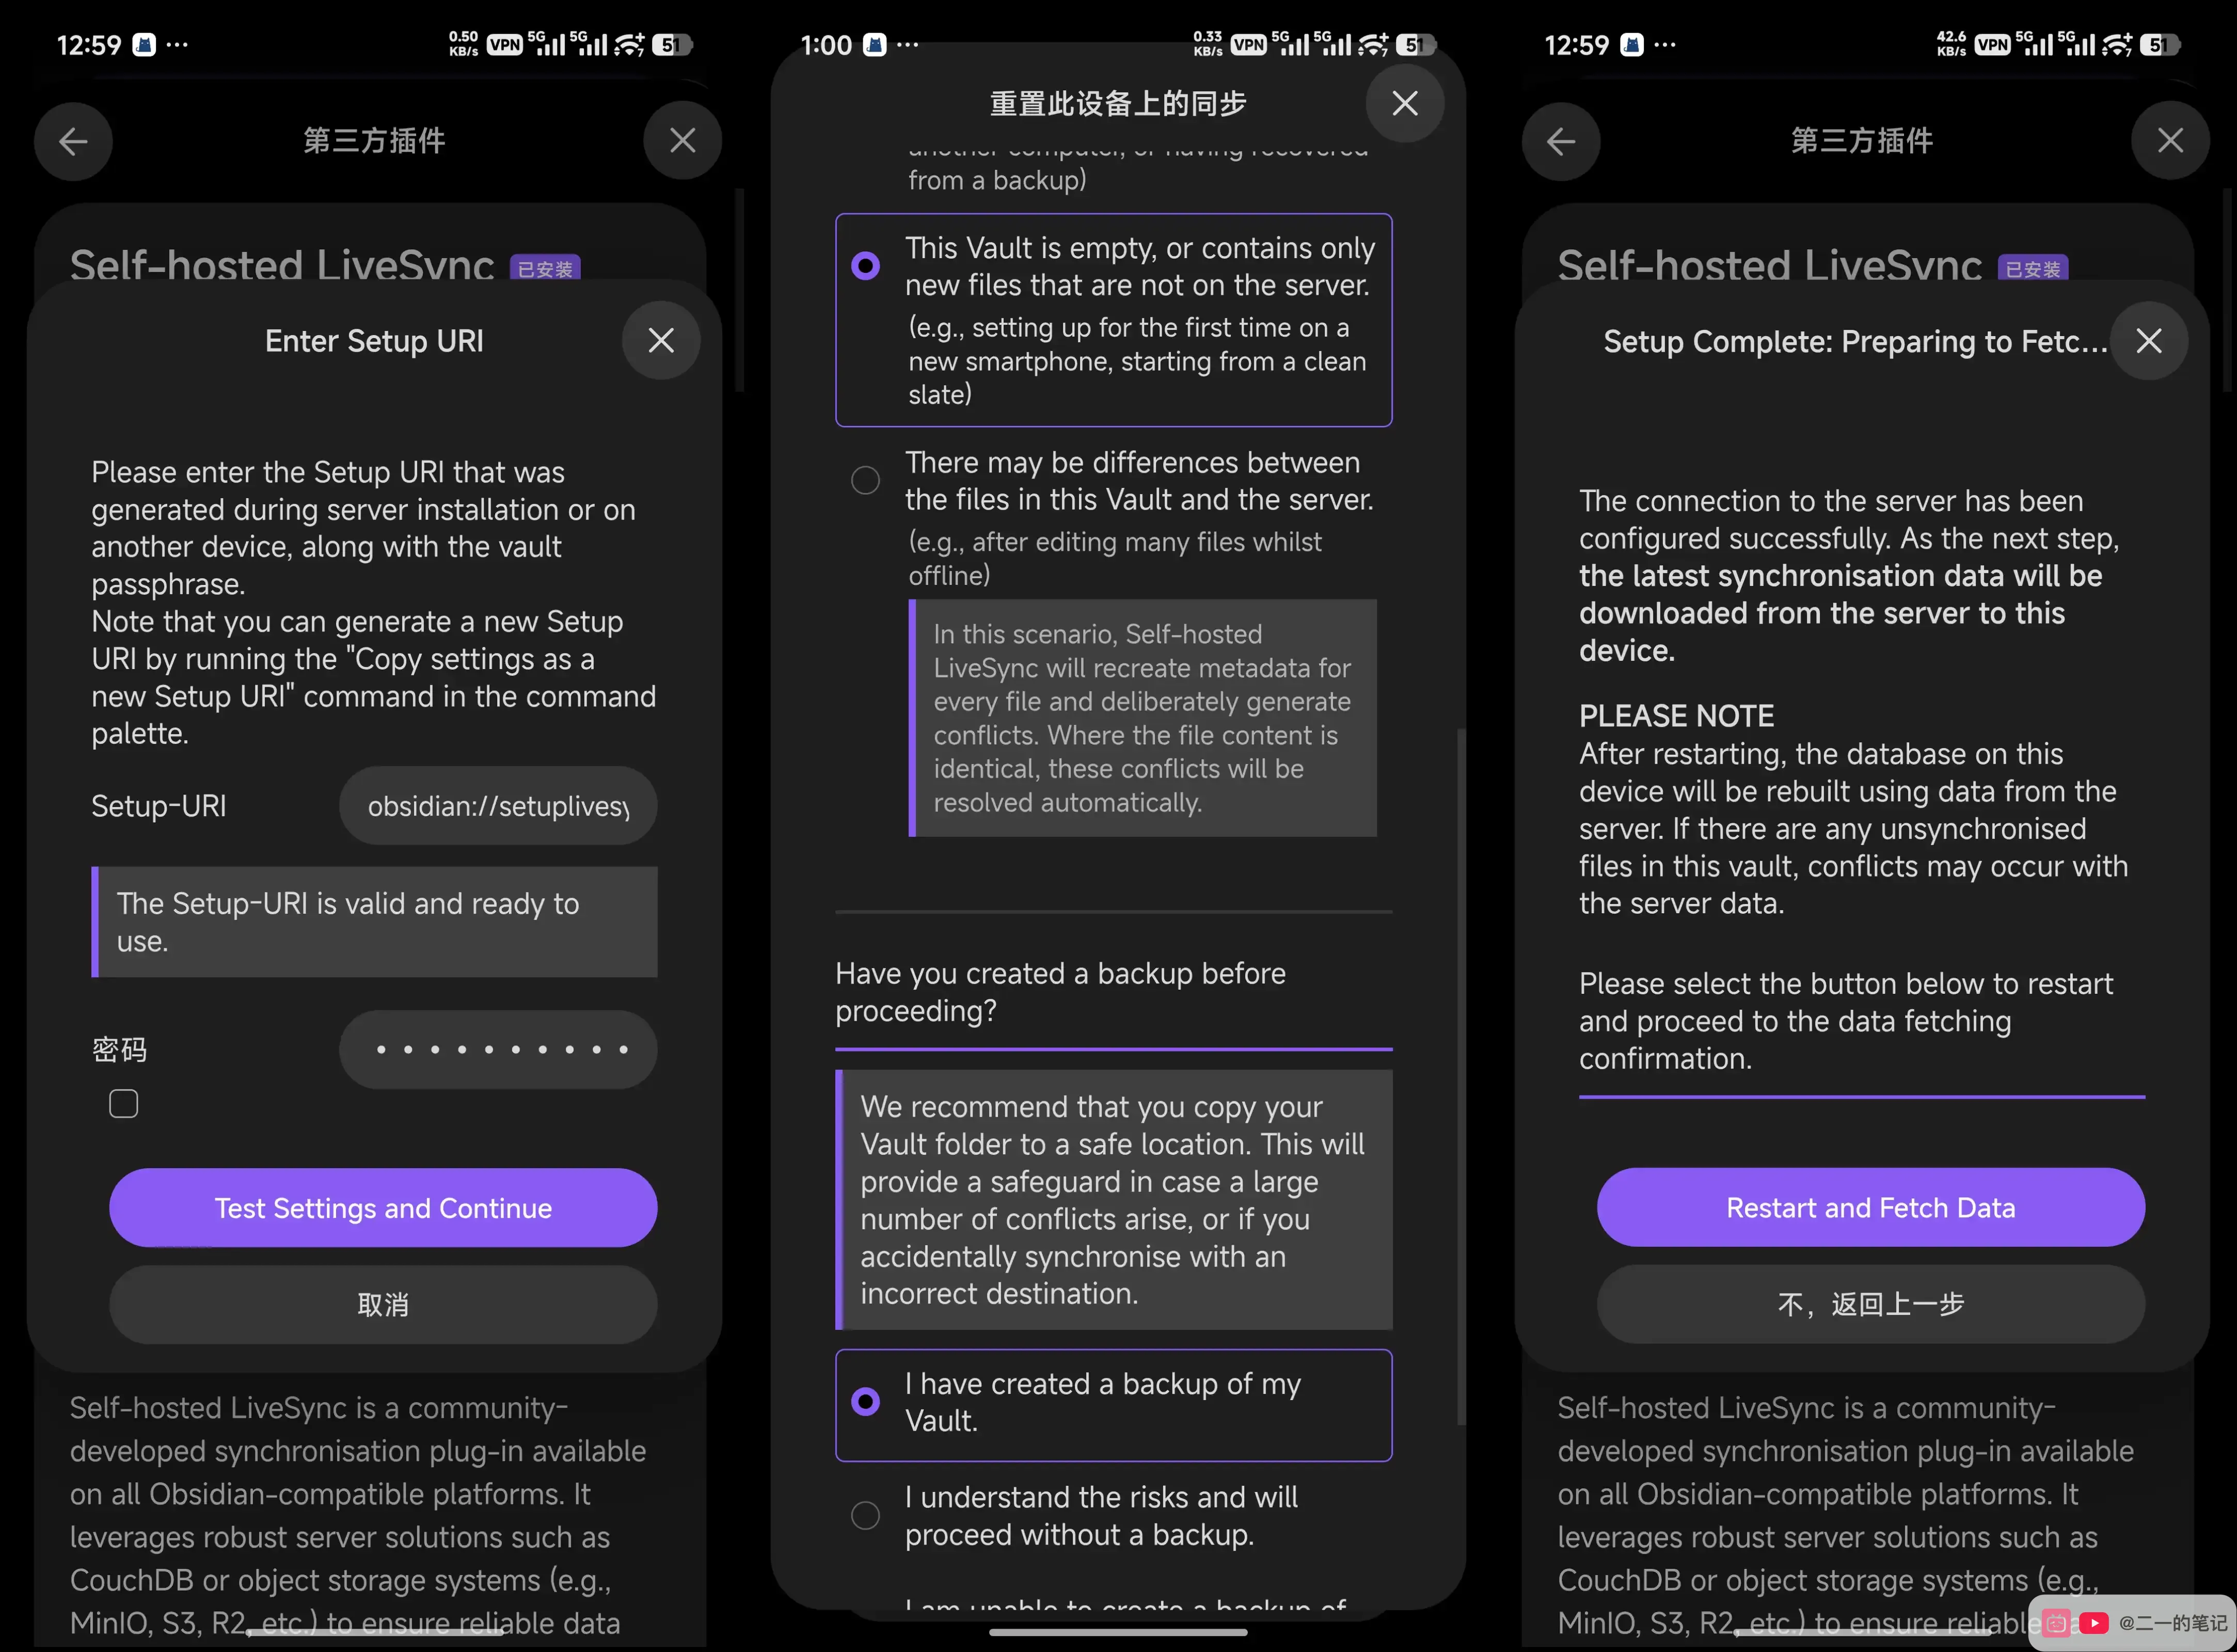
Paste the Setup URI copied from the Mac, then enter the password.
If you see The Setup-URI is valid and ready to use, the URI can be used. Click Test Settings and Continue.
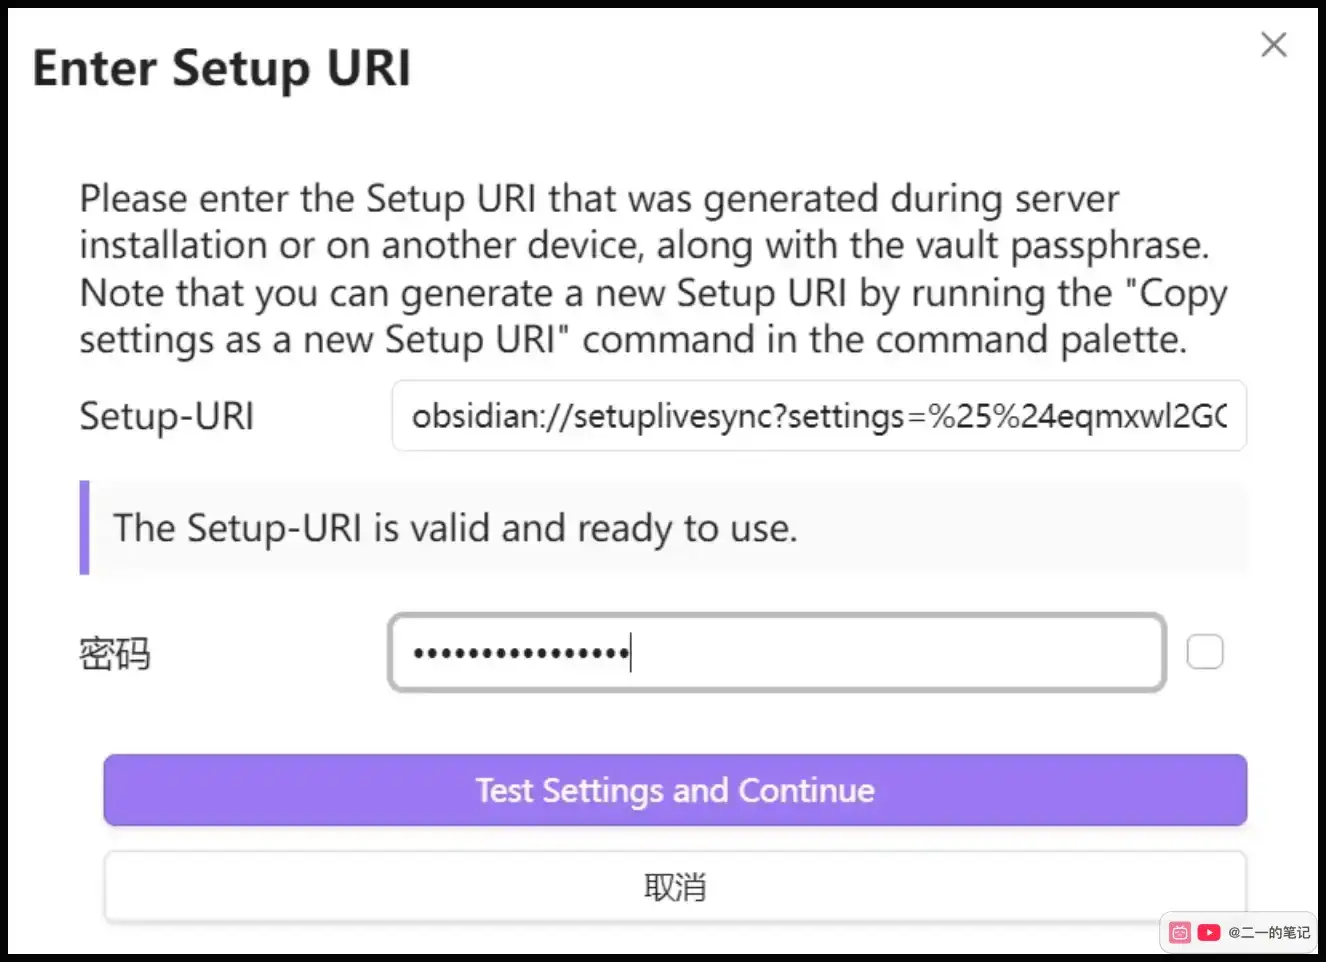
After the connection passes, the plugin will ask to fetch sync data from the server.
Click Restart and Fetch Data. Windows will download the latest server data and rebuild its local LiveSync database from it.
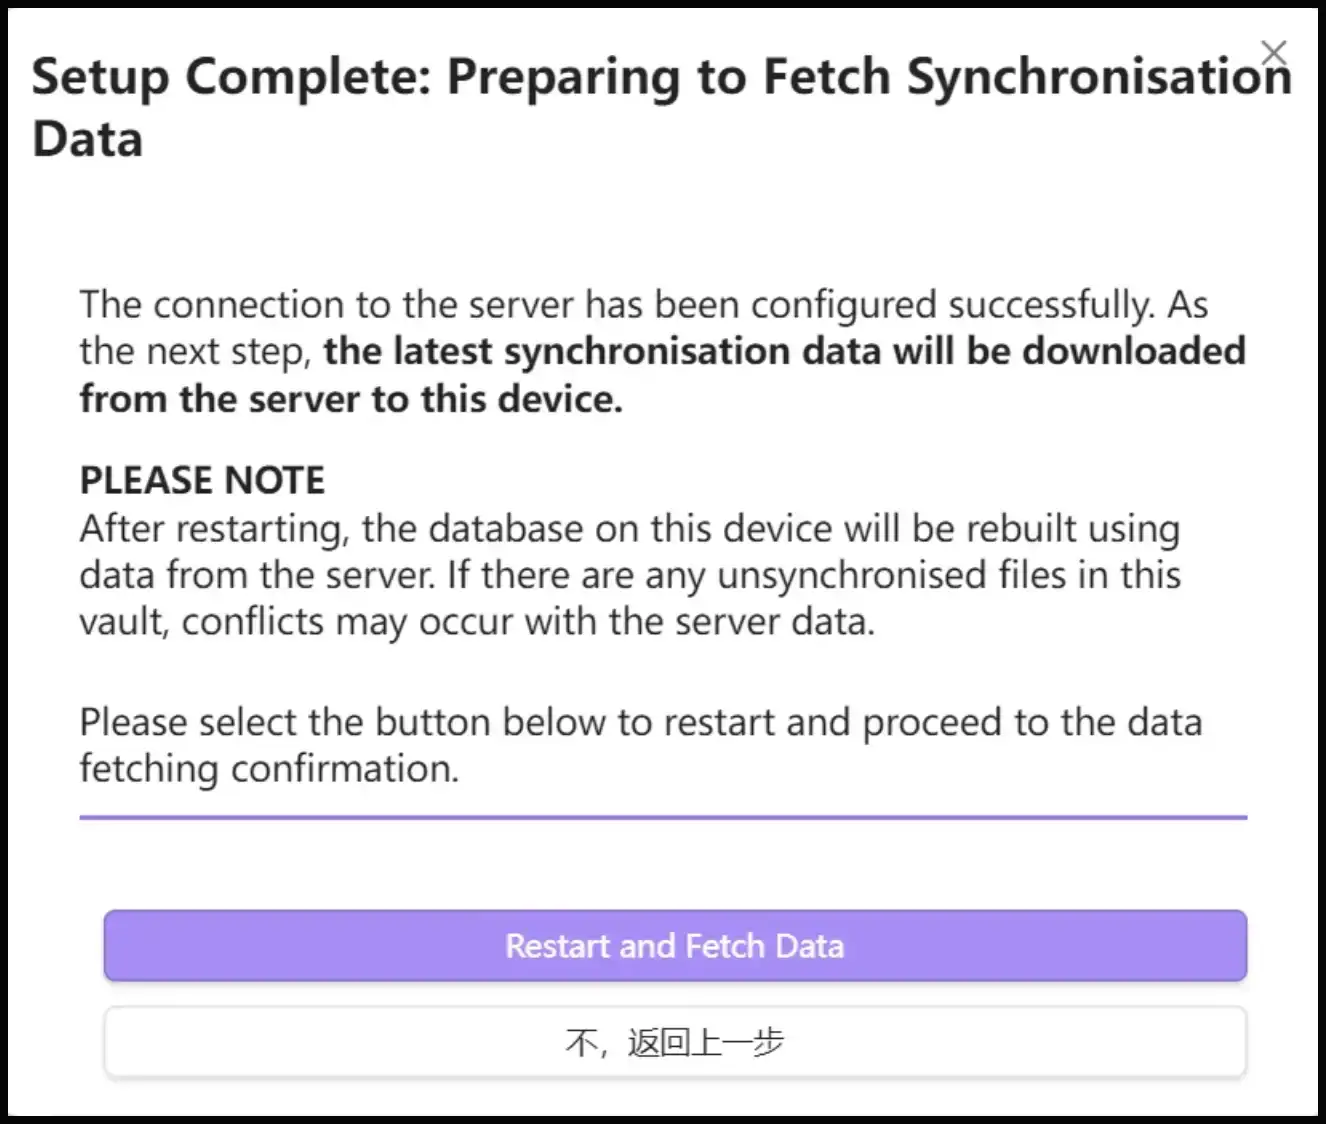
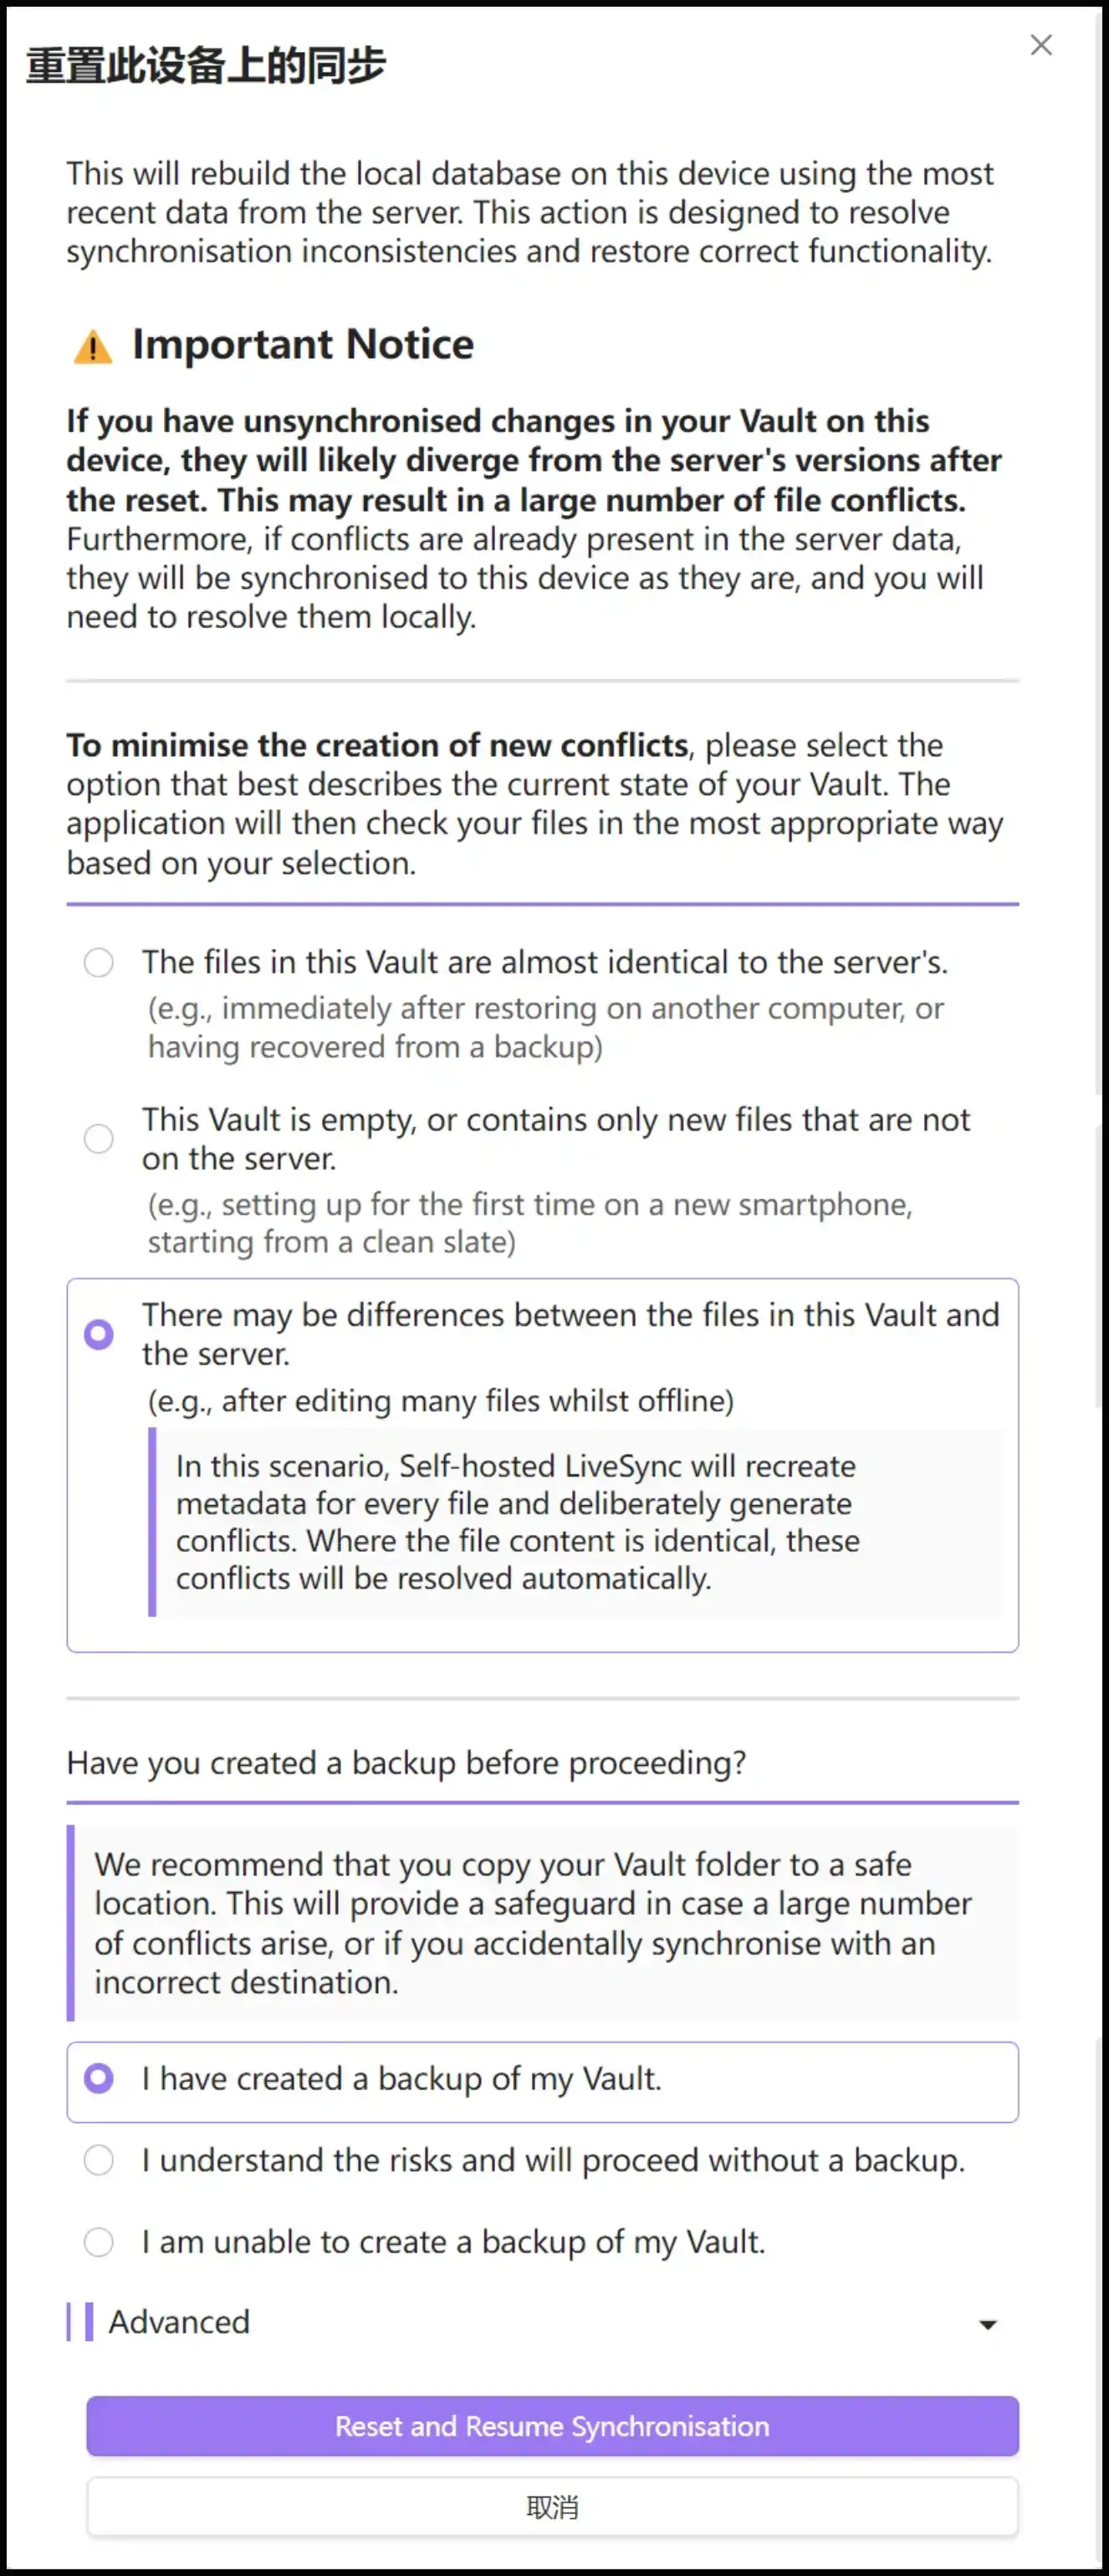
You may then see a reset-confirmation page. Choose based on the real state of the Windows vault:
- If the Windows vault is new or almost empty, choose
This Vault is empty, or contains only new files that are not on the server. - If the Windows vault was copied from the Mac and is almost identical to the server, choose
The files in this Vault are almost identical to the server's. - If Windows already has many edits and you are unsure whether it matches the server, choose
There may be differences between the files in this Vault and the server.
The third option is the most cautious, but it can create many conflict records because the plugin rechecks file metadata. For a normal tutorial, do not tell everyone to choose it by default.
Back up the Windows vault before continuing. Then click Reset and Resume Synchronisation.
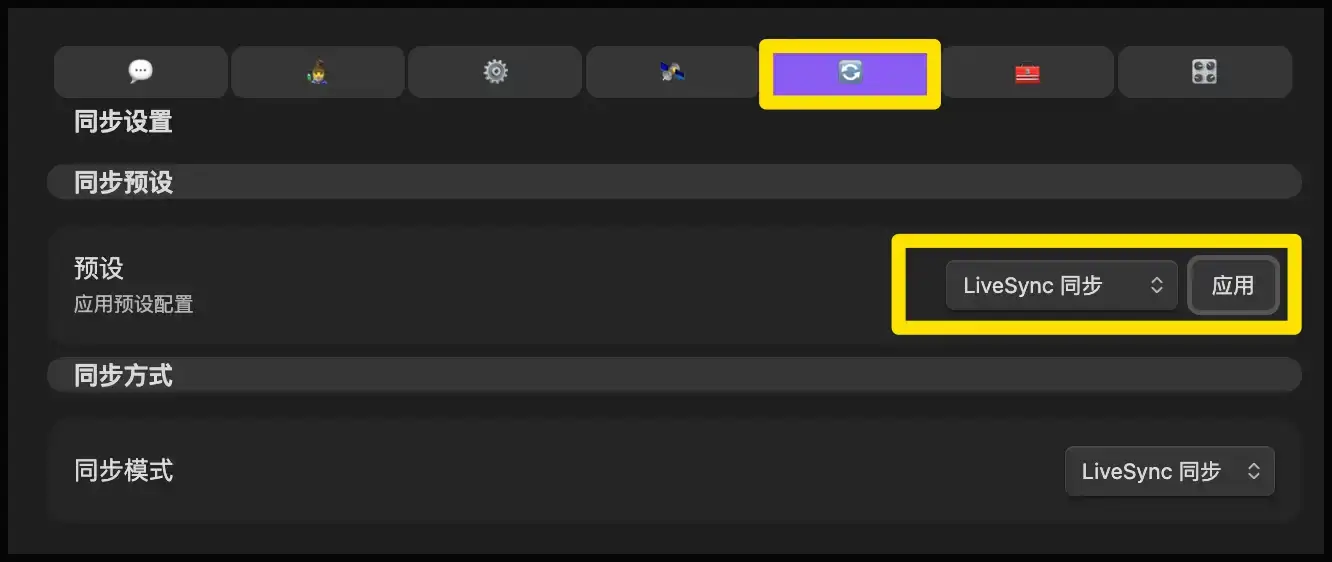
If Windows does not automatically start syncing after joining, open Self-hosted LiveSync settings, go to sync settings, set the sync preset to LiveSync, and click Apply. More troubleshooting steps are in the next section.
Add Android and iPhone
Android and iPhone follow the same logic as Windows. Install and enable Self-hosted LiveSync, choose to join an existing sync setup, and import with a Setup URI or QR code.
I recommend finishing the desktop flow first. After that, use the desktop settings page to copy the Setup URI or show a QR code for the phone.
Syncing plugins and Obsidian settings
The steps above sync your note files. Plugins, themes, hotkeys, and Obsidian settings are not always made identical by normal note sync.
Self-hosted LiveSync has two features that are easy to mix up:
Hidden Files Sync: mainly for hidden files. This is not the main entry for plugin settings sync.Customization Sync: for syncing Obsidian settings, themes, snippets, and plugin configuration.
If you want your iPhone to pick up as much of the desktop plugin setup as possible, configure Customization Sync.
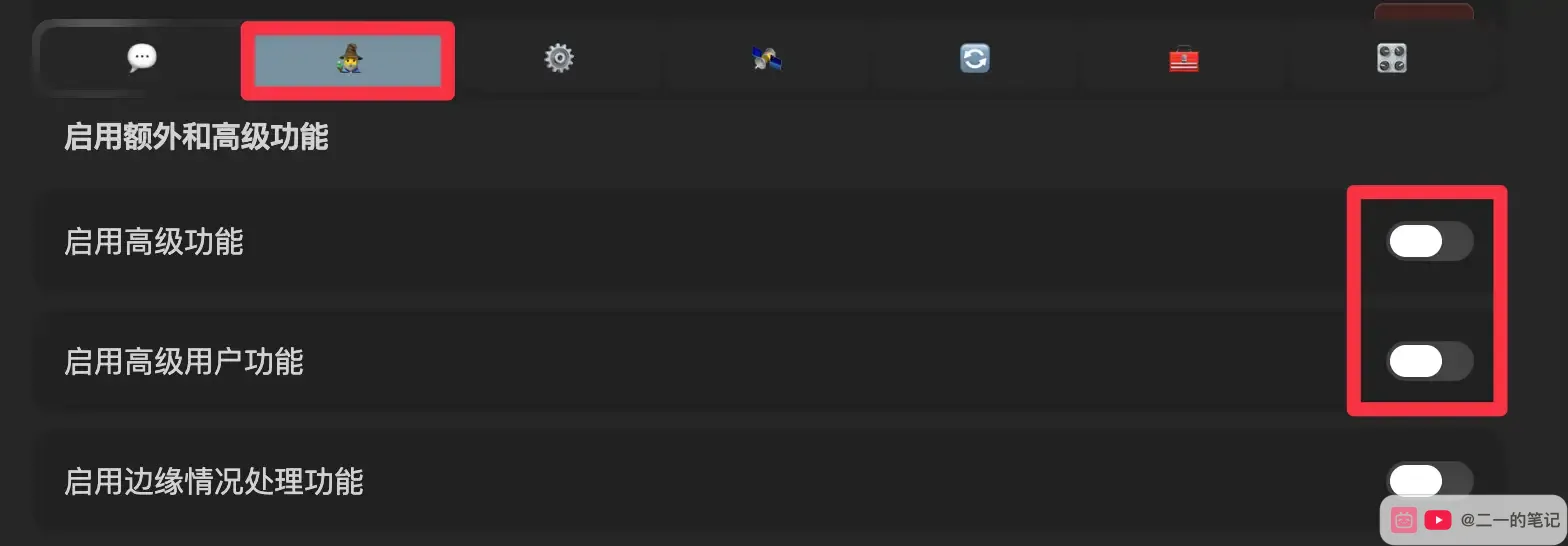
Open the Self-hosted LiveSync settings page, go to the page with the wizard icon, and make sure both advanced options are enabled. Without these switches, some advanced sync entries may not appear.
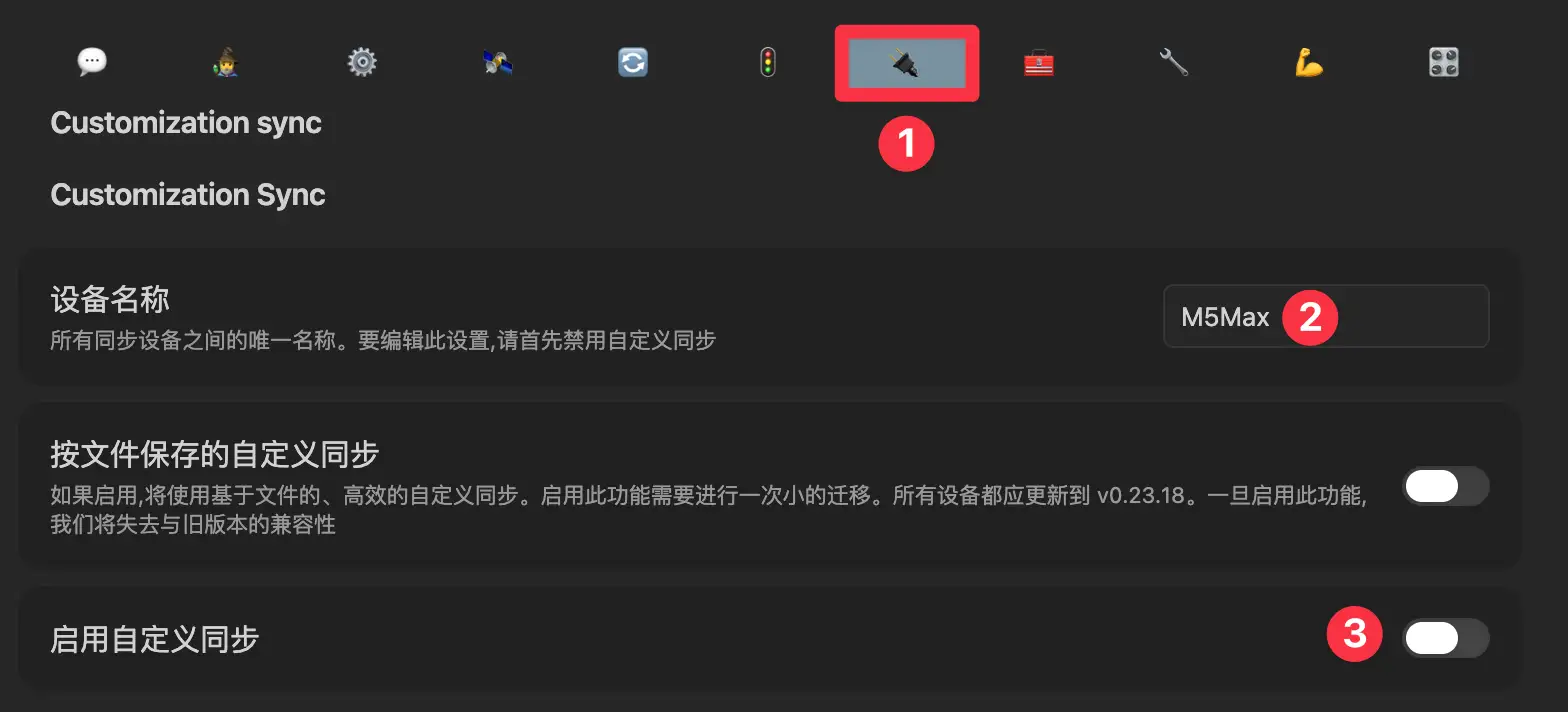
Then switch to the Customization sync page with the plug icon.
Set an easy-to-recognize device name first, such as M5Max, MacBook, or iPhone. This makes it easier to tell which device's settings you are applying later.
Then enable customization sync.
Continue down the page and enable these options:
- scan customizations automatically
- scan customizations periodically
- notify customized settings
Then click Open at the bottom of the page to open the Customization Sync (Beta3) window.

The dialog looks like this. The buttons used below, Scan changes, Sync once, Refresh, Select All Shiny, and Apply All Selected, are visible in this screenshot.
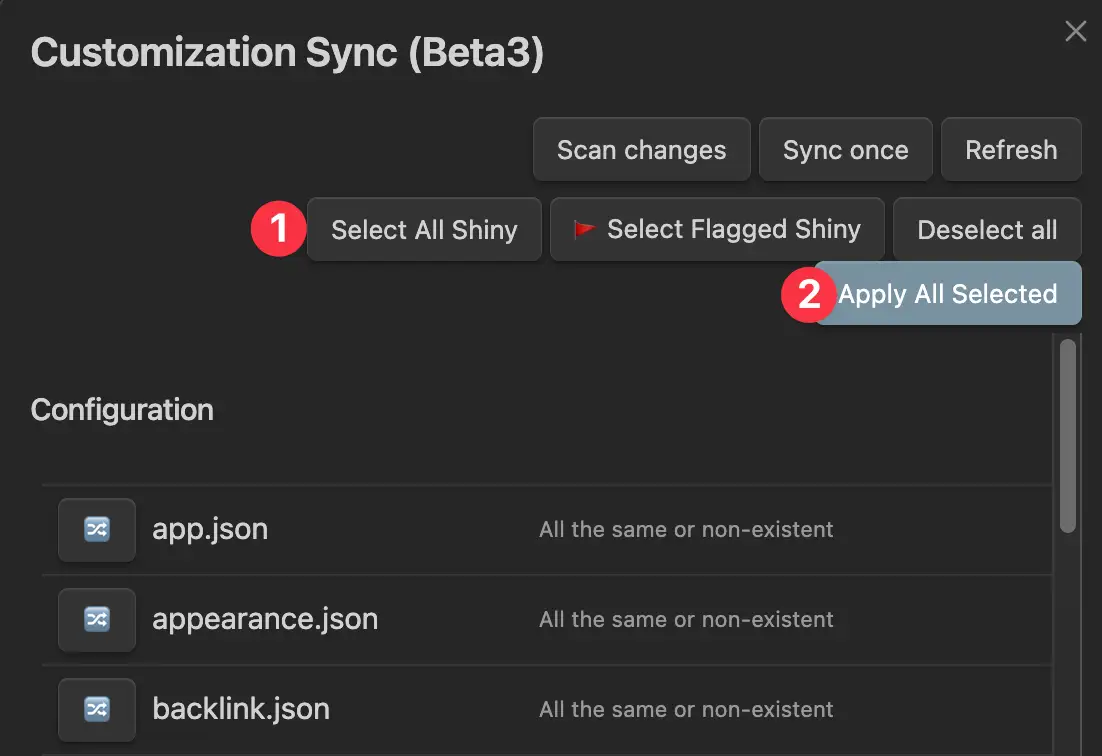
On the first device, usually the Mac or Windows PC that already has the correct setup:
- Click
Scan changes. - After the scan finishes, click
Sync onceto send this device's settings to the remote database. - Wait until the sync status returns to
↑ 0 ↓ 0.
On the second device, such as the iPhone:
- Sync notes once as usual.
- Open the same
Customization Sync (Beta3)window. - Click
Refresh. - Click
Select All Shiny. - Click
Apply All Selected. - Restart Obsidian.
Two points are worth noting.
First, do not confuse plugin settings sync with Hidden Files Sync. If the goal is to sync the plugin list, themes, hotkeys, and plugin data, focus on Customization Sync.
Second, if you have used an action such as Reset Synchronisation on This Device, LiveSync may temporarily disable Customization Sync. After the reset, come back here, enable customization sync again, then run Scan changes and Sync once again.
Troubleshooting sync failures
If a device joins successfully but does not sync, do not reset the database immediately.
The most common reason is that different devices use different sync presets. On every platform, set the sync preset to LiveSync and click Apply.
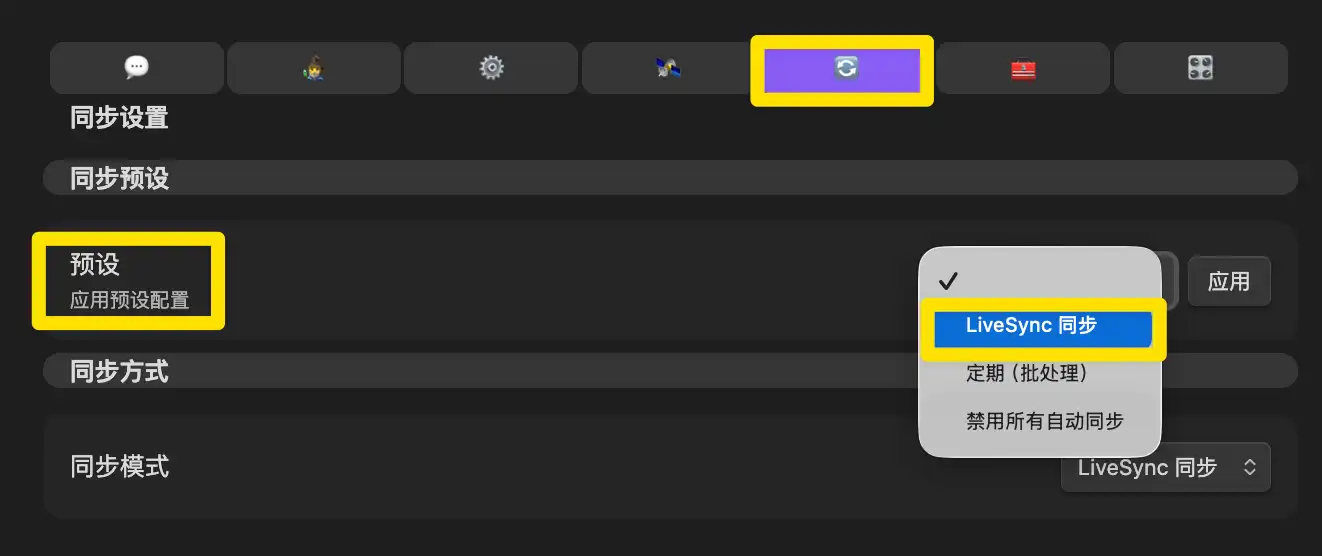
If it still does not sync, check these items in order:
- The current device can open the CouchDB address, for example
http://your Feiniu LAN IP:5984. - The database name, username, and password match the first device.
- The end-to-end encryption passphrase matches.
- The vault is not also being changed by iCloud, OneDrive, Jianguoyun, or another sync tool.
- The LiveSync log does not show network, authentication, CORS, or conflict errors.
Before using actions such as Reset, Overwrite, or Fetch, back up the entire vault folder. The principle is simple: the first device writes current data to the server, and later devices fetch from the server. If you are unsure, back up first and choose the more cautious conflict-checking option.
Public-network sync
At the moment, Feiniu does not provide a unified gateway for Docker apps, so this tutorial does not cover public-network sync for this CouchDB container yet. I will update this part when the platform supports a cleaner path.
Conclusion
The biggest advantage of this setup is low-latency sync. LiveSync only syncs changed chunks, so daily writing usually feels instant. With end-to-end encryption and your own NAS, the data stays under your control. CouchDB also handles multi-device conflicts better than ordinary cloud-drive sync. Simple conflicts can be merged, and complex conflicts are preserved for review.
The tradeoff is setup complexity. The most common failure points are Docker storage mappings, the CouchDB config file, ports, HTTP and HTTPS, encryption passphrases, and choosing the wrong sync direction when adding more devices.
LiveSync databases can also grow over time. Deleting files from the vault does not always immediately shrink CouchDB storage, because existing chunks may still be used for history, conflicts, or reuse by other files.
If you often delete, rename, or move many files, the database can grow more noticeably. To reduce it, the more reliable path is a LiveSync rebuild, where the plugin rebuilds local and remote sync databases from the current vault files.
The official docs mention Rebuild everything, and also special files such as redflag2.md or flag_rebuild.md placed at the vault root before restarting Obsidian.
Only do this after all devices have synced and after backing up the vault, because it rebuilds the sync relationship and may use more time and bandwidth.
If you want an easier sync setup, Remotely Save, Feiniu WebDAV + Remotely Save, or Obsidian Sync is simpler. LiveSync is better for people who want self-hosting, want their data on their own NAS, and can accept the troubleshooting cost.
Remotely Save, Git, Syncthing, and LiveSync solve different problems. Remotely Save fits people who want to connect Obsidian to remote storage quickly. Git fits people who care about history and rollback. Syncthing fits people who are willing to maintain peer-to-peer sync. LiveSync is a better fit when you already have a NAS or server and want Obsidian sync to feel more timely and continuous across devices.
My recommendation is to first get one Mac and one Windows PC syncing on the local network. After that is stable, consider mobile and public access. Do not connect every device, plugin config, and hidden file at once at the beginning. If something breaks, it will be much harder to know where the problem came from.
Whichever sync method you settle on, once your vault syncs across devices you can follow the FLO.W Obsidian template install guide to give that vault a ready-made structure for projects, tasks, and notes.
More Posts
Obsidian 的三个问题|模板开发日志(二)
吉祥物、囤积癖、热衷表演

Obsidian 模板开发日志(一):下定决心
这篇开发日志记录我为什么开始认真开发 FLO.W Obsidian 模板,以及我对 Notion、AI 时代笔记价值和 Obsidian 模板设计的重新思考。
Obsidian OneDrive Sync Tutorial: Use Remotely Save for Multi-device Sync
This tutorial uses the Remotely Save plugin with OneDrive Personal to sync an Obsidian vault across Mac, Windows, iPhone, and Android.