Obsidian Syncthing Sync Tutorial: Sync Mac, Windows, Android, And iPhone
Obsidian Syncthing sync tutorial: use Syncthing and Syncthing-Fork to sync across Mac, Windows, Android and iPhone, covering folder IDs, pairing and sharing.
When To Use This
If you want to sync Obsidian across Mac, Windows, Android, and iPhone without subscribing to Obsidian Sync, Syncthing is worth considering.
Syncthing works by installing a sync client on every device, then adding the same Obsidian Vault to the sync group. Files mainly move between your own devices instead of being stored in a third-party cloud drive.
The guide starts from Mac, then connects Windows, Android, and iPhone. Before doing this with your real vault, back it up first, especially the first time you connect multiple devices to the same vault.
Mac Setup
- Syncthing download page
- If the official download is slow, you can use my backup download package
Install Syncthing on Mac first. After installation, it appears in the menu bar. Click the menu bar icon and open the management page.
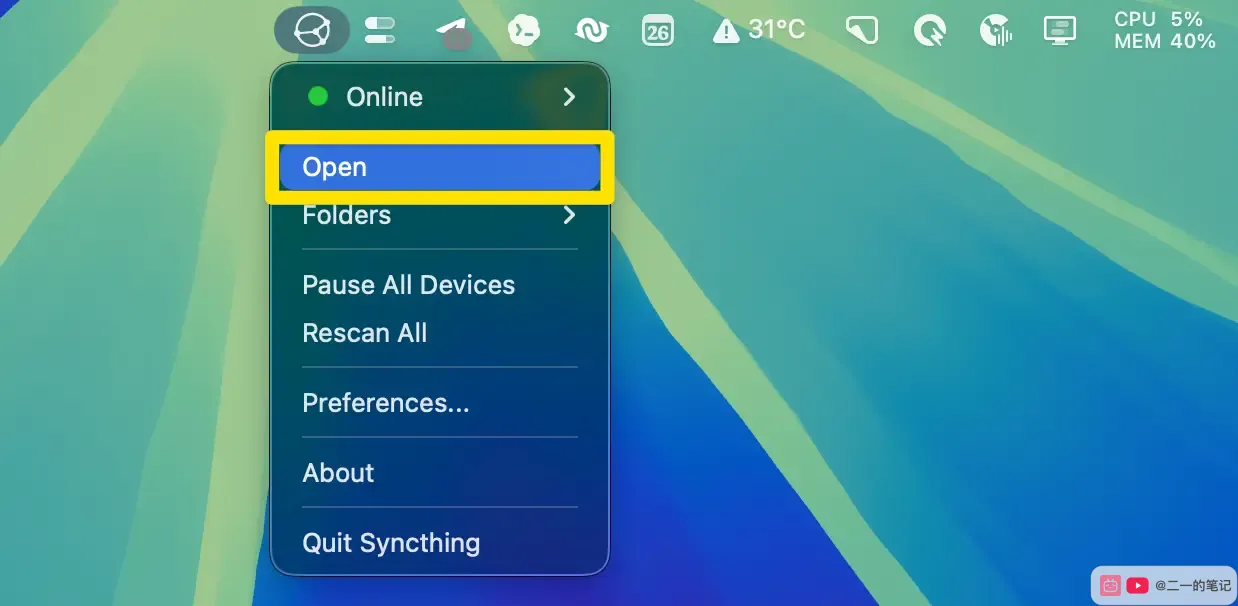
The Syncthing management UI opens in the browser. If it does not open automatically, visit:
On first launch, Syncthing may ask you to set a username and password for the web UI. This only protects the Syncthing management page. You can close it first and come back later after the sync setup is done.
Next, add your Obsidian vault on Mac to Syncthing.
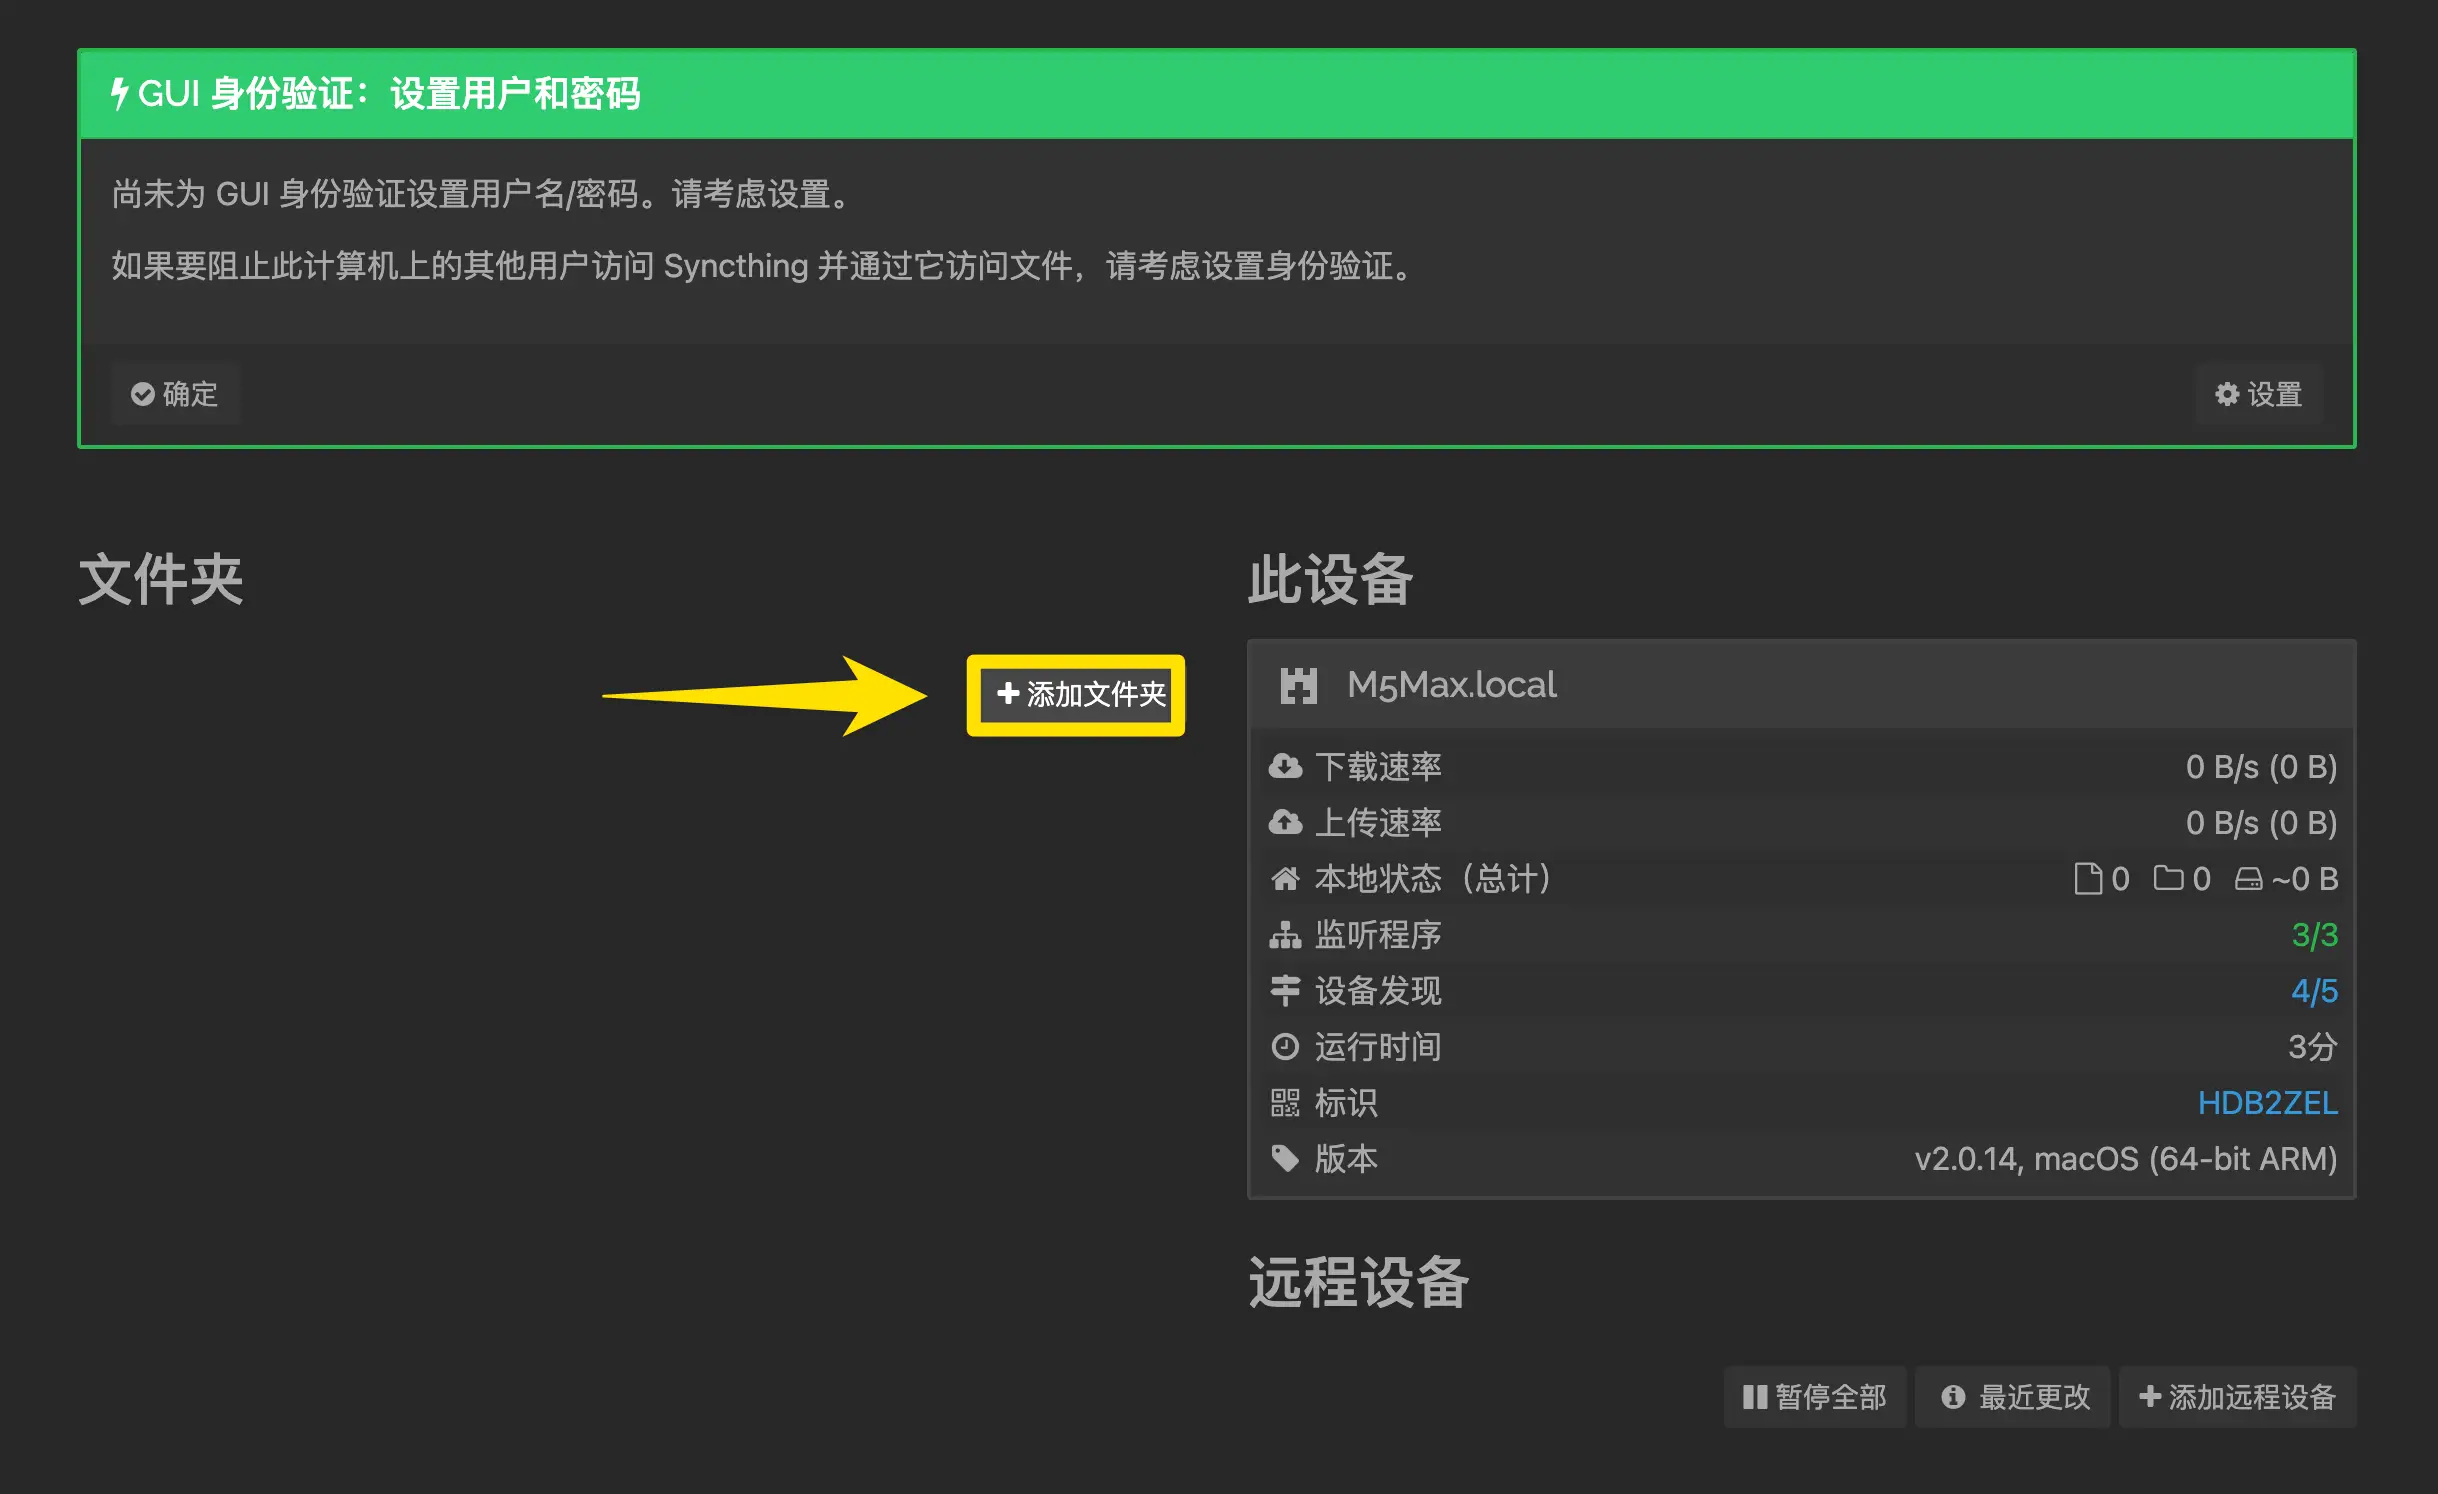
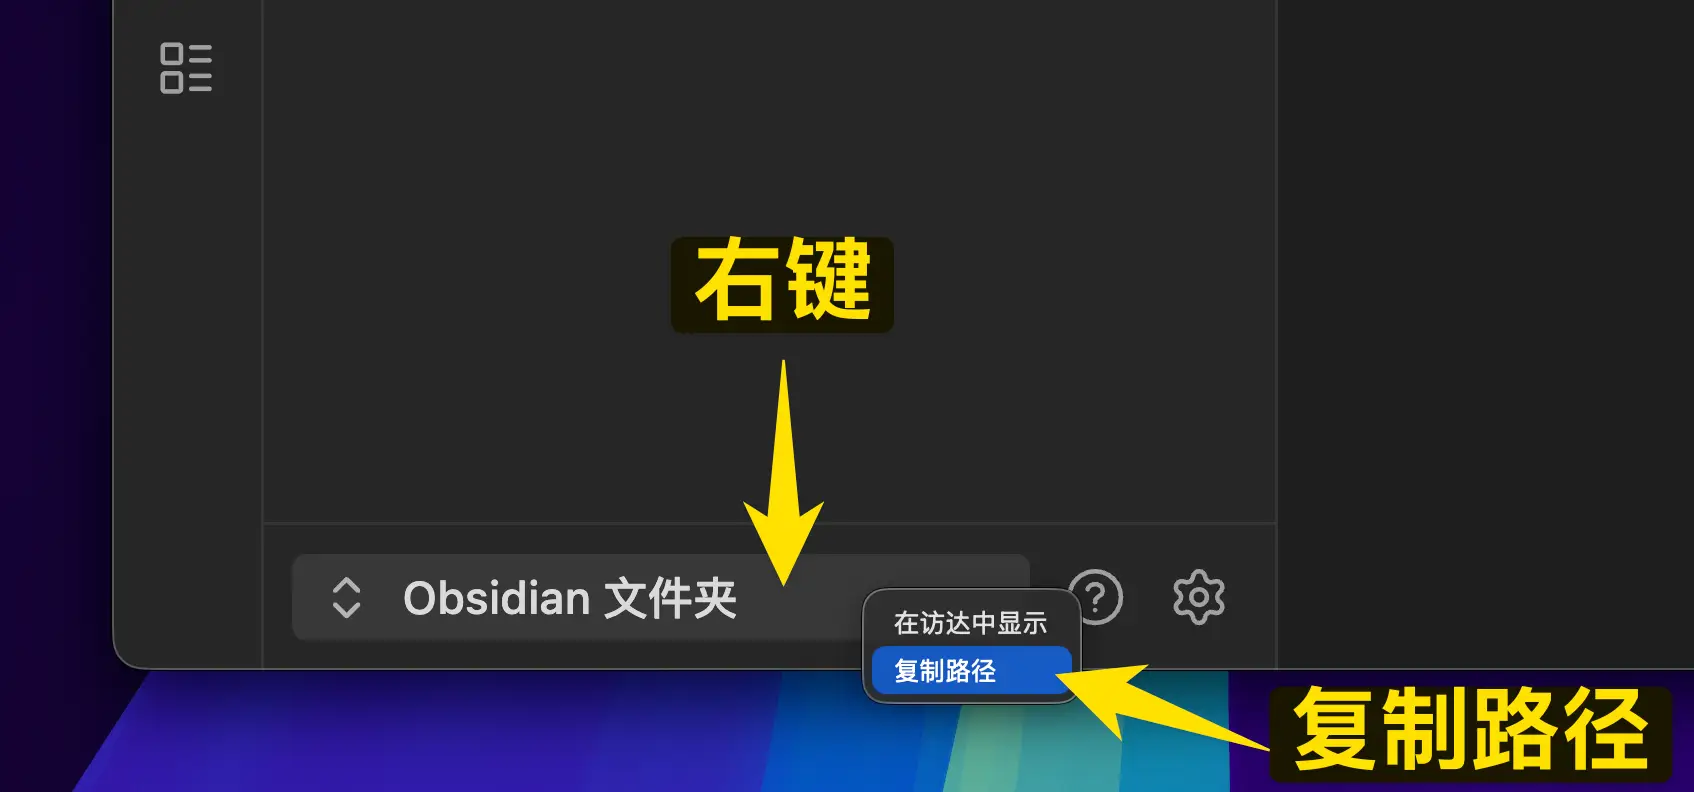
Before adding the folder, go back to Obsidian and copy the current vault path. This path should point to the vault root, the folder where .obsidian is located.
Back in Syncthing, set the folder label to something like Mac, then paste the Obsidian vault path into the folder path field.
The key field is “Folder ID”. It identifies this sync folder, and Windows, Android, and iPhone must use the same ID later. Your ID does not need to match my tg25k-fz2ys, but your own devices must use the same one. Save after confirming the label, ID, and path.

Mac is now ready. Do not test yet. Next, create the matching sync folder on Windows.
Windows Setup
- Syncthing download page
- You can also use my backup download package
Install the Windows version with the default options. After installation, the browser opens the local management page:
If the browser says the connection is not secure, open the advanced option. 127.0.0.1 is this Windows computer itself, so the certificate warning does not affect the setup.

Continue to the local management page.

Create a folder in Windows File Explorer for the Obsidian vault, then copy its path. This folder can be empty for now. It will receive content from Mac later.

Back in Syncthing, add a new sync folder.
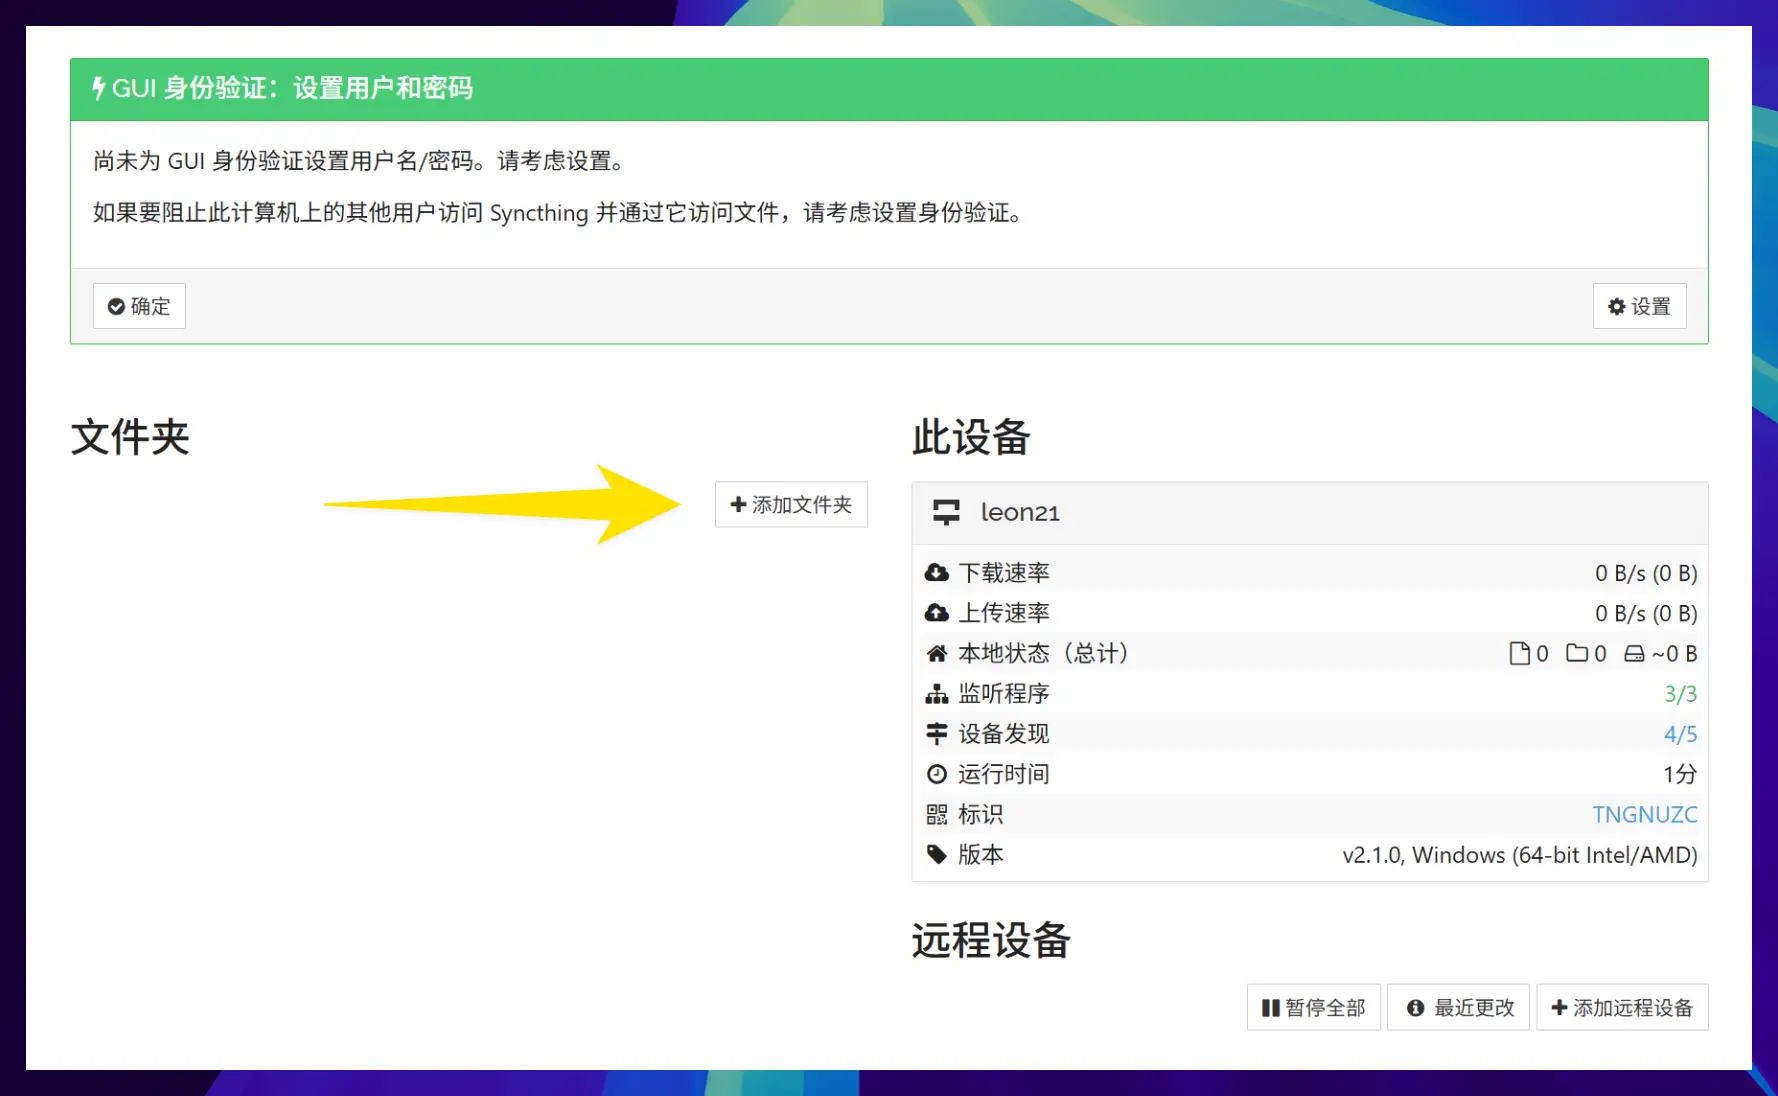
Set the folder label to Windows. The folder ID must be the same as the one on Mac, for example tg25k-fz2ys. Paste the Windows folder path, then save.

Both computers now know which local folder should be synced. Next, connect Mac and Windows.
Connect Mac And Windows
First, copy the device ID on Mac. The device ID lets another computer find it. You will paste it into “Add Remote Device” on Windows.
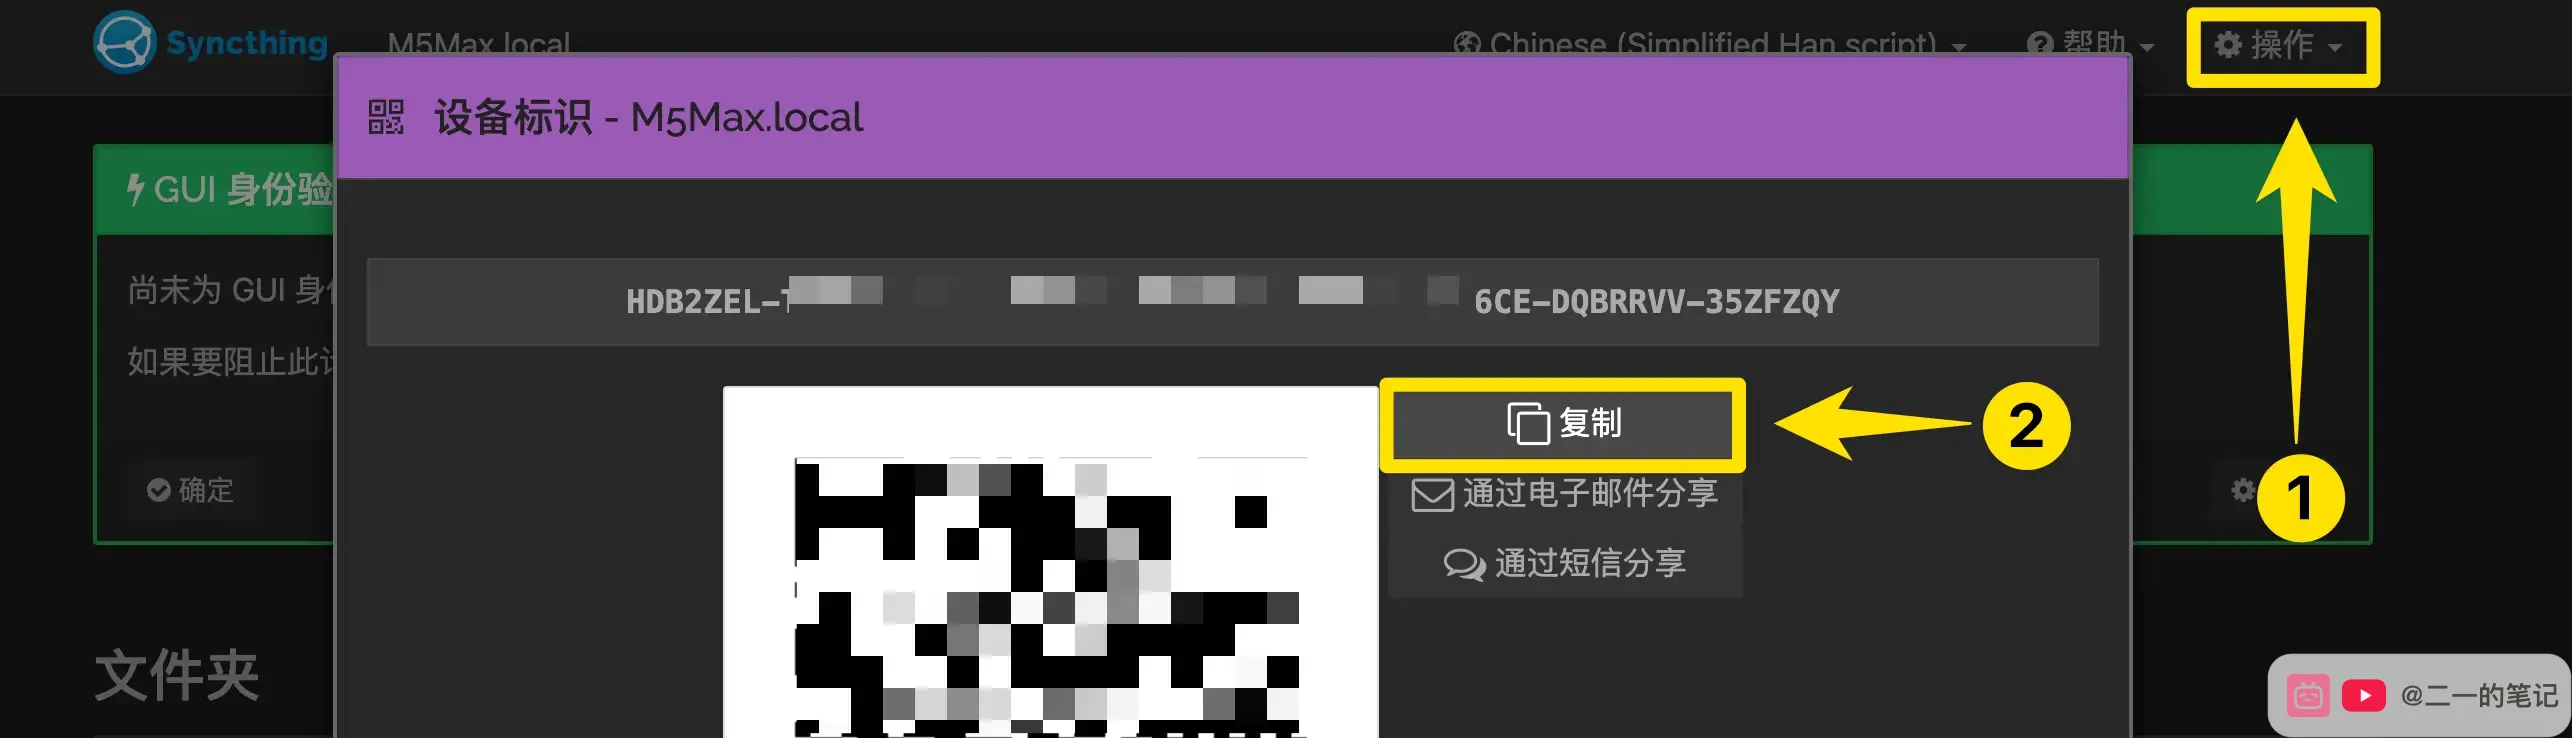
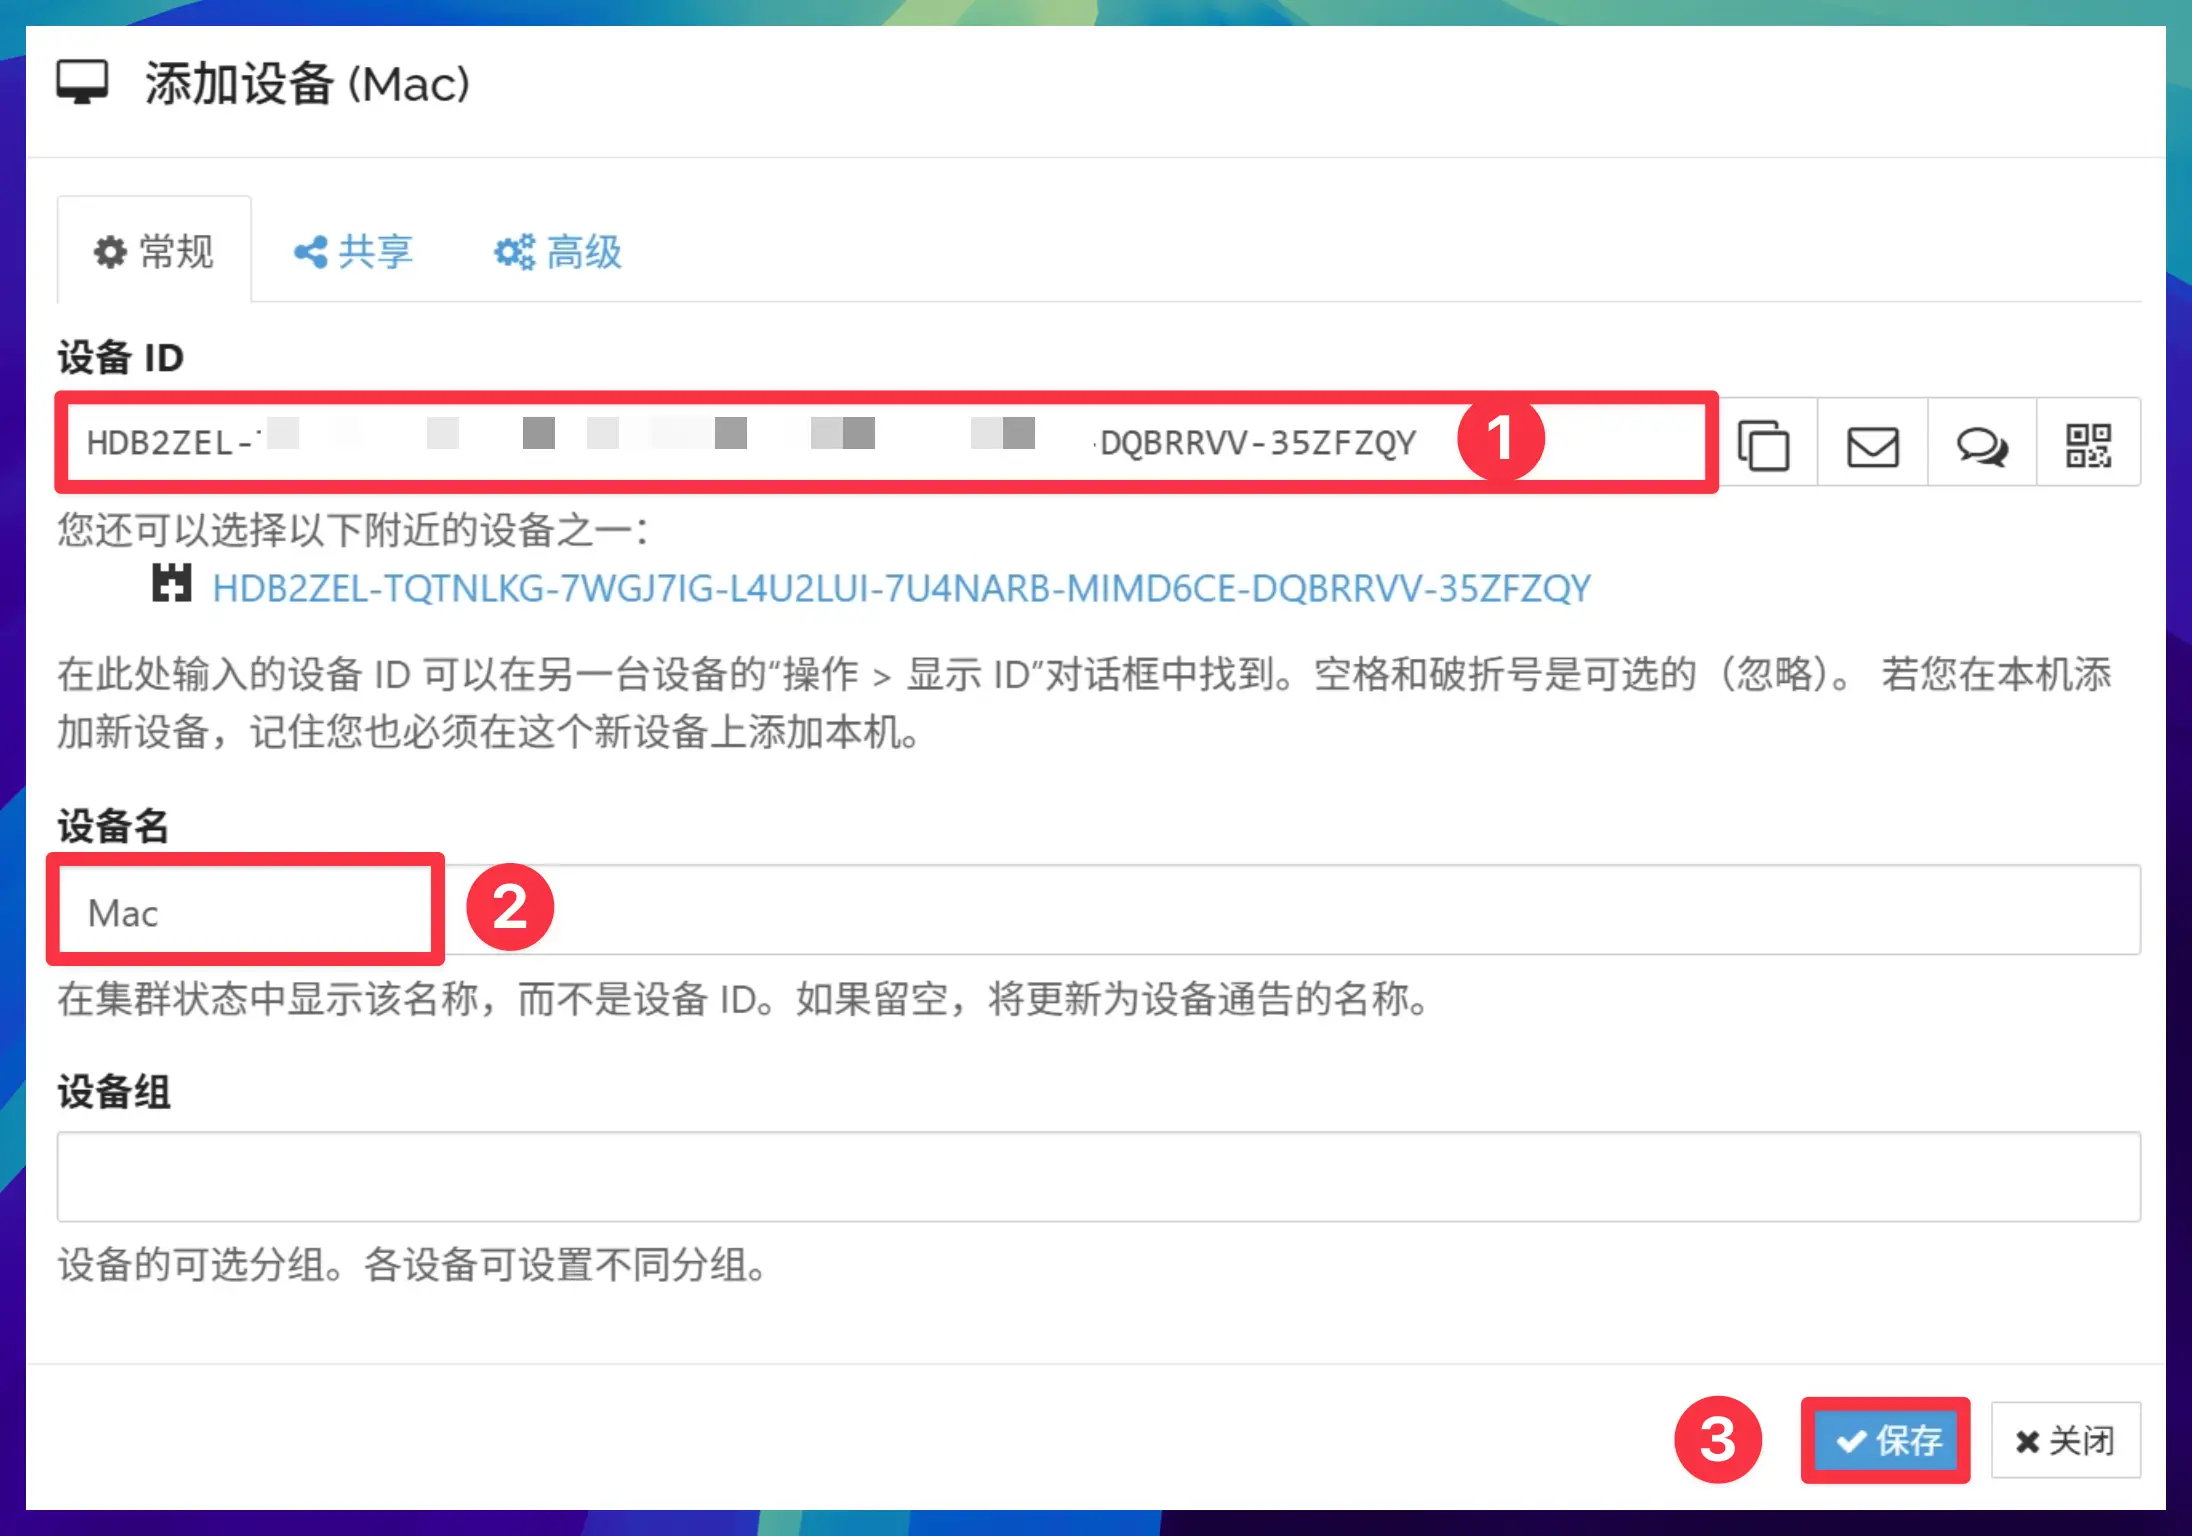
On Windows, add a remote device. Paste the Mac device ID, set the device name to Mac, then save.
After Windows sends the request, Mac will show a new device prompt. Accept Windows here. Otherwise, the two devices are not actually connected yet.

After the devices are connected, Windows still needs to accept the folder shared by Mac. Click share so Windows can start receiving this Obsidian vault.

Wait for a moment, then open the Windows sync folder. If you can see .obsidian, it means the Obsidian configuration came over together with the notes.
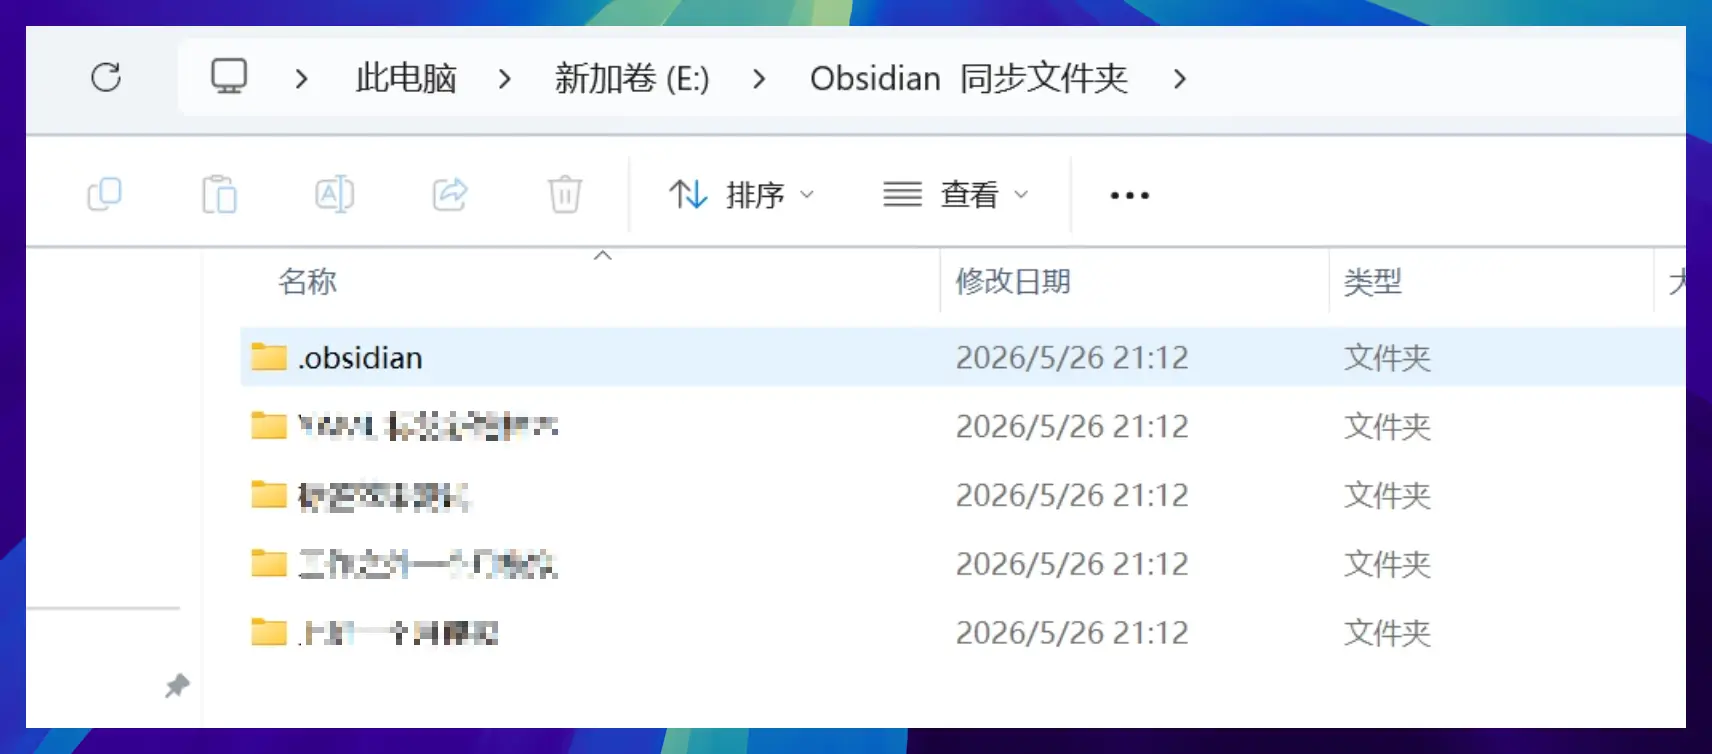
Finally, test it: create a test note in Obsidian on Mac, wait a few seconds, then check whether it appears in the Windows folder. If it appears, Mac and Windows sync is working.
Sync To Android
On Android, use Syncthing-Fork.
- Syncthing-Fork download page
- You can also use my backup download package
Android mainly needs two permissions: file access and background running. If the installer shows a security warning, continue installing. On first launch, grant storage permission, then set the battery policy to “Unrestricted”. Otherwise, Syncthing-Fork may be killed in the background, causing unstable sync.
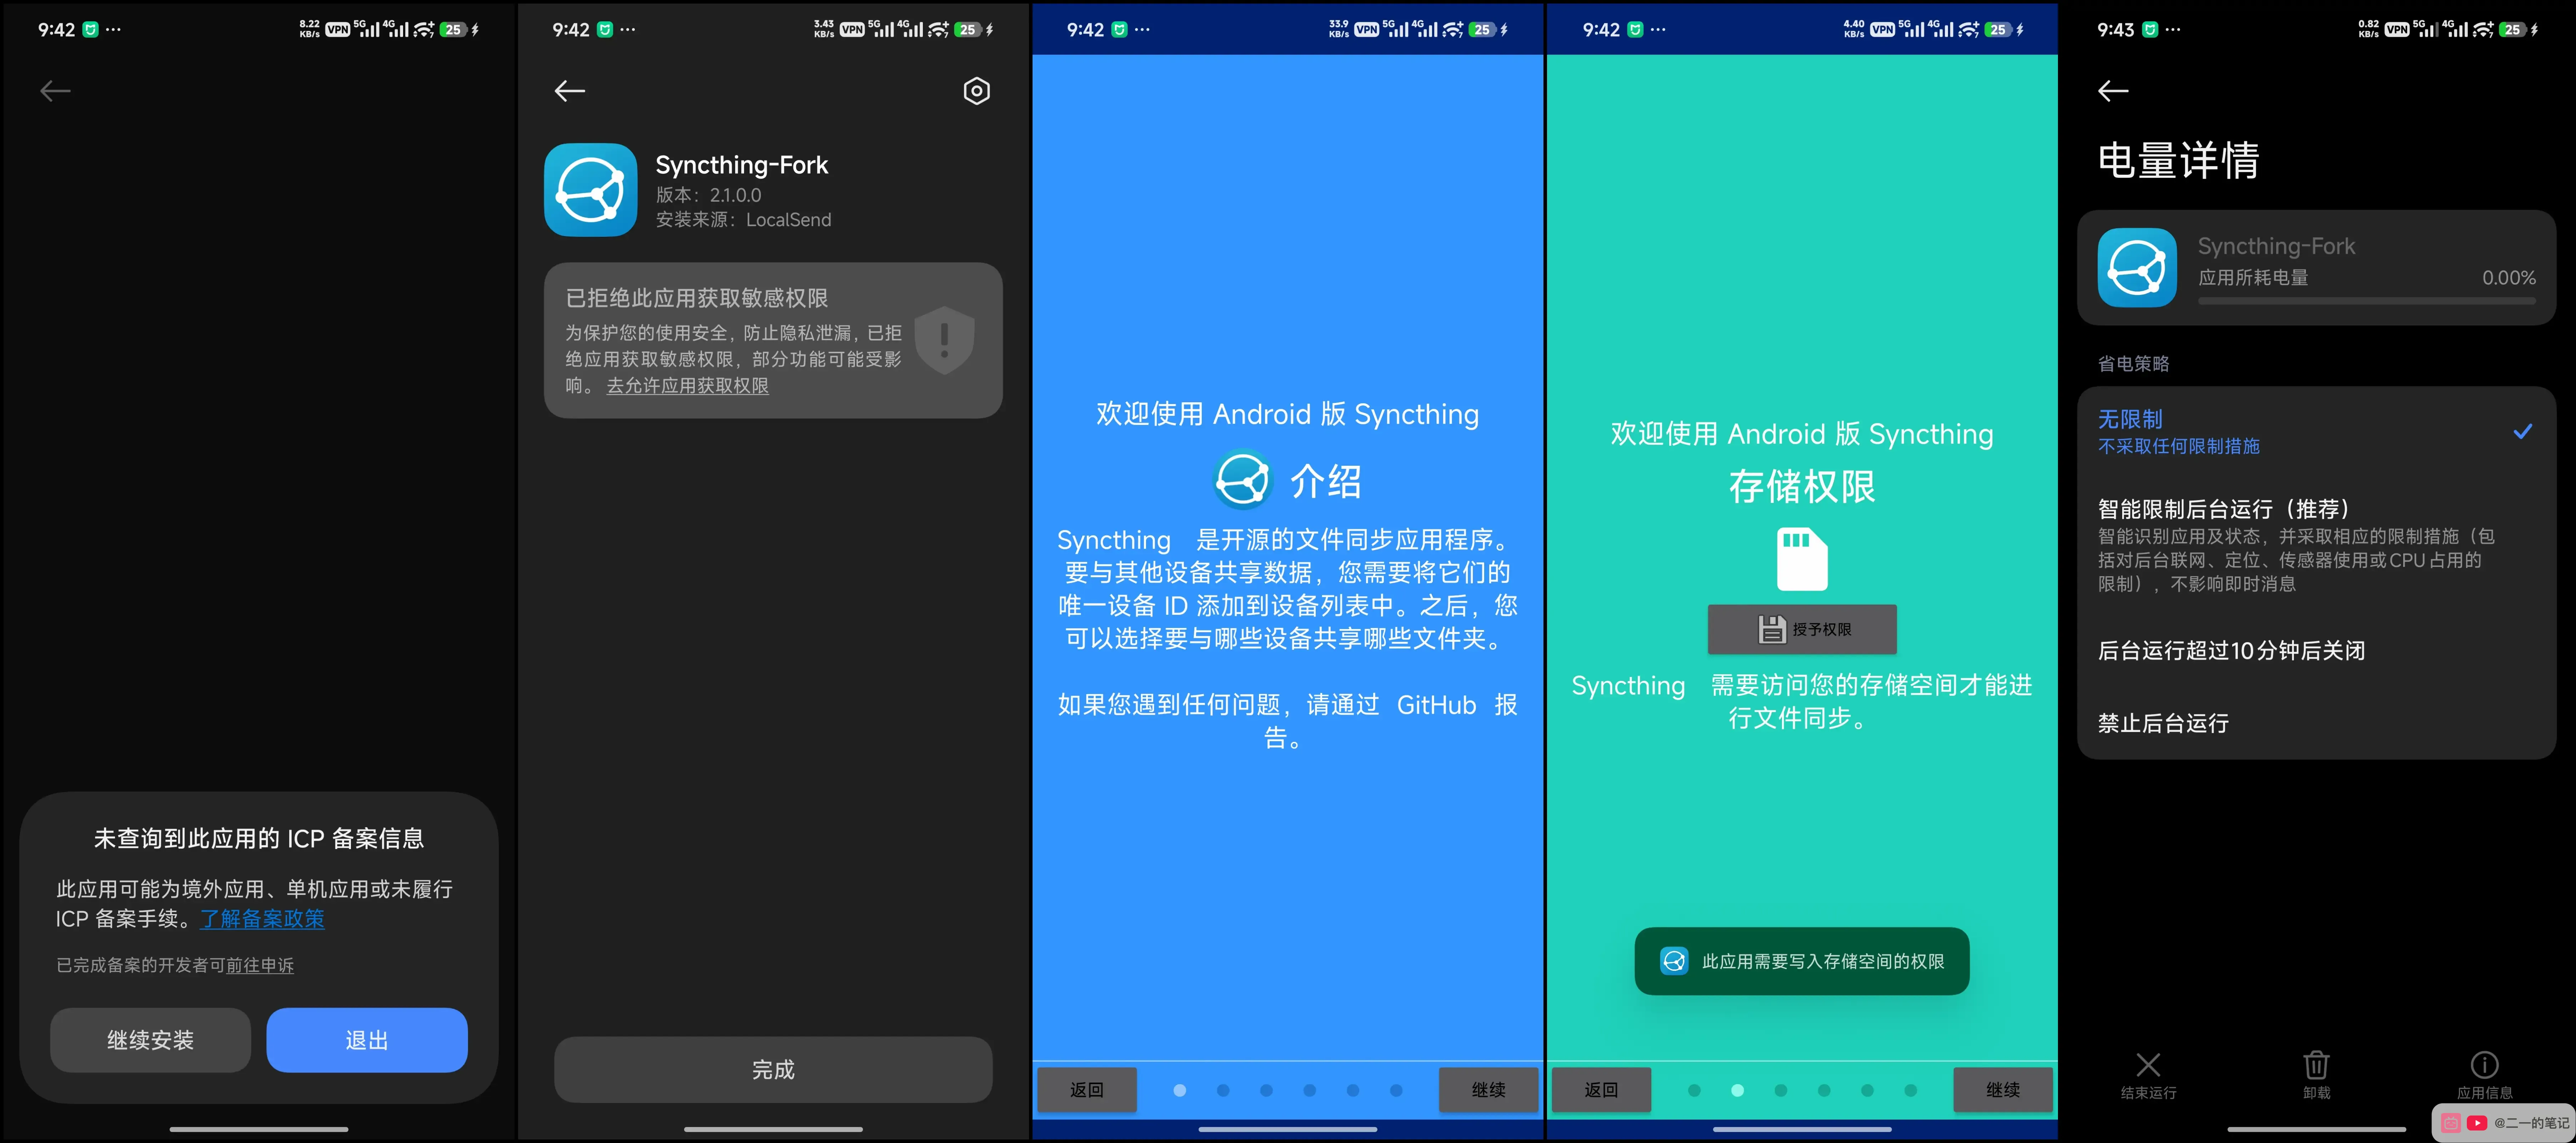
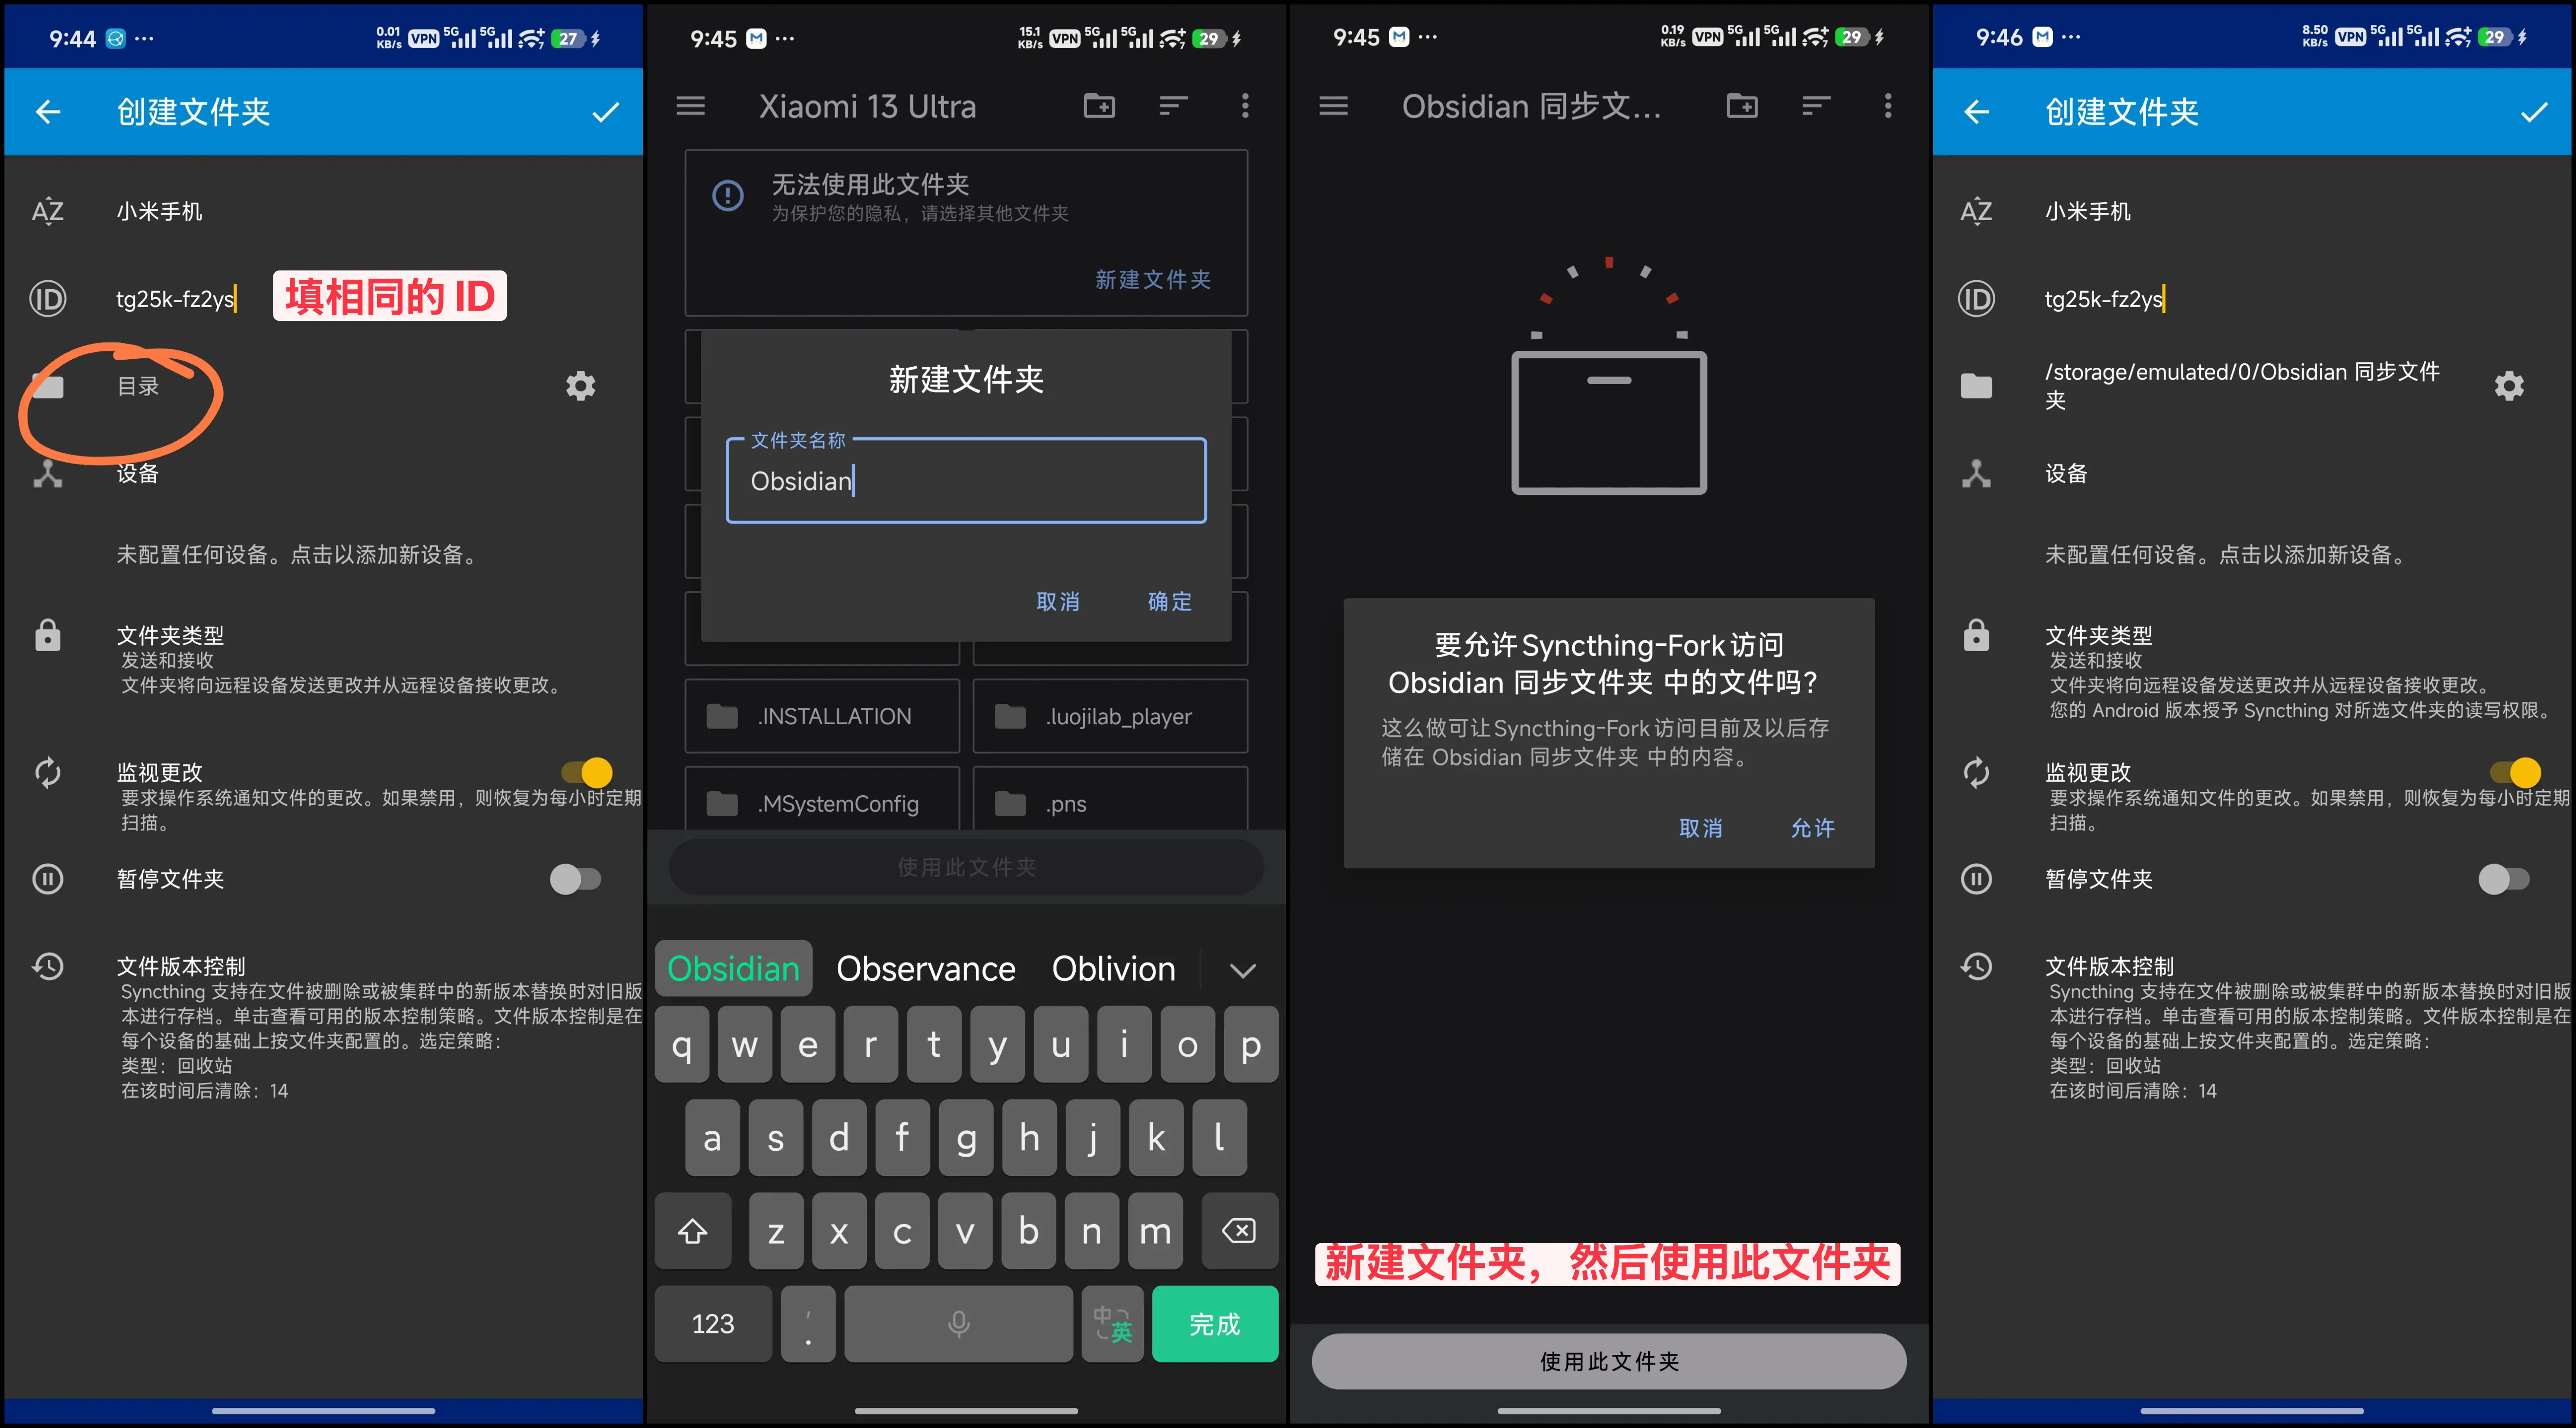
Next, create a sync folder on the phone. The folder name can be “Xiaomi phone” or “Obsidian sync folder”, but the folder ID must still be the same one, for example tg25k-fz2ys.
Choose a local folder on the phone. You can create a dedicated folder for the Obsidian vault. After selecting it, Android will ask whether to allow access to this folder. Allow it, then confirm that the directory becomes the real phone path and save.
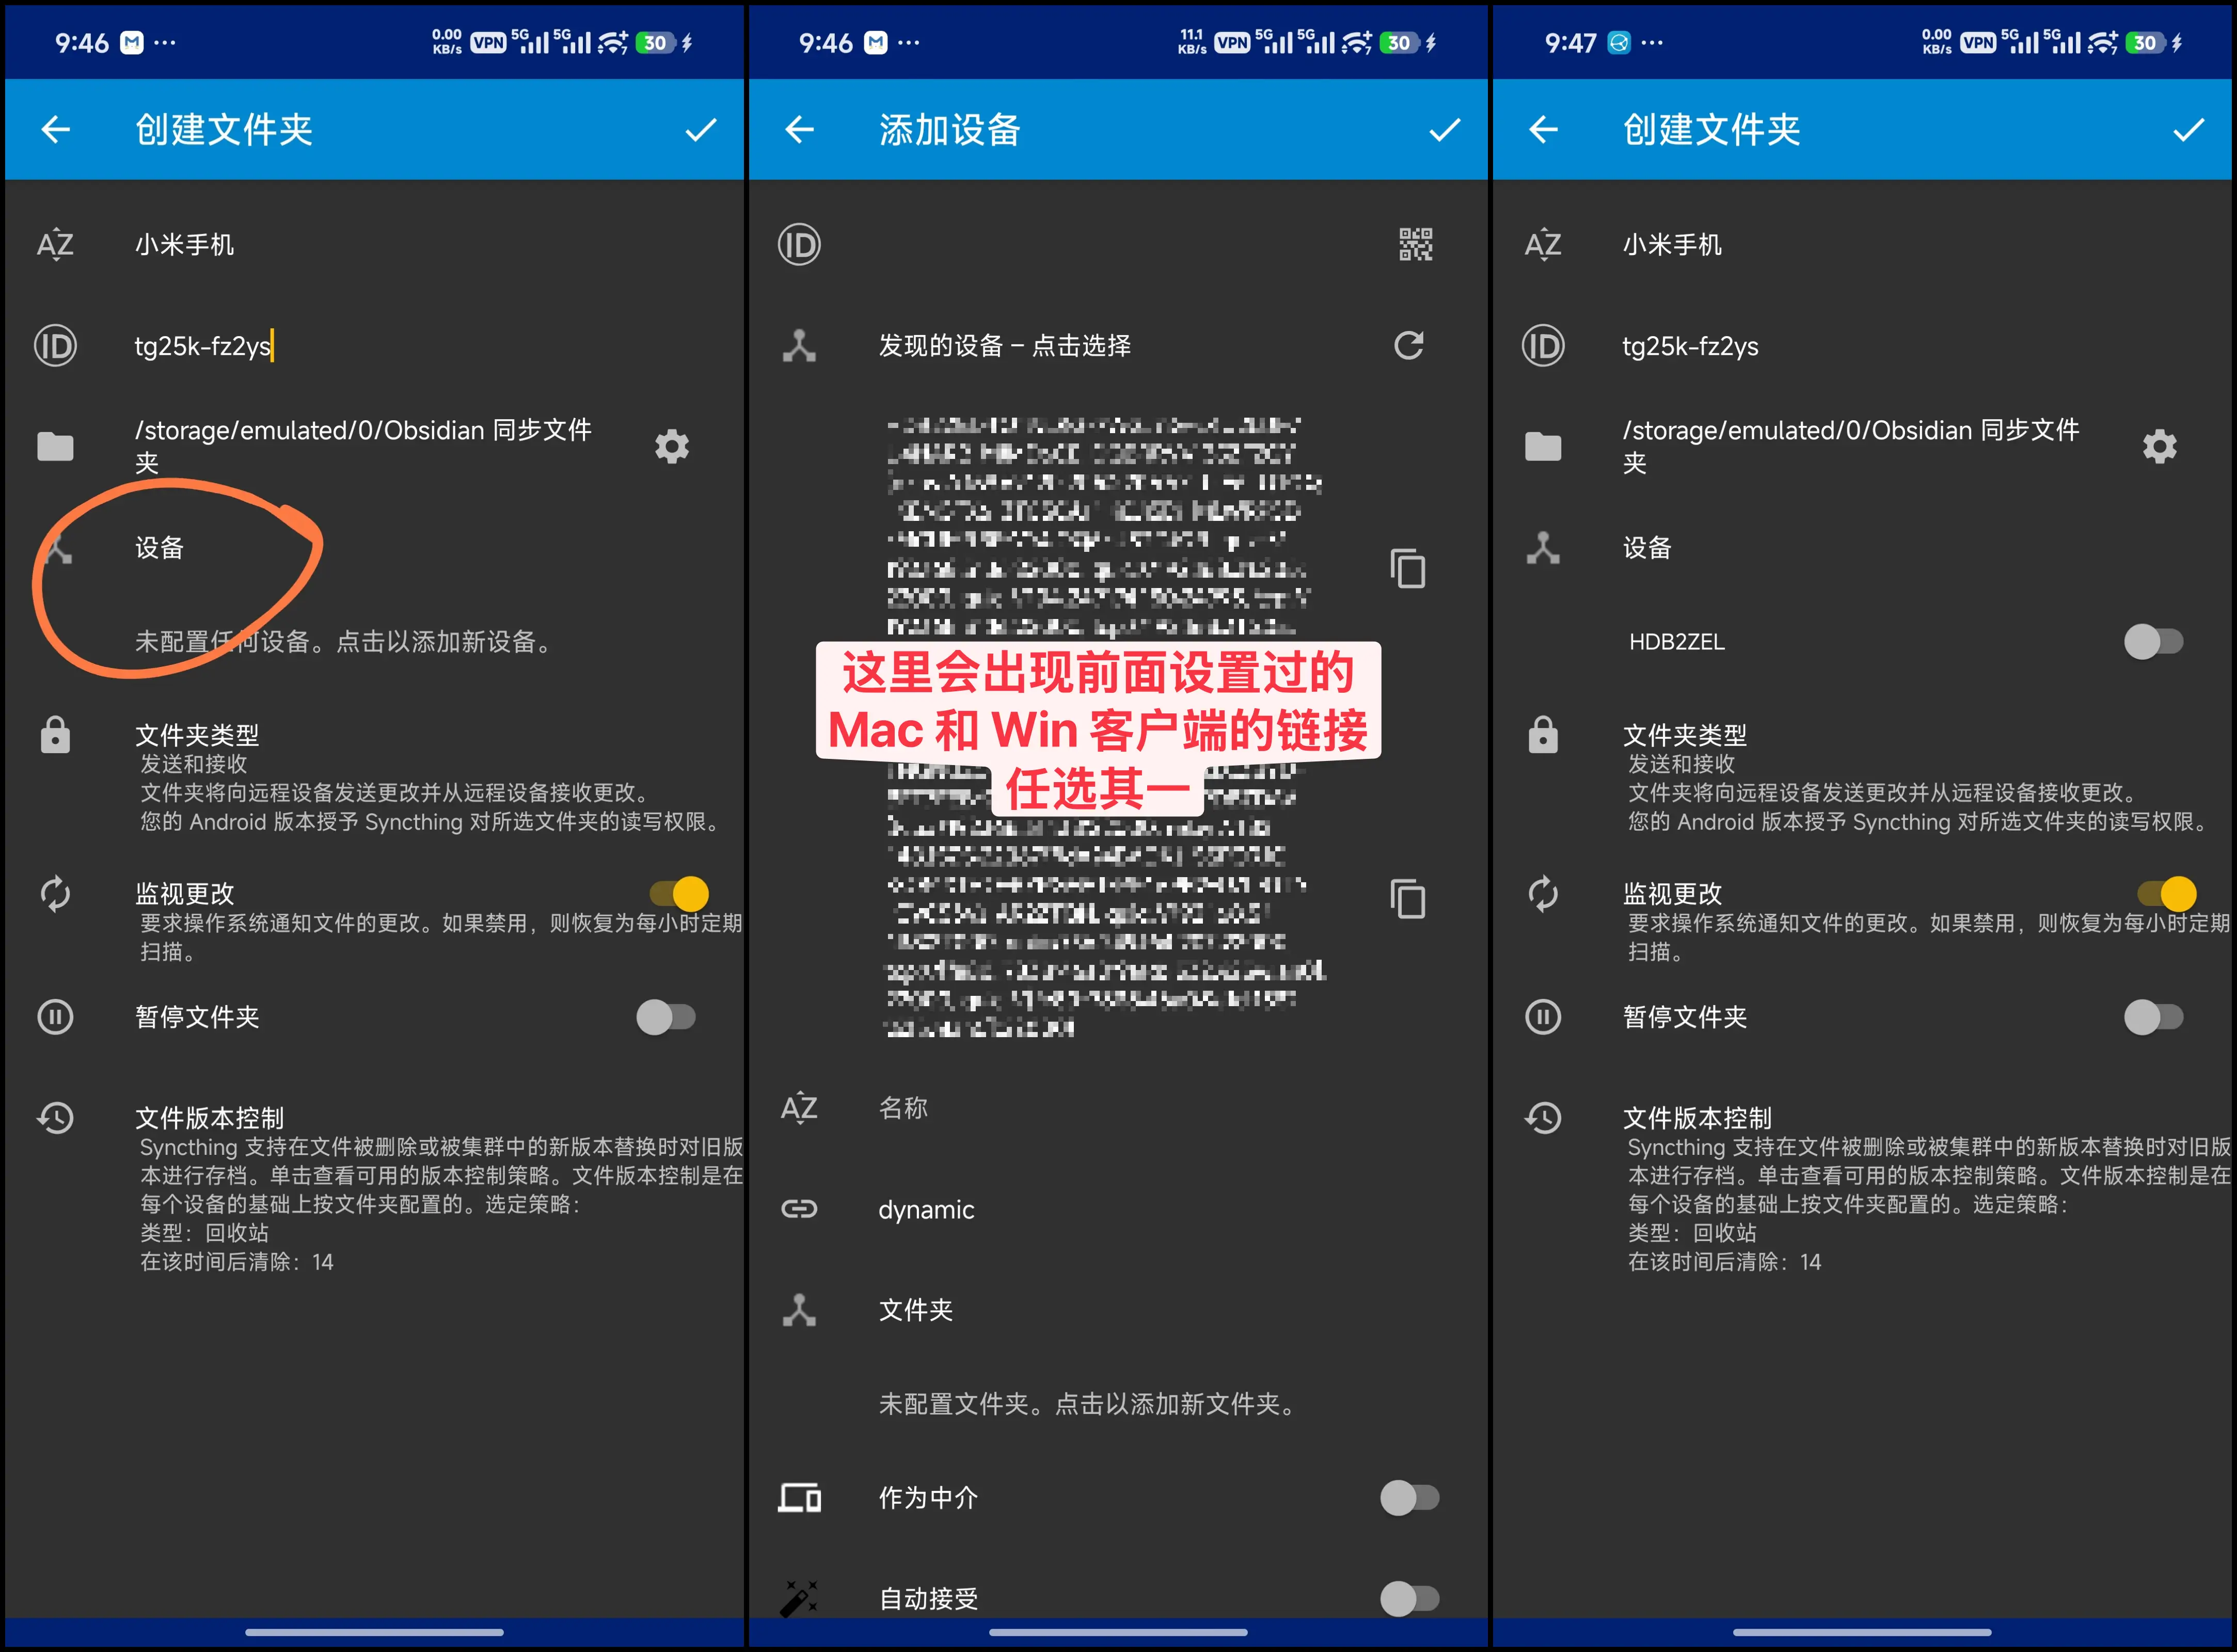
After saving the phone folder, choose which computer it should sync with. I recommend selecting only Mac first. Once Mac and the phone are stable, you can decide whether the phone should also connect directly to Windows. This makes troubleshooting easier.
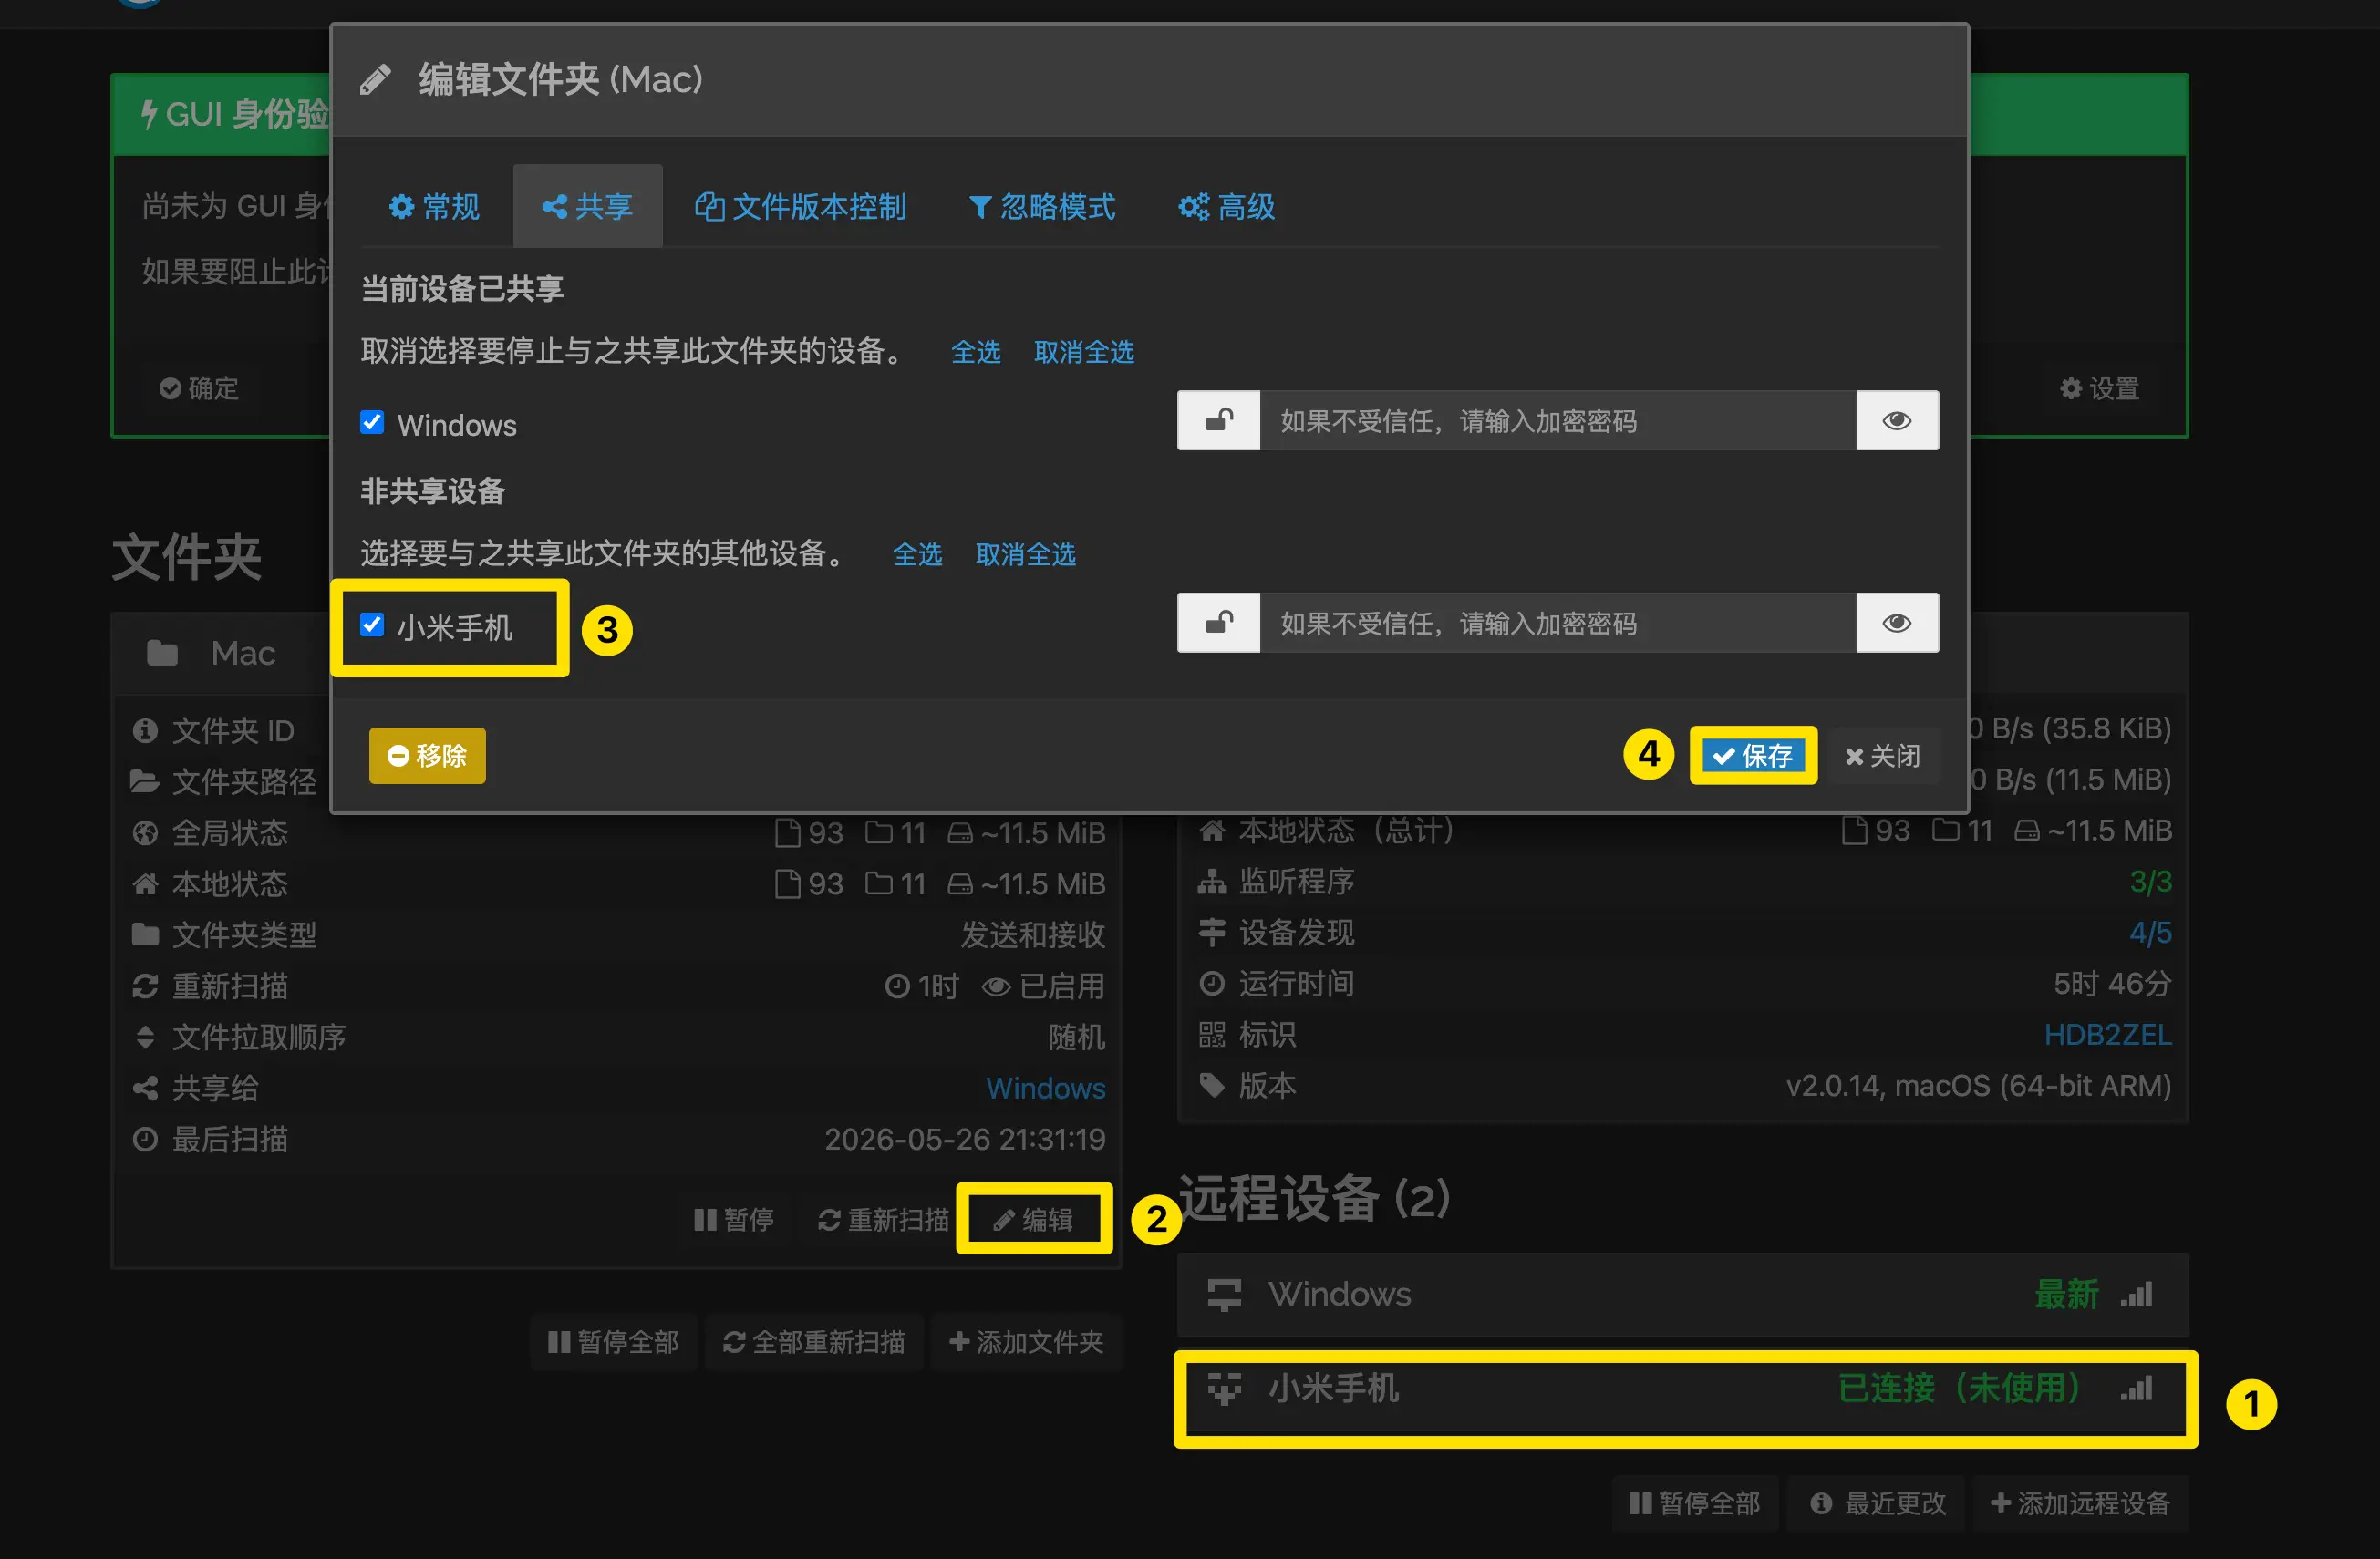
After the phone sends a connection request, Mac will show a new device prompt. Confirm that it is your phone and add it.

Adding the device is only the first step. You also need to share the Obsidian folder on Mac with this phone. Open the edit page for the sync folder on Mac, enable sharing with the phone, then save.
Back on the phone, wait for sync to finish. When the folder status becomes “Up to Date” and the file count and size look right, the phone has the vault. If nothing happens, first check whether this phone folder has the Mac device enabled.
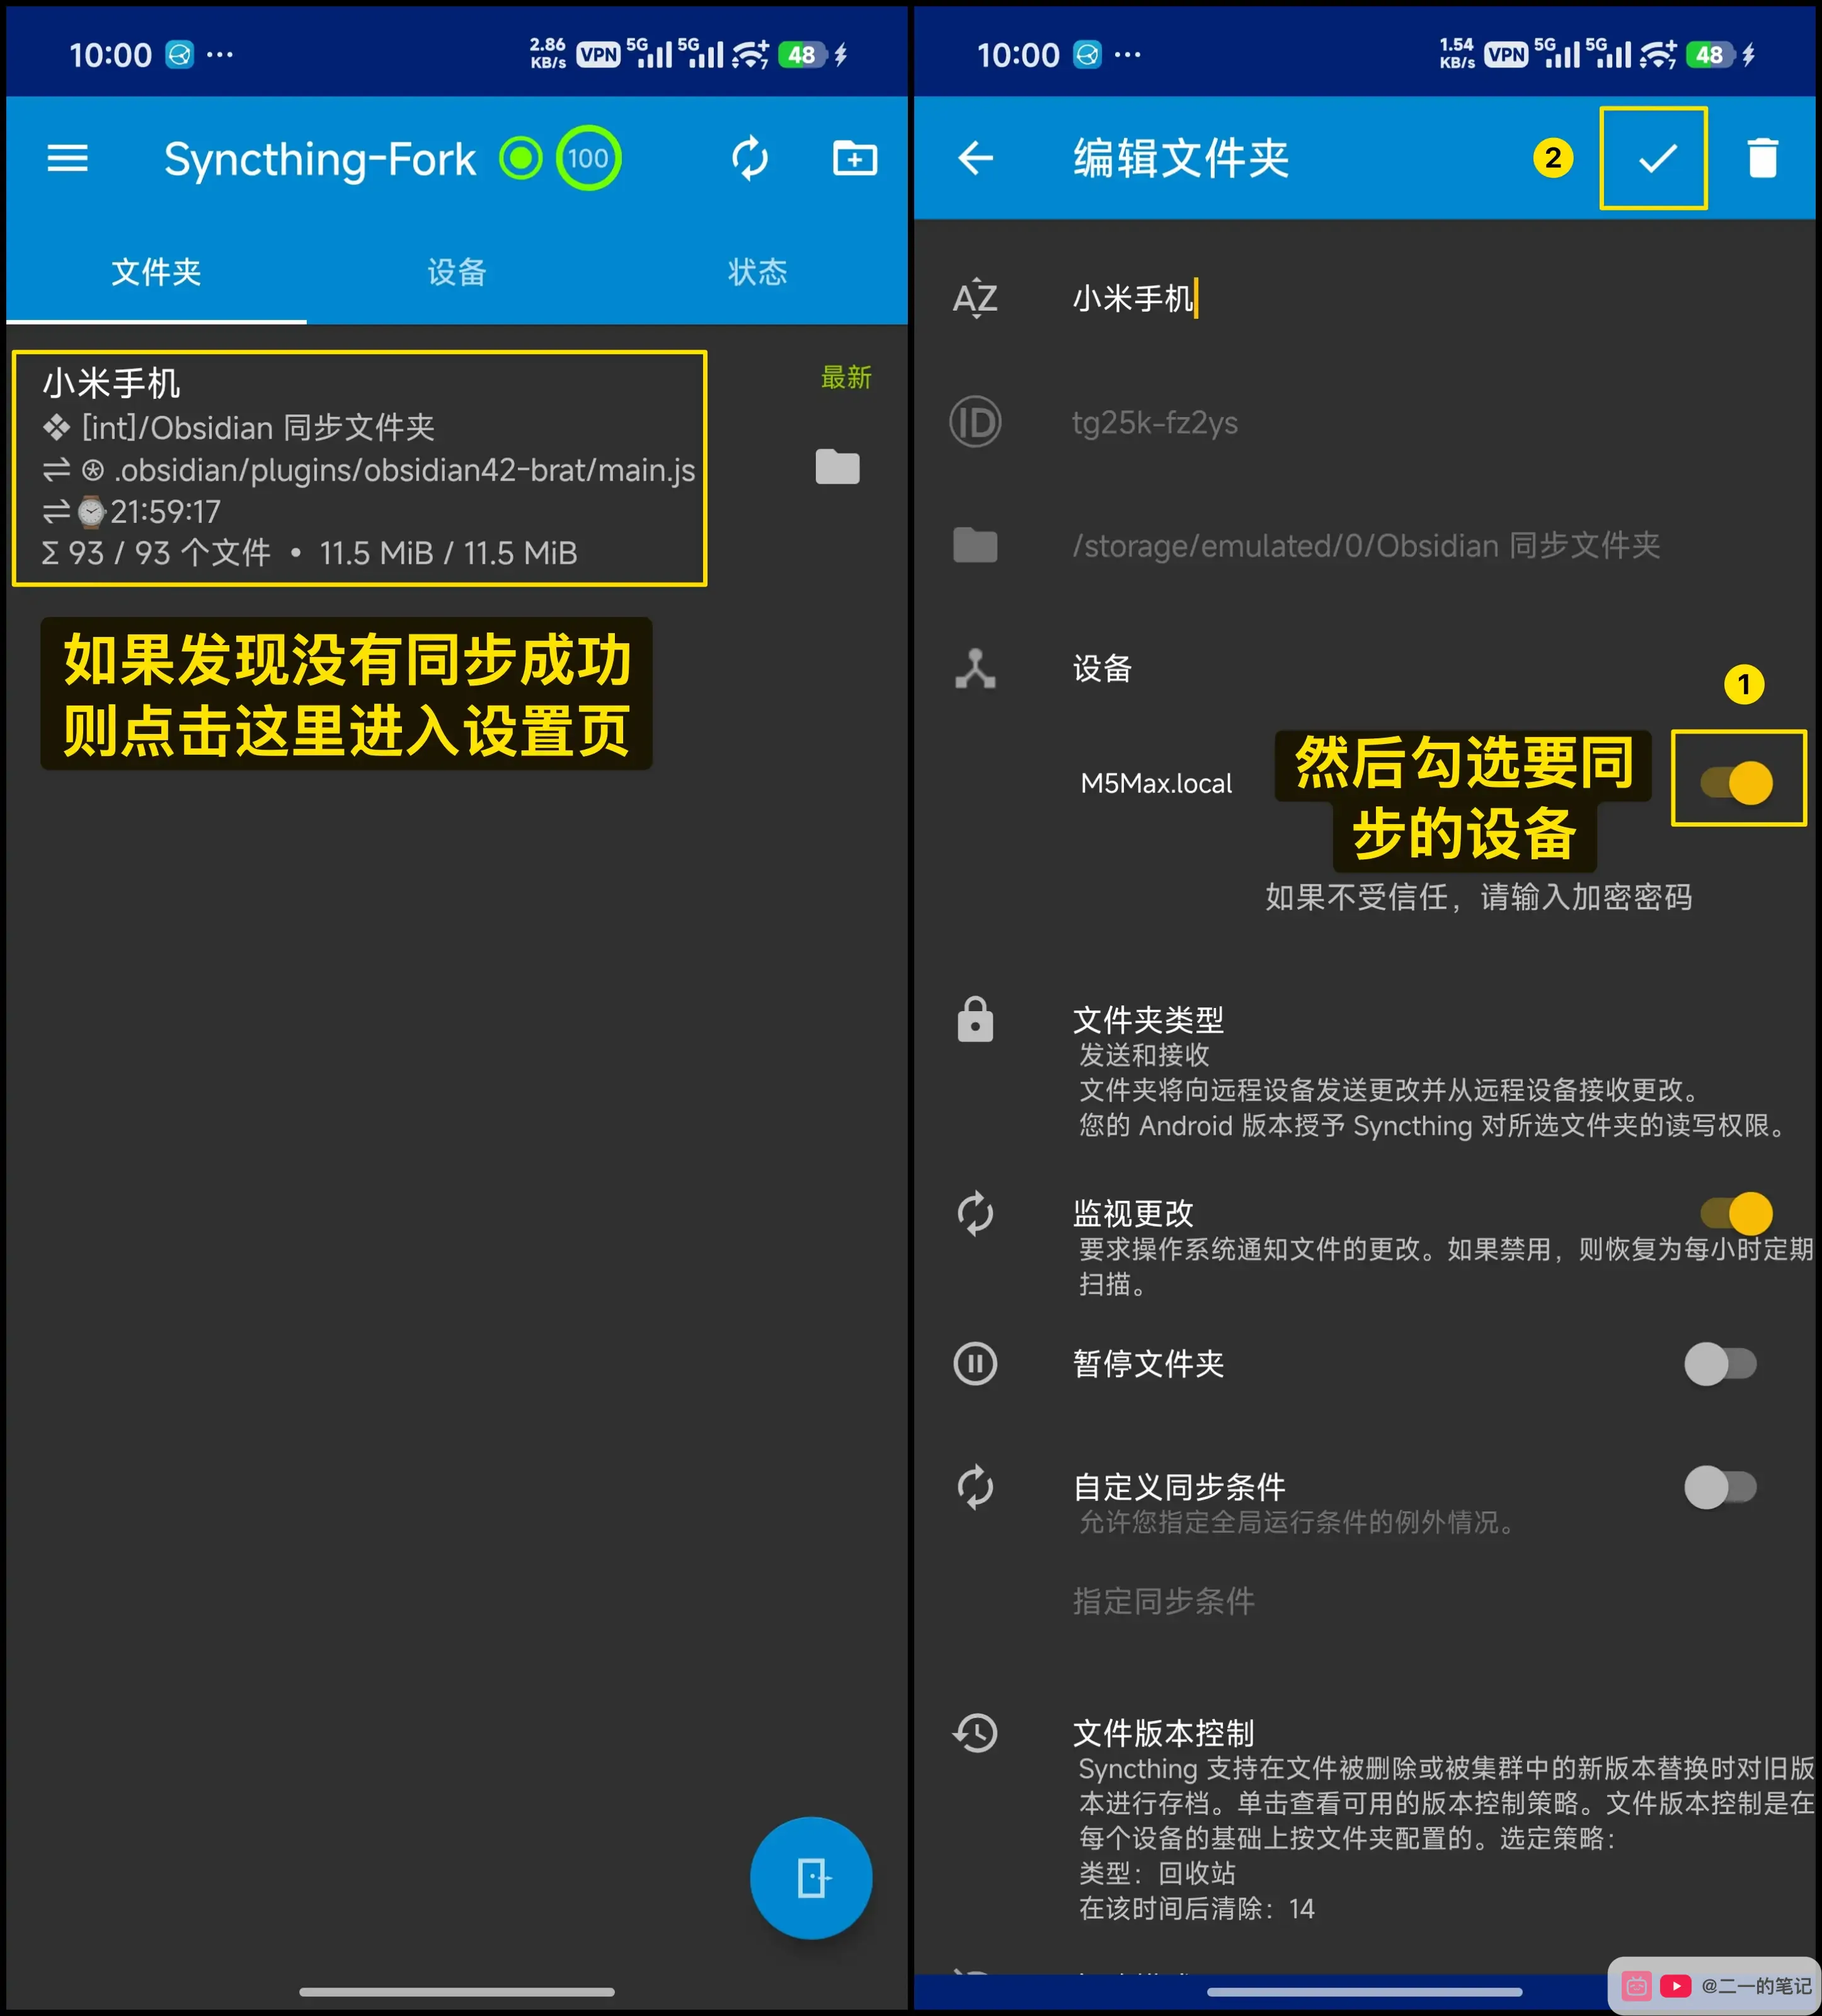
Finally, open Obsidian on Android and choose this sync folder as the vault. Select the vault root, the folder where .obsidian is visible.
Sync To iPhone
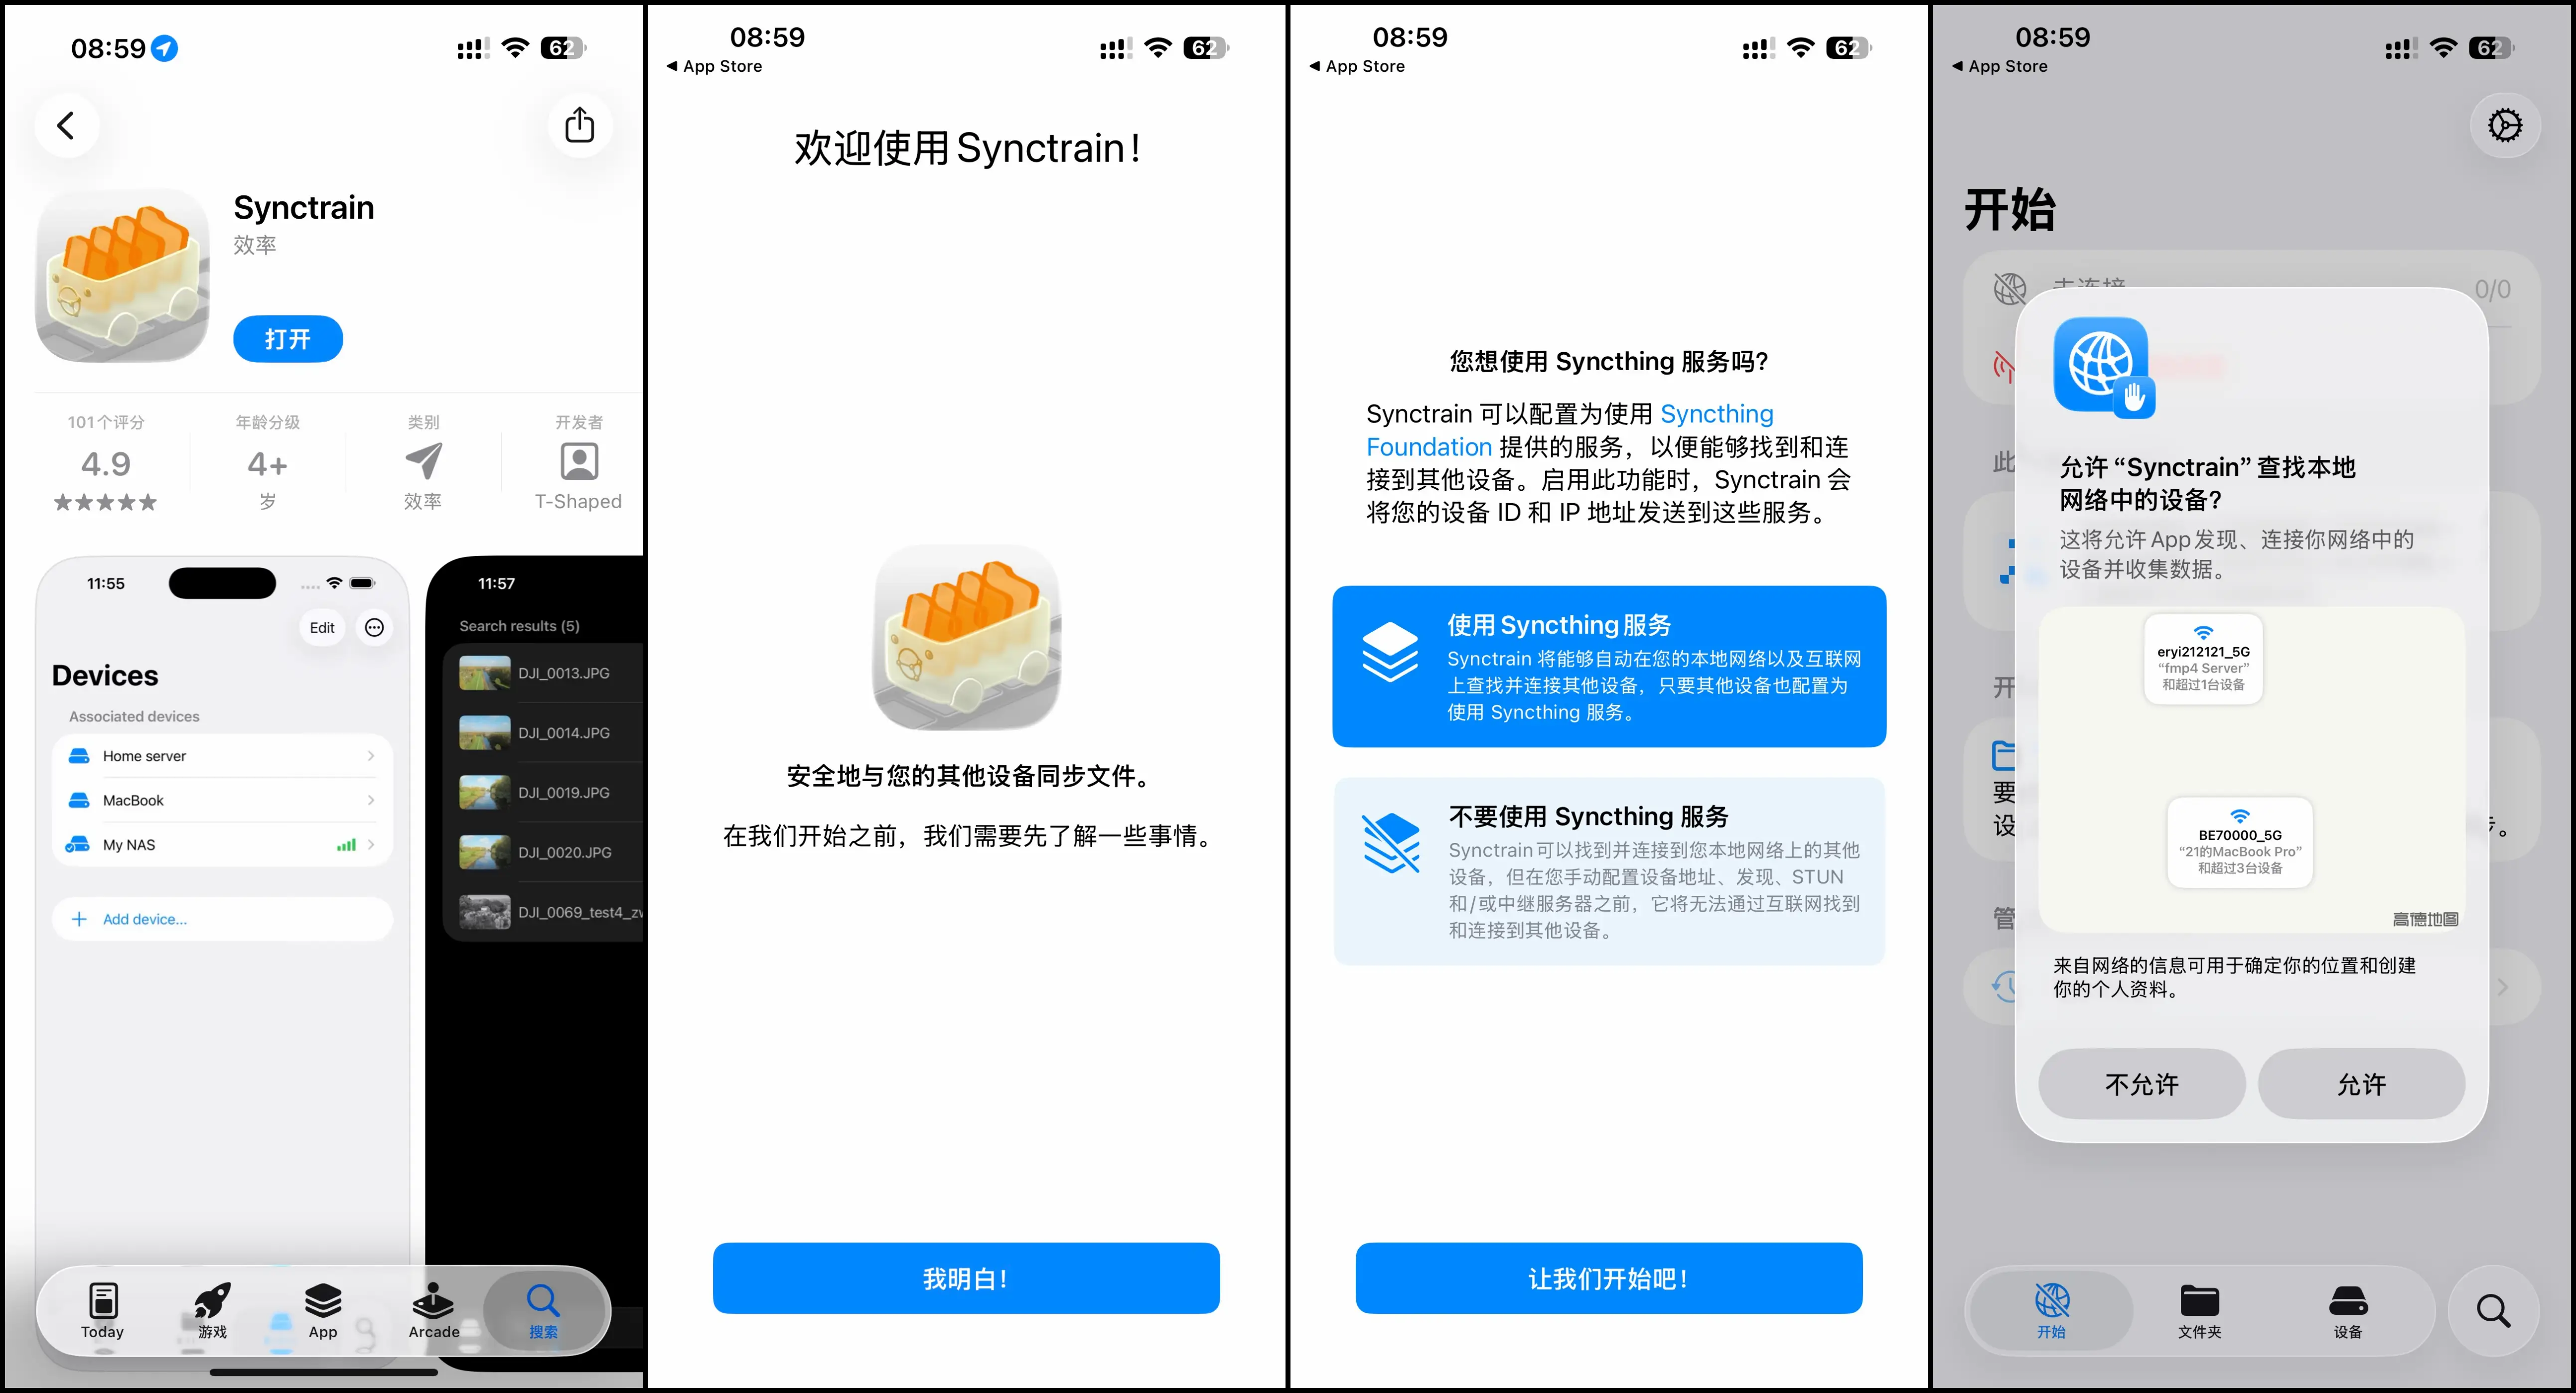
Möbius Sync is available in the China App Store, but it is a paid app. This guide uses the free option, SyncTrain. SyncTrain can be downloaded from the US App Store.
On first launch, choose the Syncthing service and allow local network access. This lets it discover Mac and Windows on the same Wi-Fi.
Next, add a folder in SyncTrain. The location needs to be inside the Obsidian folder in iCloud Drive, because Obsidian for iPhone can only recognize vaults in that location.
If you cannot find the Obsidian folder with the Obsidian icon in iCloud Drive, follow this Obsidian iCloud sync tutorial first and let Obsidian for iPhone create the proper folder.
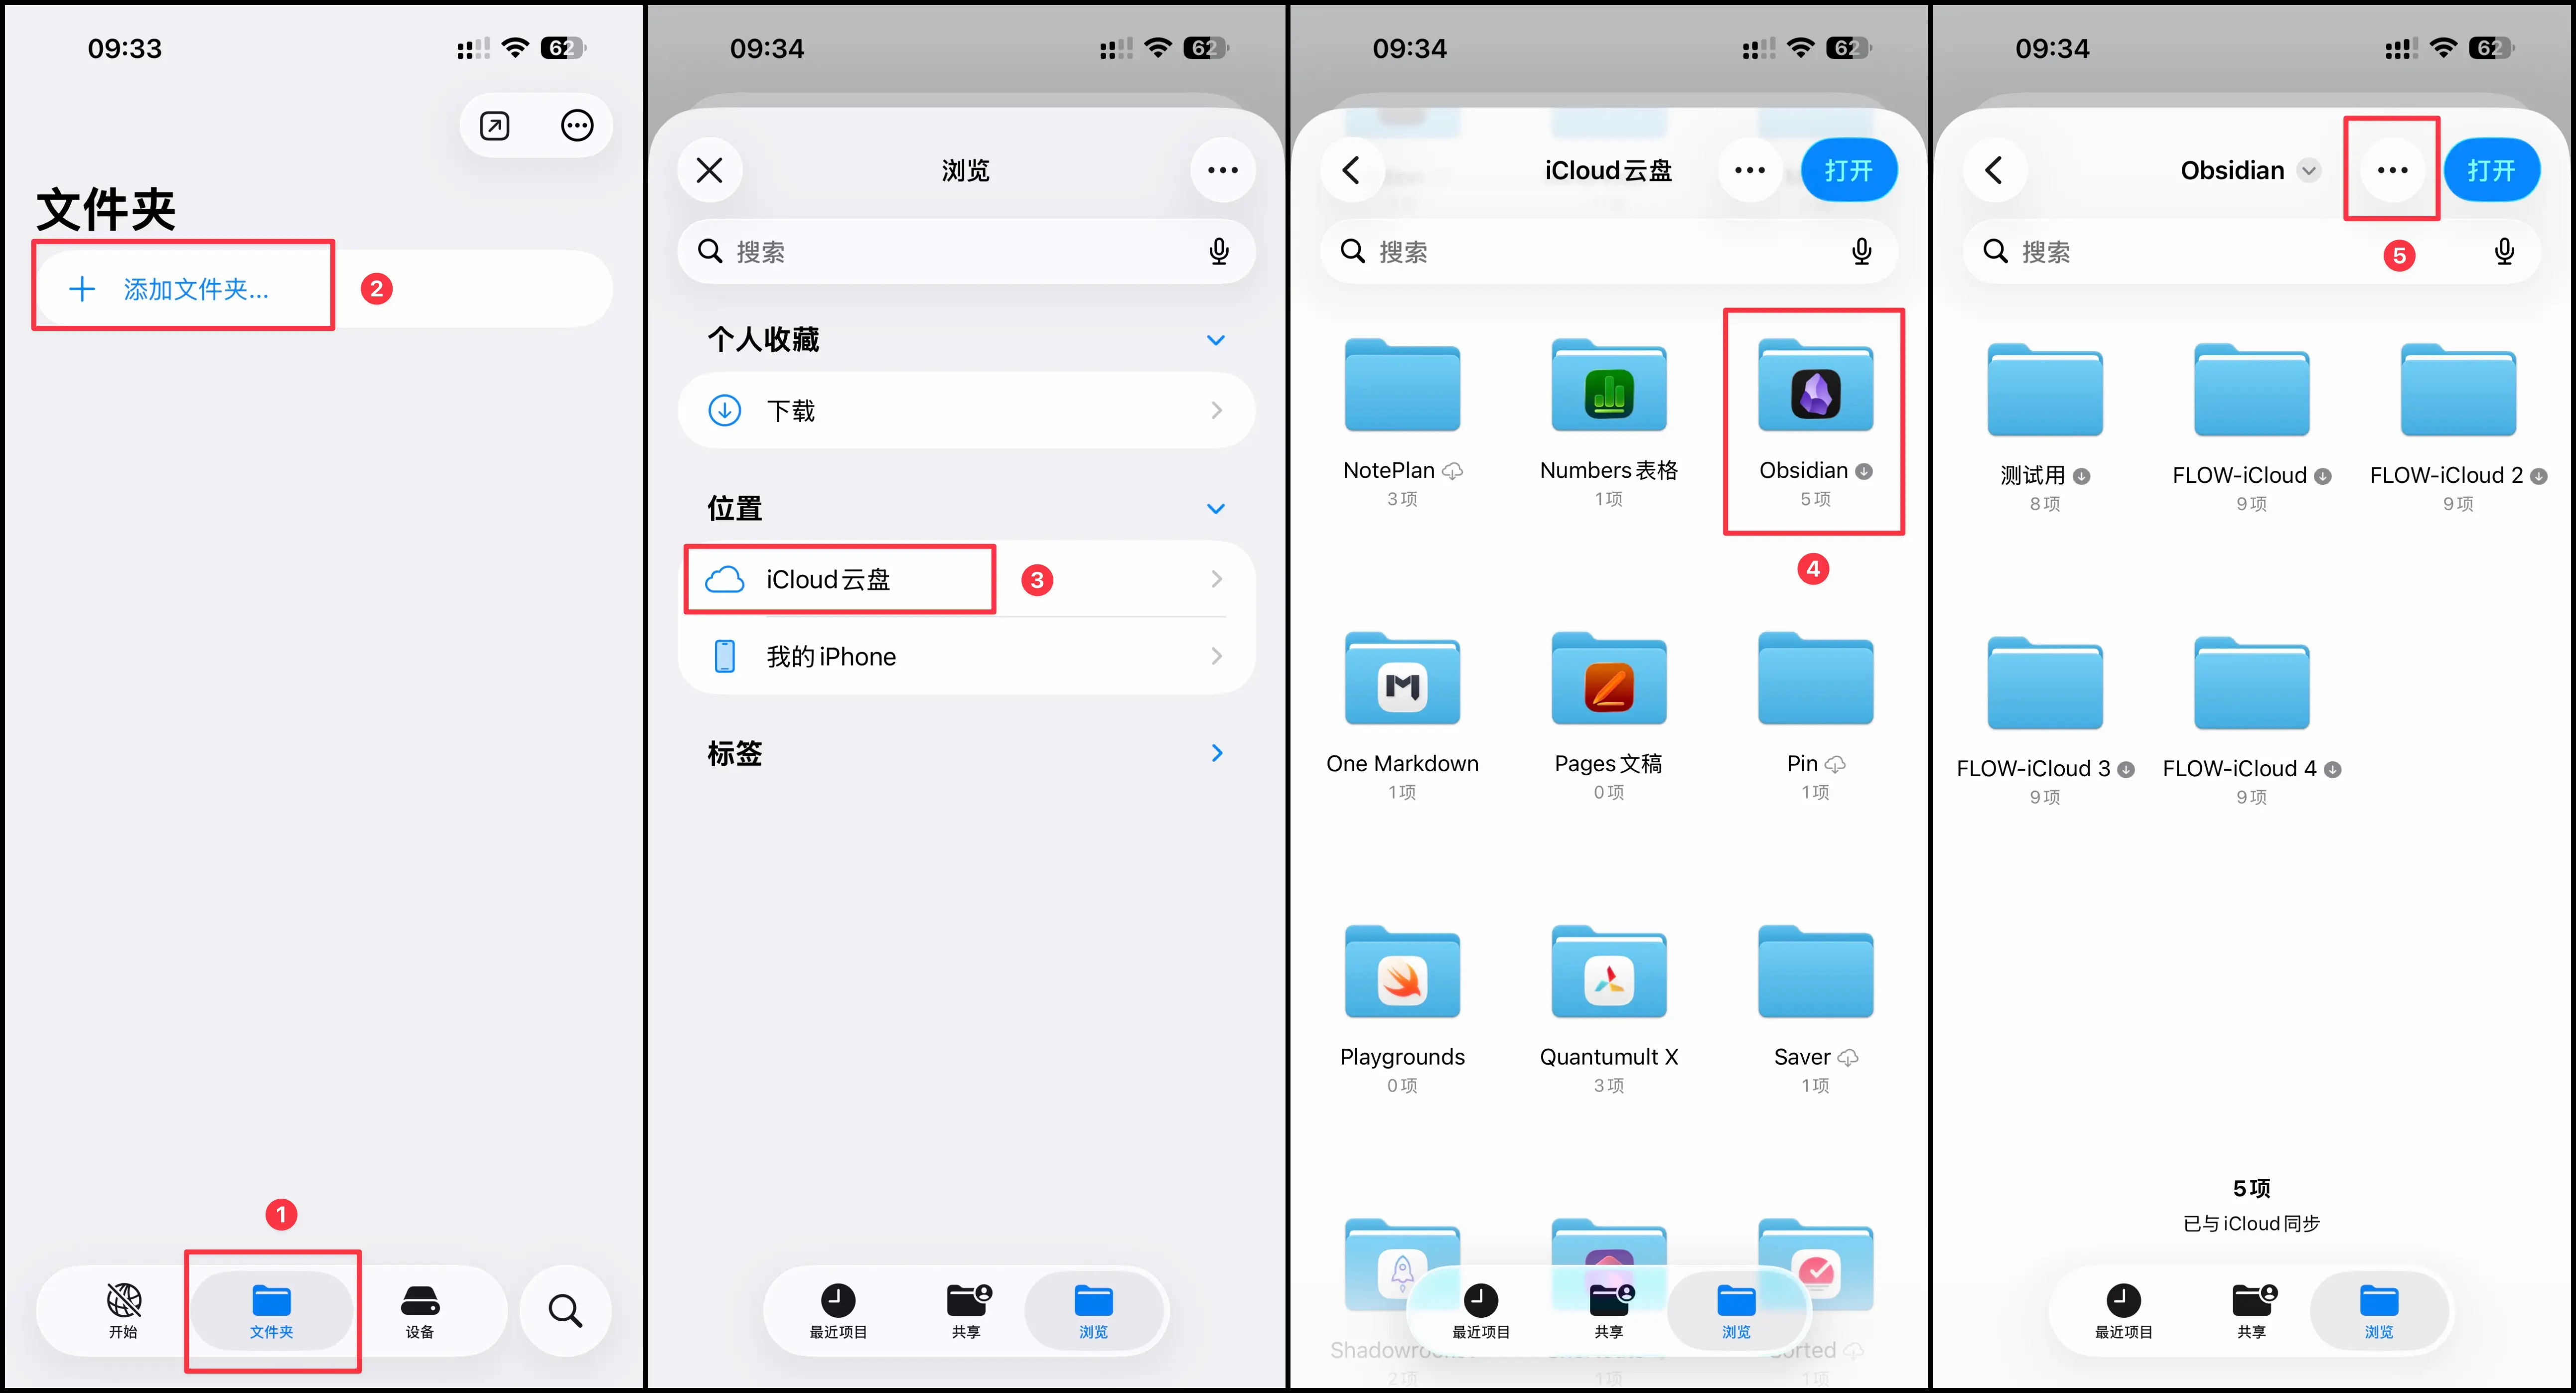
Inside the Obsidian directory, create a folder for syncing, such as Obsidian-Syncthing. After creating it, go back to SyncTrain and add this existing folder.
Use the same folder ID again, for example tg25k-fz2ys. Set the folder type to the existing folder you just created, set the sync scope to all files, then save.
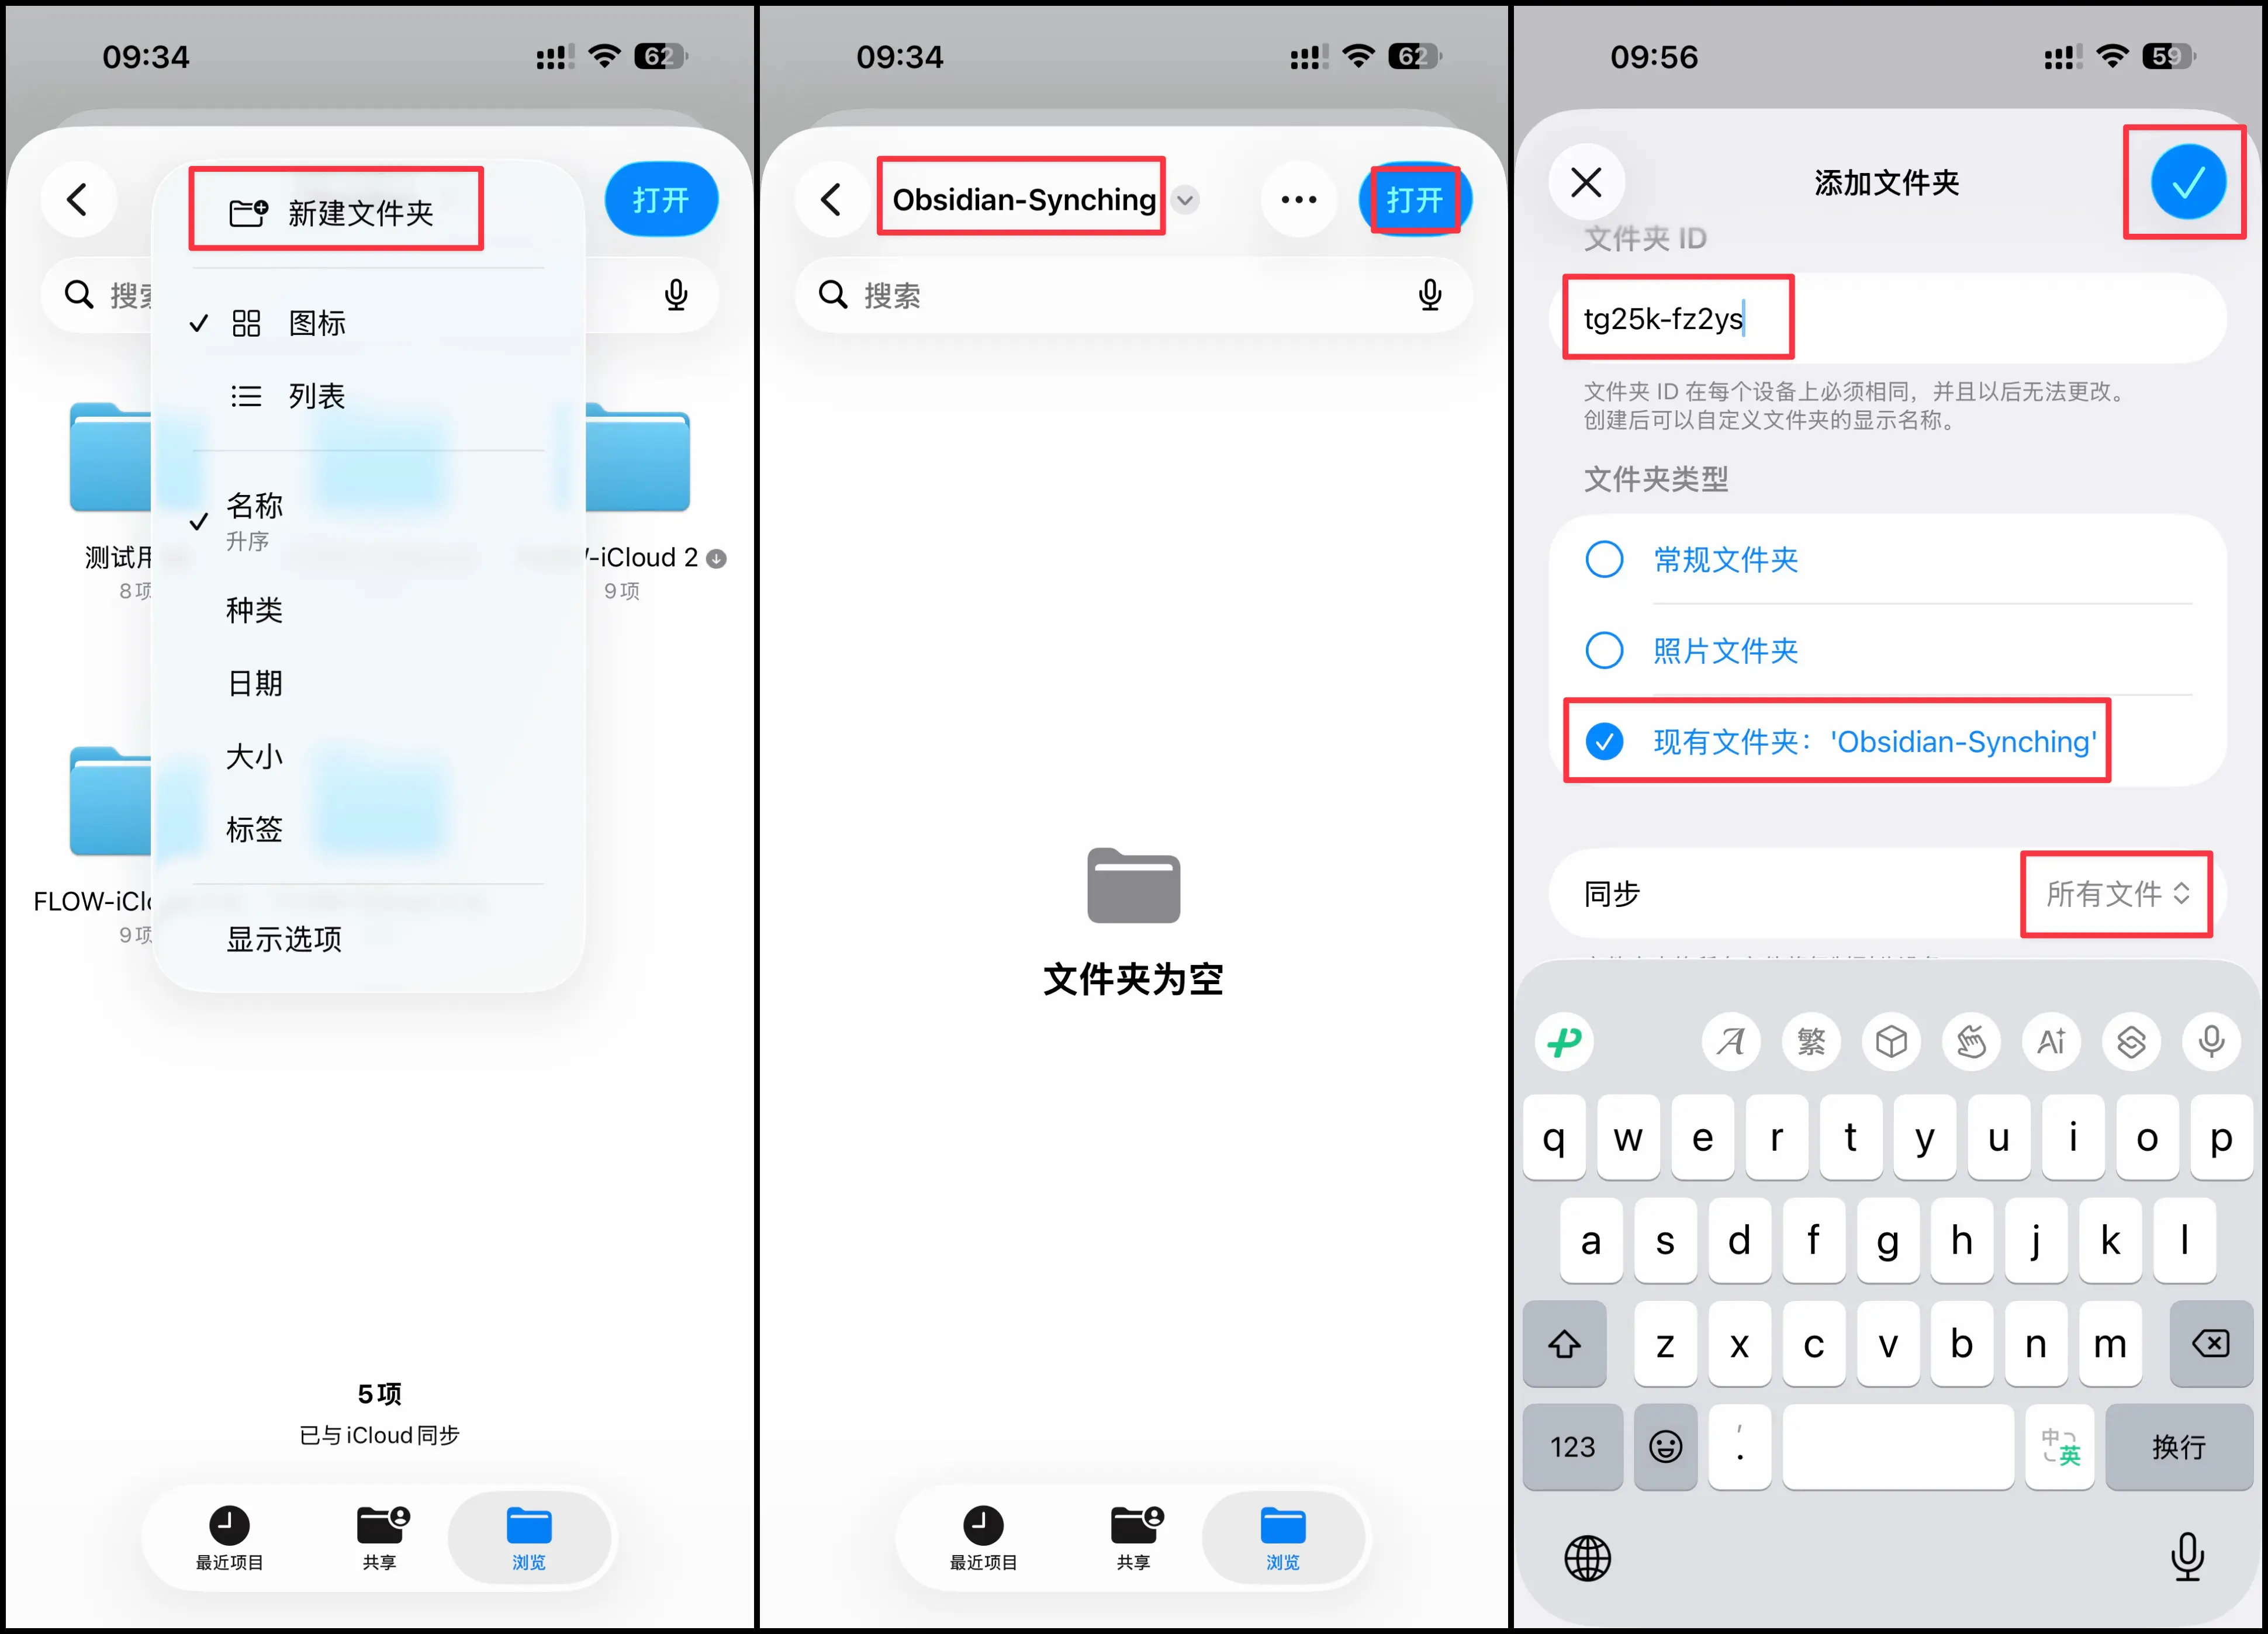
After the folder is ready, switch to the devices page and add the Mac discovered on the local network. After adding it, open the device details and enable sharing for the folder you just created.
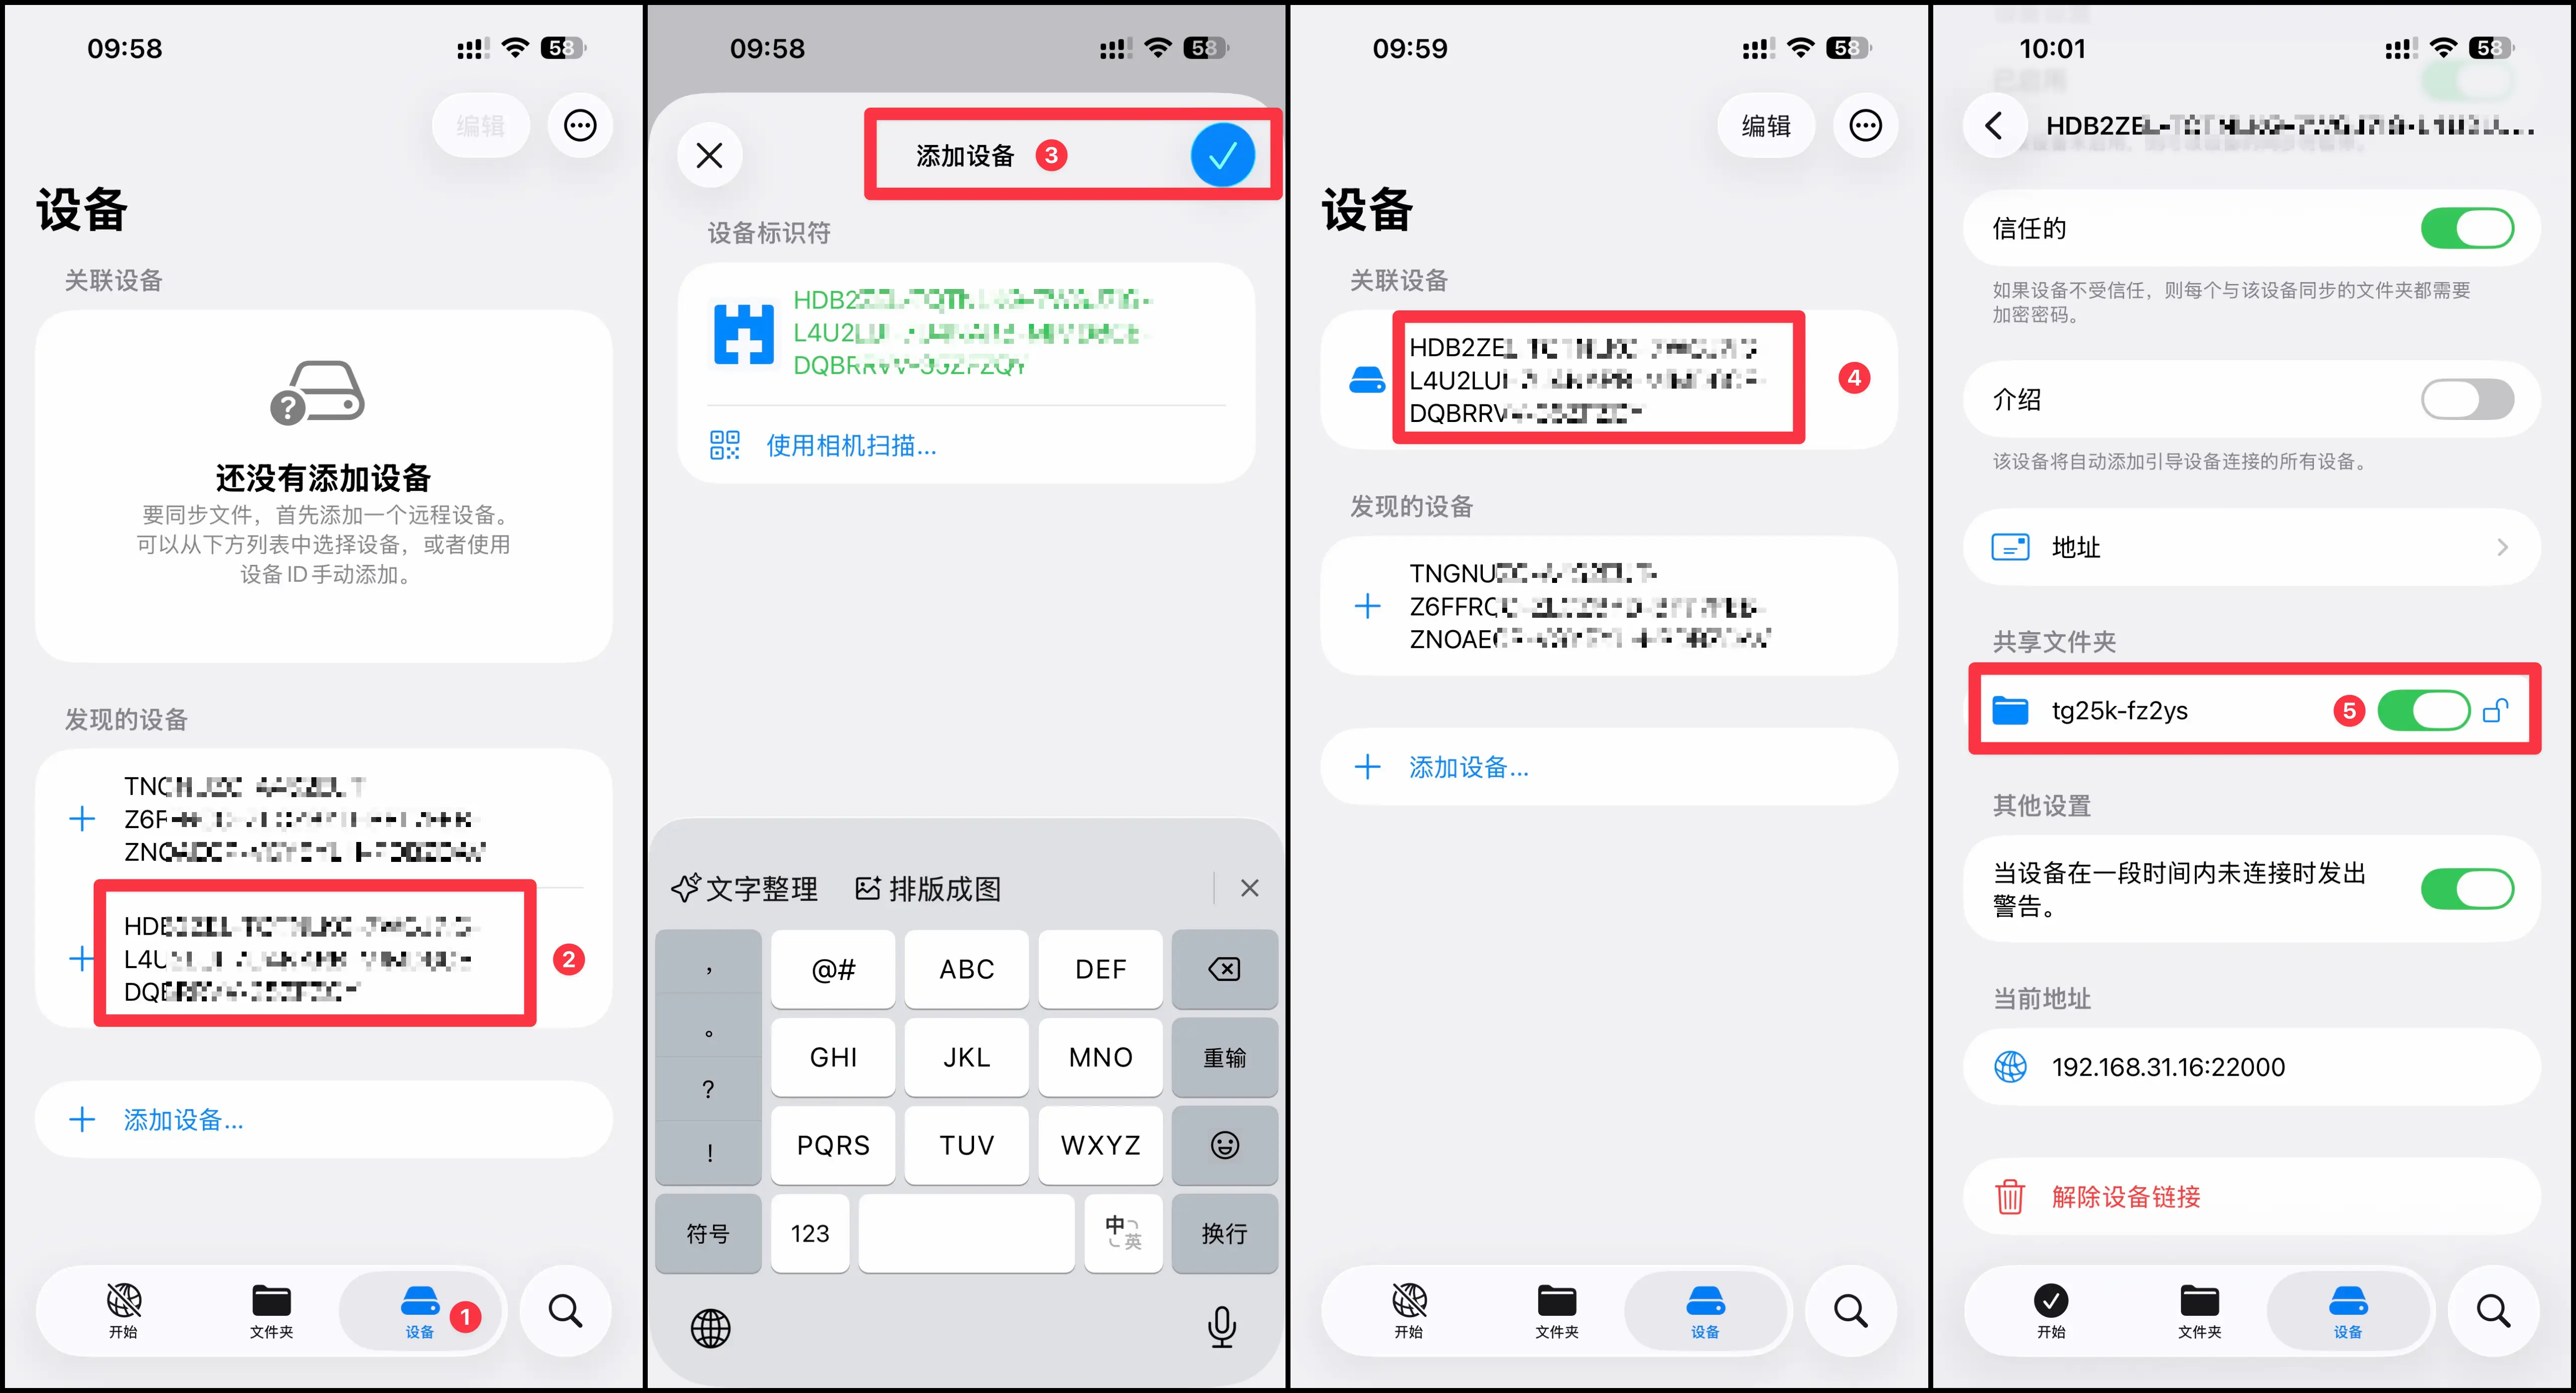
After iPhone sends the request, Mac will show a new device prompt. Confirm that it is your iPhone and add it.

After adding the iPhone, share the Obsidian folder on Mac with it. Open the iPhone remote device sharing settings, enable the Mac sync folder, then save.

If Mac does not show the new device prompt automatically, you can add iPhone manually.

When adding manually, paste the device ID from SyncTrain on iPhone. The device name can be 21iPhone for easier recognition.

If iPhone has been added successfully but is not syncing, the sharing relation is usually not enabled. Open this device’s sharing settings, enable the Mac sync folder, then save.

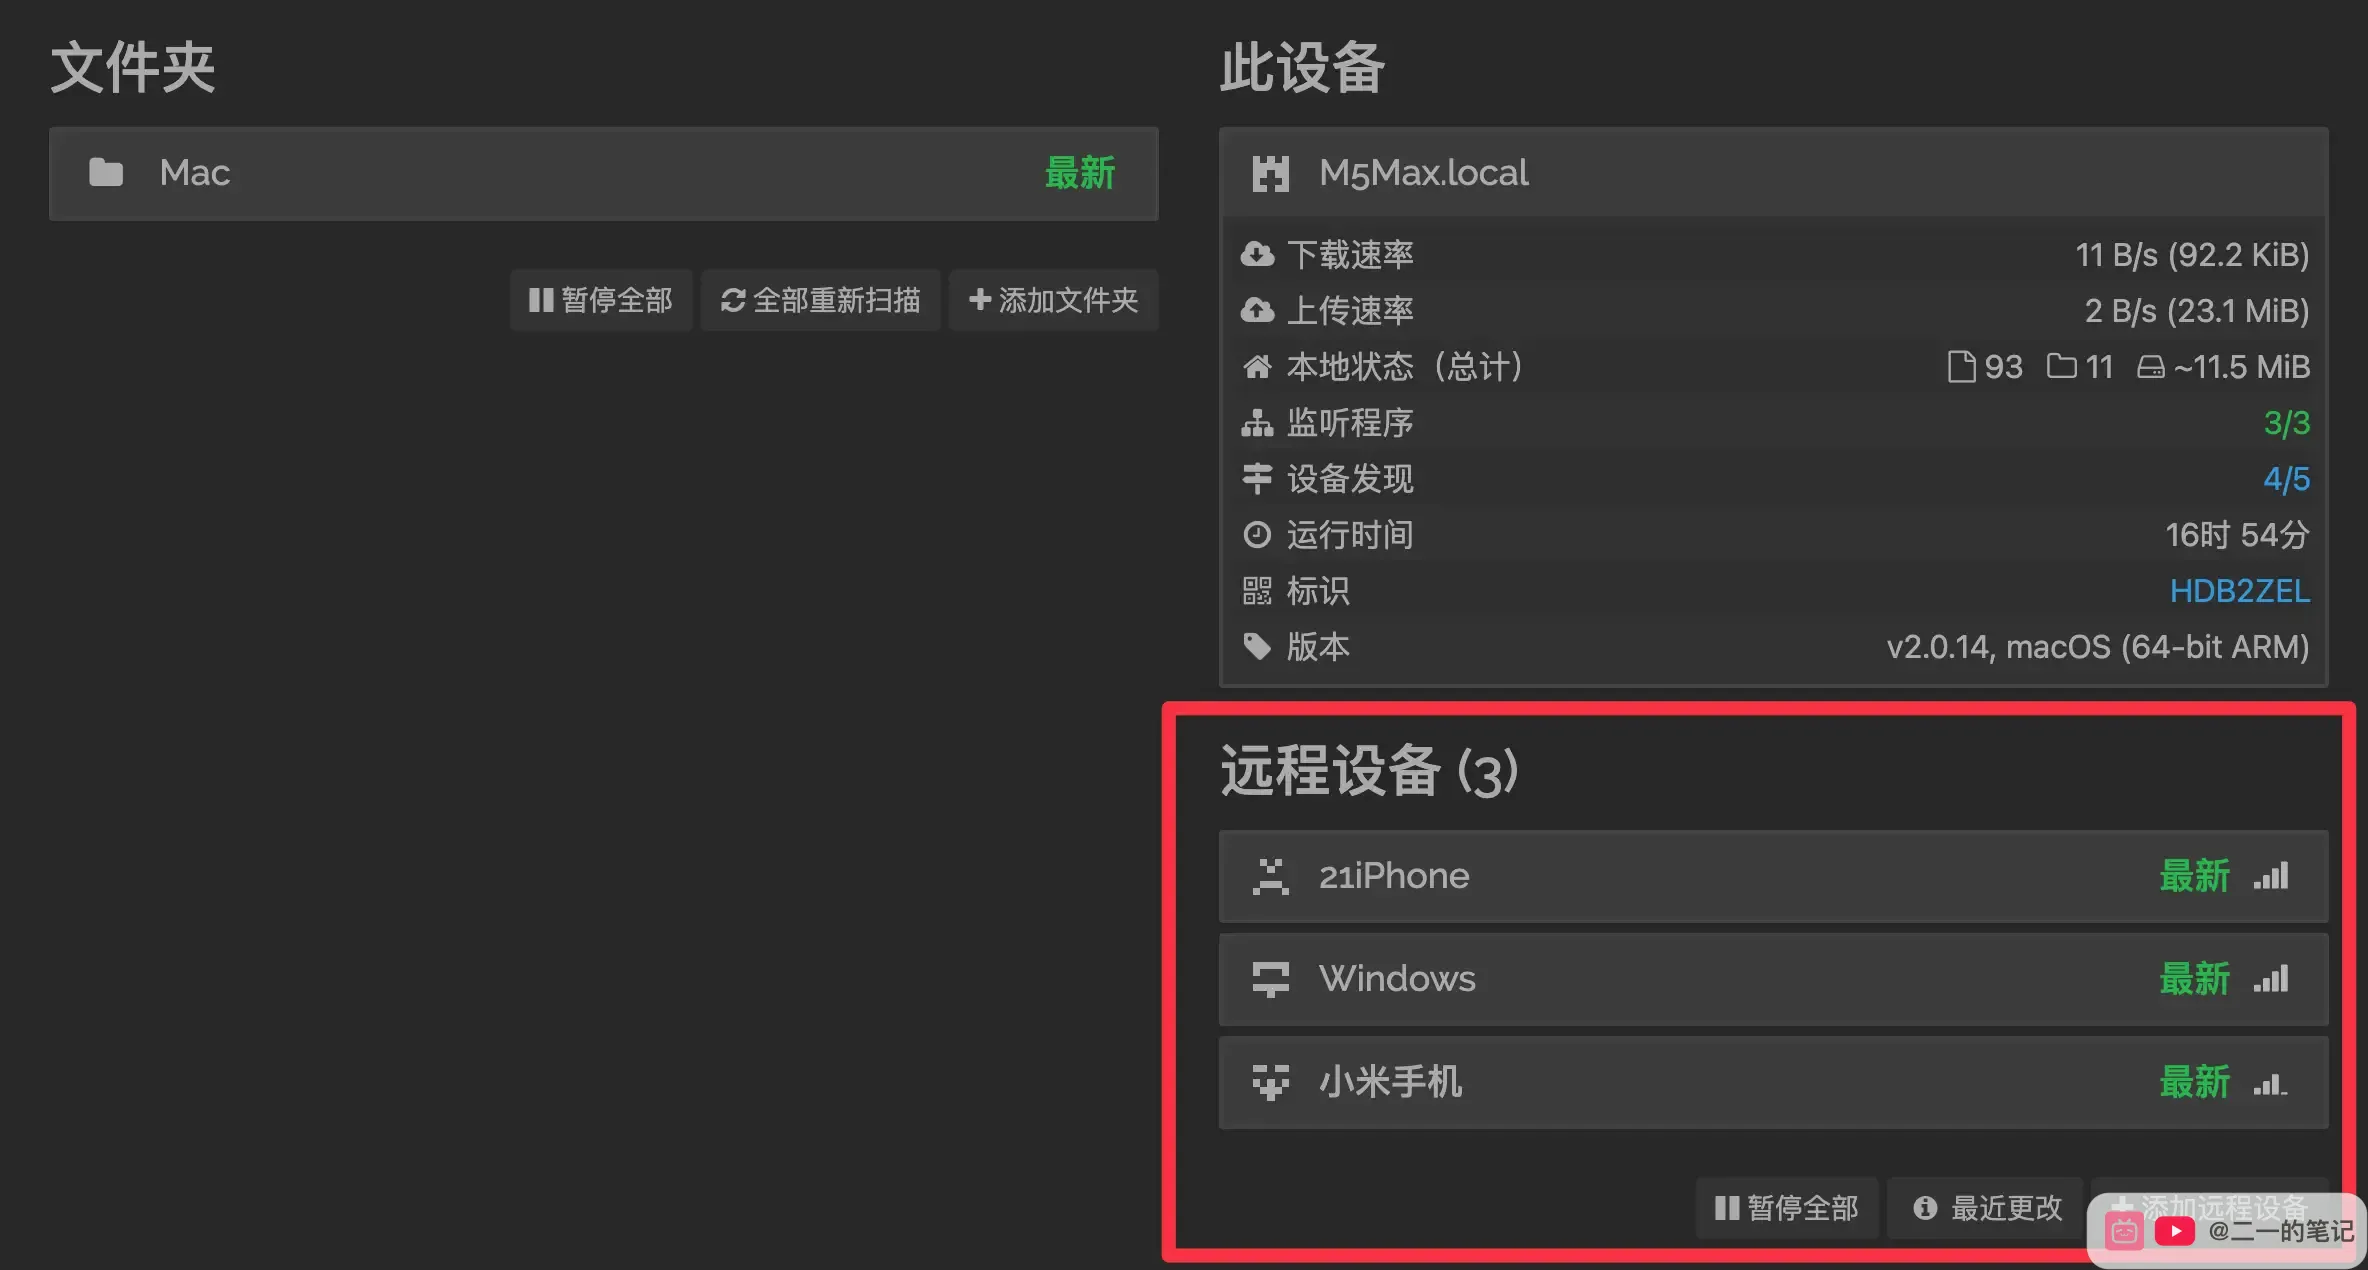
Finally, return to the Syncthing home page. When all remote devices show “Up to Date”, Mac, Windows, Android, and iPhone have the same latest files.
Then open Obsidian on iPhone and choose the sync folder you created inside the iCloud Drive Obsidian directory. After selecting it, iPhone can open the synced vault.
Relay Device
Syncthing transfers files between your devices. It does not keep your files on an official cloud server. To complete sync, at least one device with the latest files must be online, and the target device must have a chance to be online at the same time.
For a more stable experience, keep one device as a long-running relay node. It can be:
- a Mac mini or a Mac that stays on at home
- a small Windows machine that stays powered on
- a spare Android phone that stays plugged in
The relay keeps a recent copy of the vault. Other devices do not have to be online at the same time, but this relay should be online often. For example, after editing notes on iPhone, as long as iPhone and the relay are online at the same time, the relay gets the latest files. Later, Windows or Android can sync from the relay.
Who This Is For
Syncthing takes more setup work. Every platform needs a client, remote devices, folder sharing, and matching folder IDs. After setup, the main benefits are:
- It does not depend on an Obsidian plugin. Sync can run even when Obsidian is closed.
- It works across Mac, Windows, Android, and iPhone.
- Files mainly move between your own devices.
- It does not require you to run a database, server, or CouchDB.
Syncthing is closer to a device-to-device file sync tool. When no device is online, new changes will not appear elsewhere automatically. For the most stable experience, prepare one always-available relay device.
If you already have a NAS or server, you can also consider Self-hosted LiveSync. If you only want to sync an Obsidian Vault across your own computers and phones, Syncthing is easier to maintain afterward.
Other Sync Methods
If you are still comparing Obsidian sync options, continue with these:
- Obsidian iCloud sync tutorial for Mac and iPhone
- Obsidian Baidu Netdisk sync tutorial for desktop vault sync (Chinese)
- Obsidian Remotely Save sync tutorial with Tencent Cloud COS
- Obsidian Feiniu NAS sync tutorial with WebDAV + Remotely Save
- Obsidian LiveSync self-hosted tutorial with Feiniu NAS Docker and CouchDB
More Posts

Obsidian 2026 百度网盘同步教程:电脑之间同步 Vault 的完整设置方法
这篇教程会用百度网盘同步空间作为示例,演示如何把 Obsidian 仓库放进同步空间,并在多台电脑之间打开同一份 Vault。需要注意,百度网盘同步空间不是免费能力,使用前请确认账号是否已开通对应会员或同步权益。


Obsidian 11 种主流同步方案对比:设备、费用、难度和适合人群
这篇文章整理了 Obsidian Sync、iCloud、百度网盘、OneDrive、坚果云、Remotely Save、Fast Note Sync、LiveSync、Syncthing 和 Git 等 11 种主流同步方案,按费用、平台、手机端、难度、版本历史和适合人群做对比。

Obsidian 的三个问题|模板开发日志(二)
吉祥物、囤积癖、热衷表演