
Obsidian Fast Note Sync tutorial: deploy the server on Feiniu NAS with Docker
This guide deploys the Fast Note Sync server with Docker on Feiniu NAS, then connects Mac, iPhone, and other devices to the same Obsidian vault sync setup.
Fast Note Sync is an Obsidian sync plugin that needs a self-hosted server. The basic idea is to run a sync service on a NAS, a server, or an always-on computer, then let the Obsidian plugin on each device connect to that service.
This guide uses Docker on Feiniu NAS as the example. The same approach also works on other NAS devices that support Docker, a VPS, or an always-on Mac mini.
If you are not sure whether Fast Note Sync is the right option, start with the Obsidian sync guide. This article focuses directly on the Feiniu Docker setup.
Configure the server in Feiniu Docker
Fast Note Sync needs the server first. After the server is running, you copy the authorization config generated by the server into the Obsidian plugin.
Open File Manager in Feiniu, then go to the docker folder where you usually keep Docker data. If the folder does not exist, create it first.
Inside the docker folder, create a project folder:
obsidian-fast-note-syncOpen that project folder and create two subfolders:
config, for server configurationstorage, for the database, logs, and synced files
The final folder structure should look like this:
docker
└── obsidian-fast-note-sync
    ├── config
    └── storage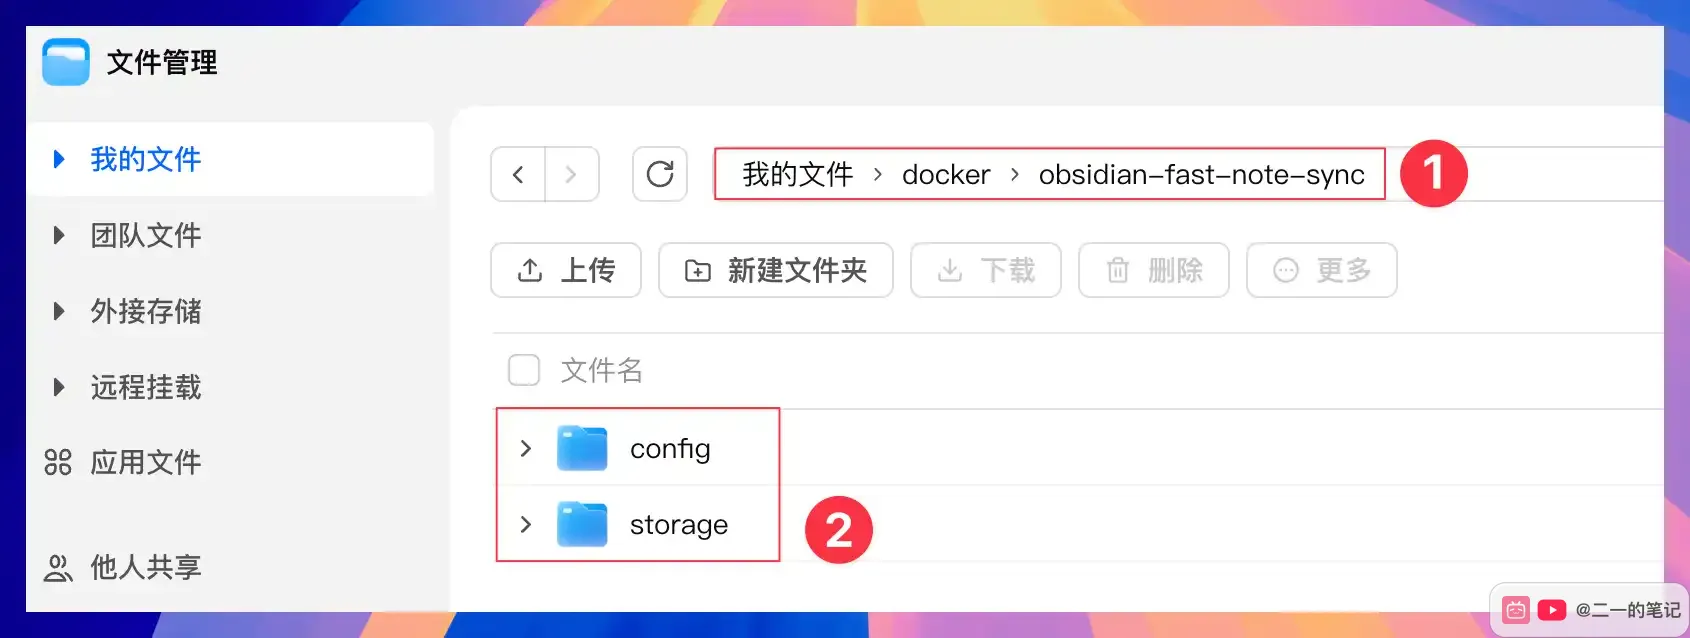
Next, open Docker in Feiniu, go to the Compose page from the left sidebar, and click New Project.
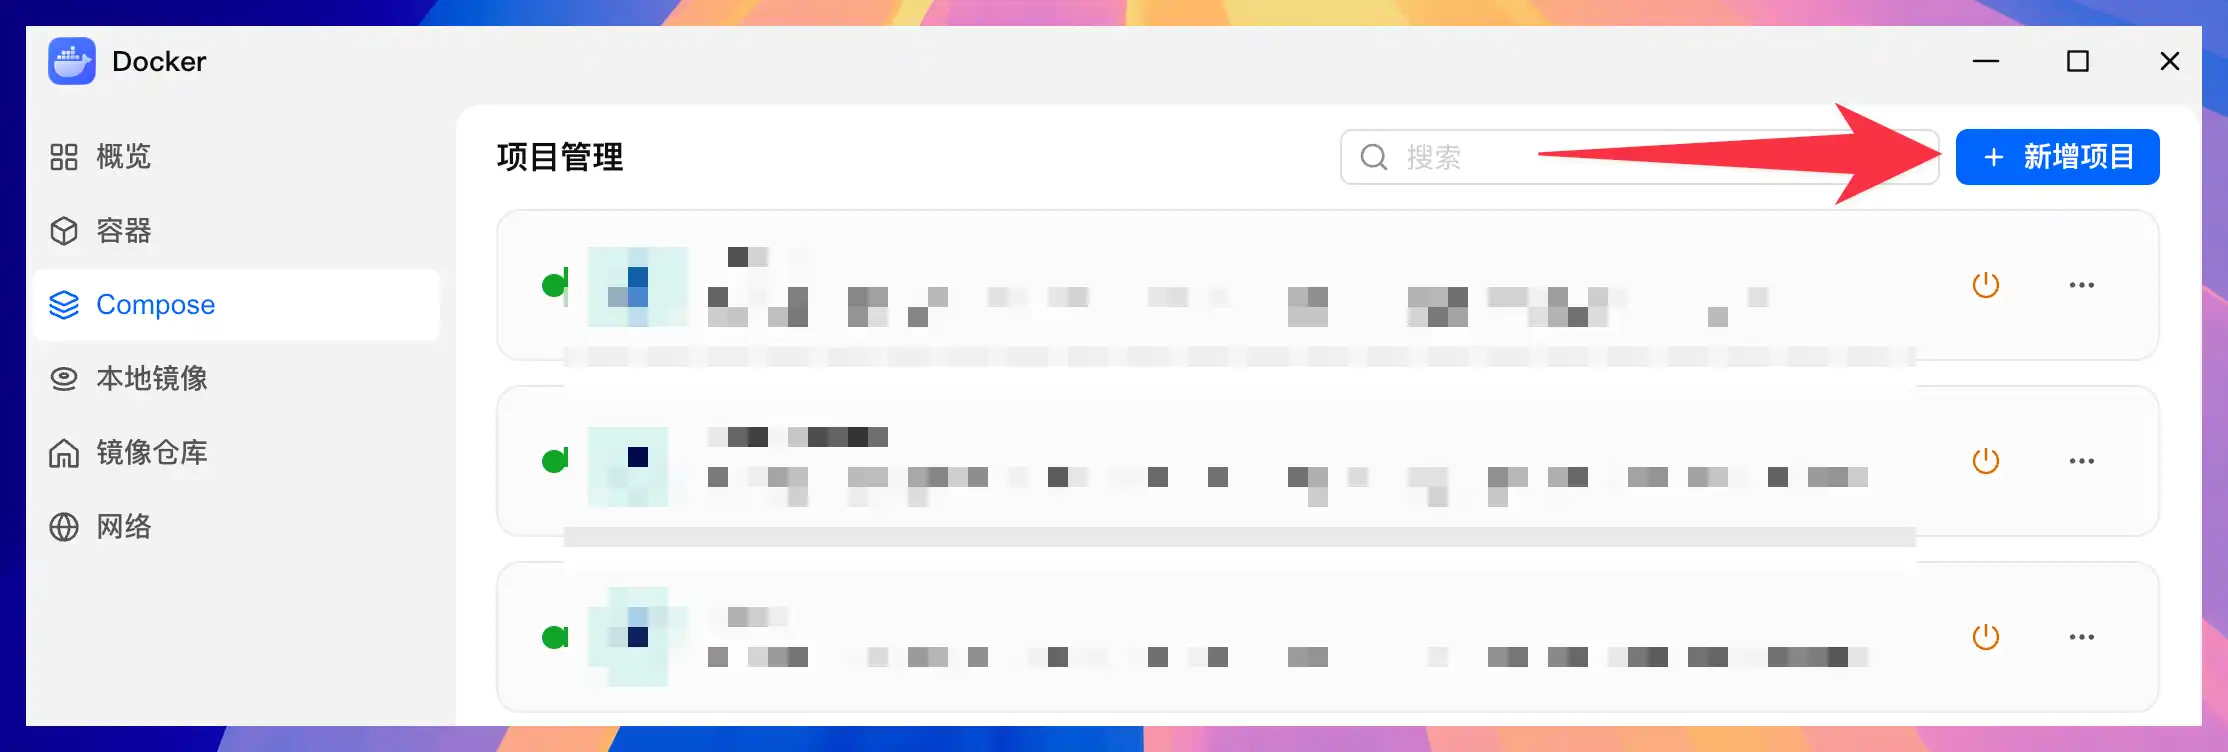
You can use this project name:
obsidian-fast-note-syncFor the path, choose the obsidian-fast-note-sync folder you just created. If your Feiniu NAS has multiple storage locations, make sure this is the same project folder that contains config and storage.
For the source, choose to create docker-compose.yml, then paste this config:
services:
  fast-note-sync-service:
    image: haierkeys/fast-note-sync-service:latest
    container_name: fast-note-sync-service
    restart: always
    ports:
      - "9000:9000"
    volumes:
      - ./config:/fast-note-sync/config
      - ./storage:/fast-note-sync/storage
After pasting it, check these two lines under volumes:
- ./config:/fast-note-sync/config
- ./storage:/fast-note-sync/storage
./config and ./storage refer to the two subfolders inside the current project folder. /fast-note-sync/config and /fast-note-sync/storage are the paths used inside the container. You can keep them exactly as shown.
Select the option to start the project immediately after creation, click Confirm, then wait for the image to download and the container to start.
When it starts successfully, the container list should show fast-note-sync-service, and the port should be 9000:9000.

Open this address in your browser:
http://your-feiniu-ip:9000For example, my Feiniu address is 192.168.31.158, so I open:
http://192.168.31.158:9000If you can see the Fast Note Sync registration page, the server is running.
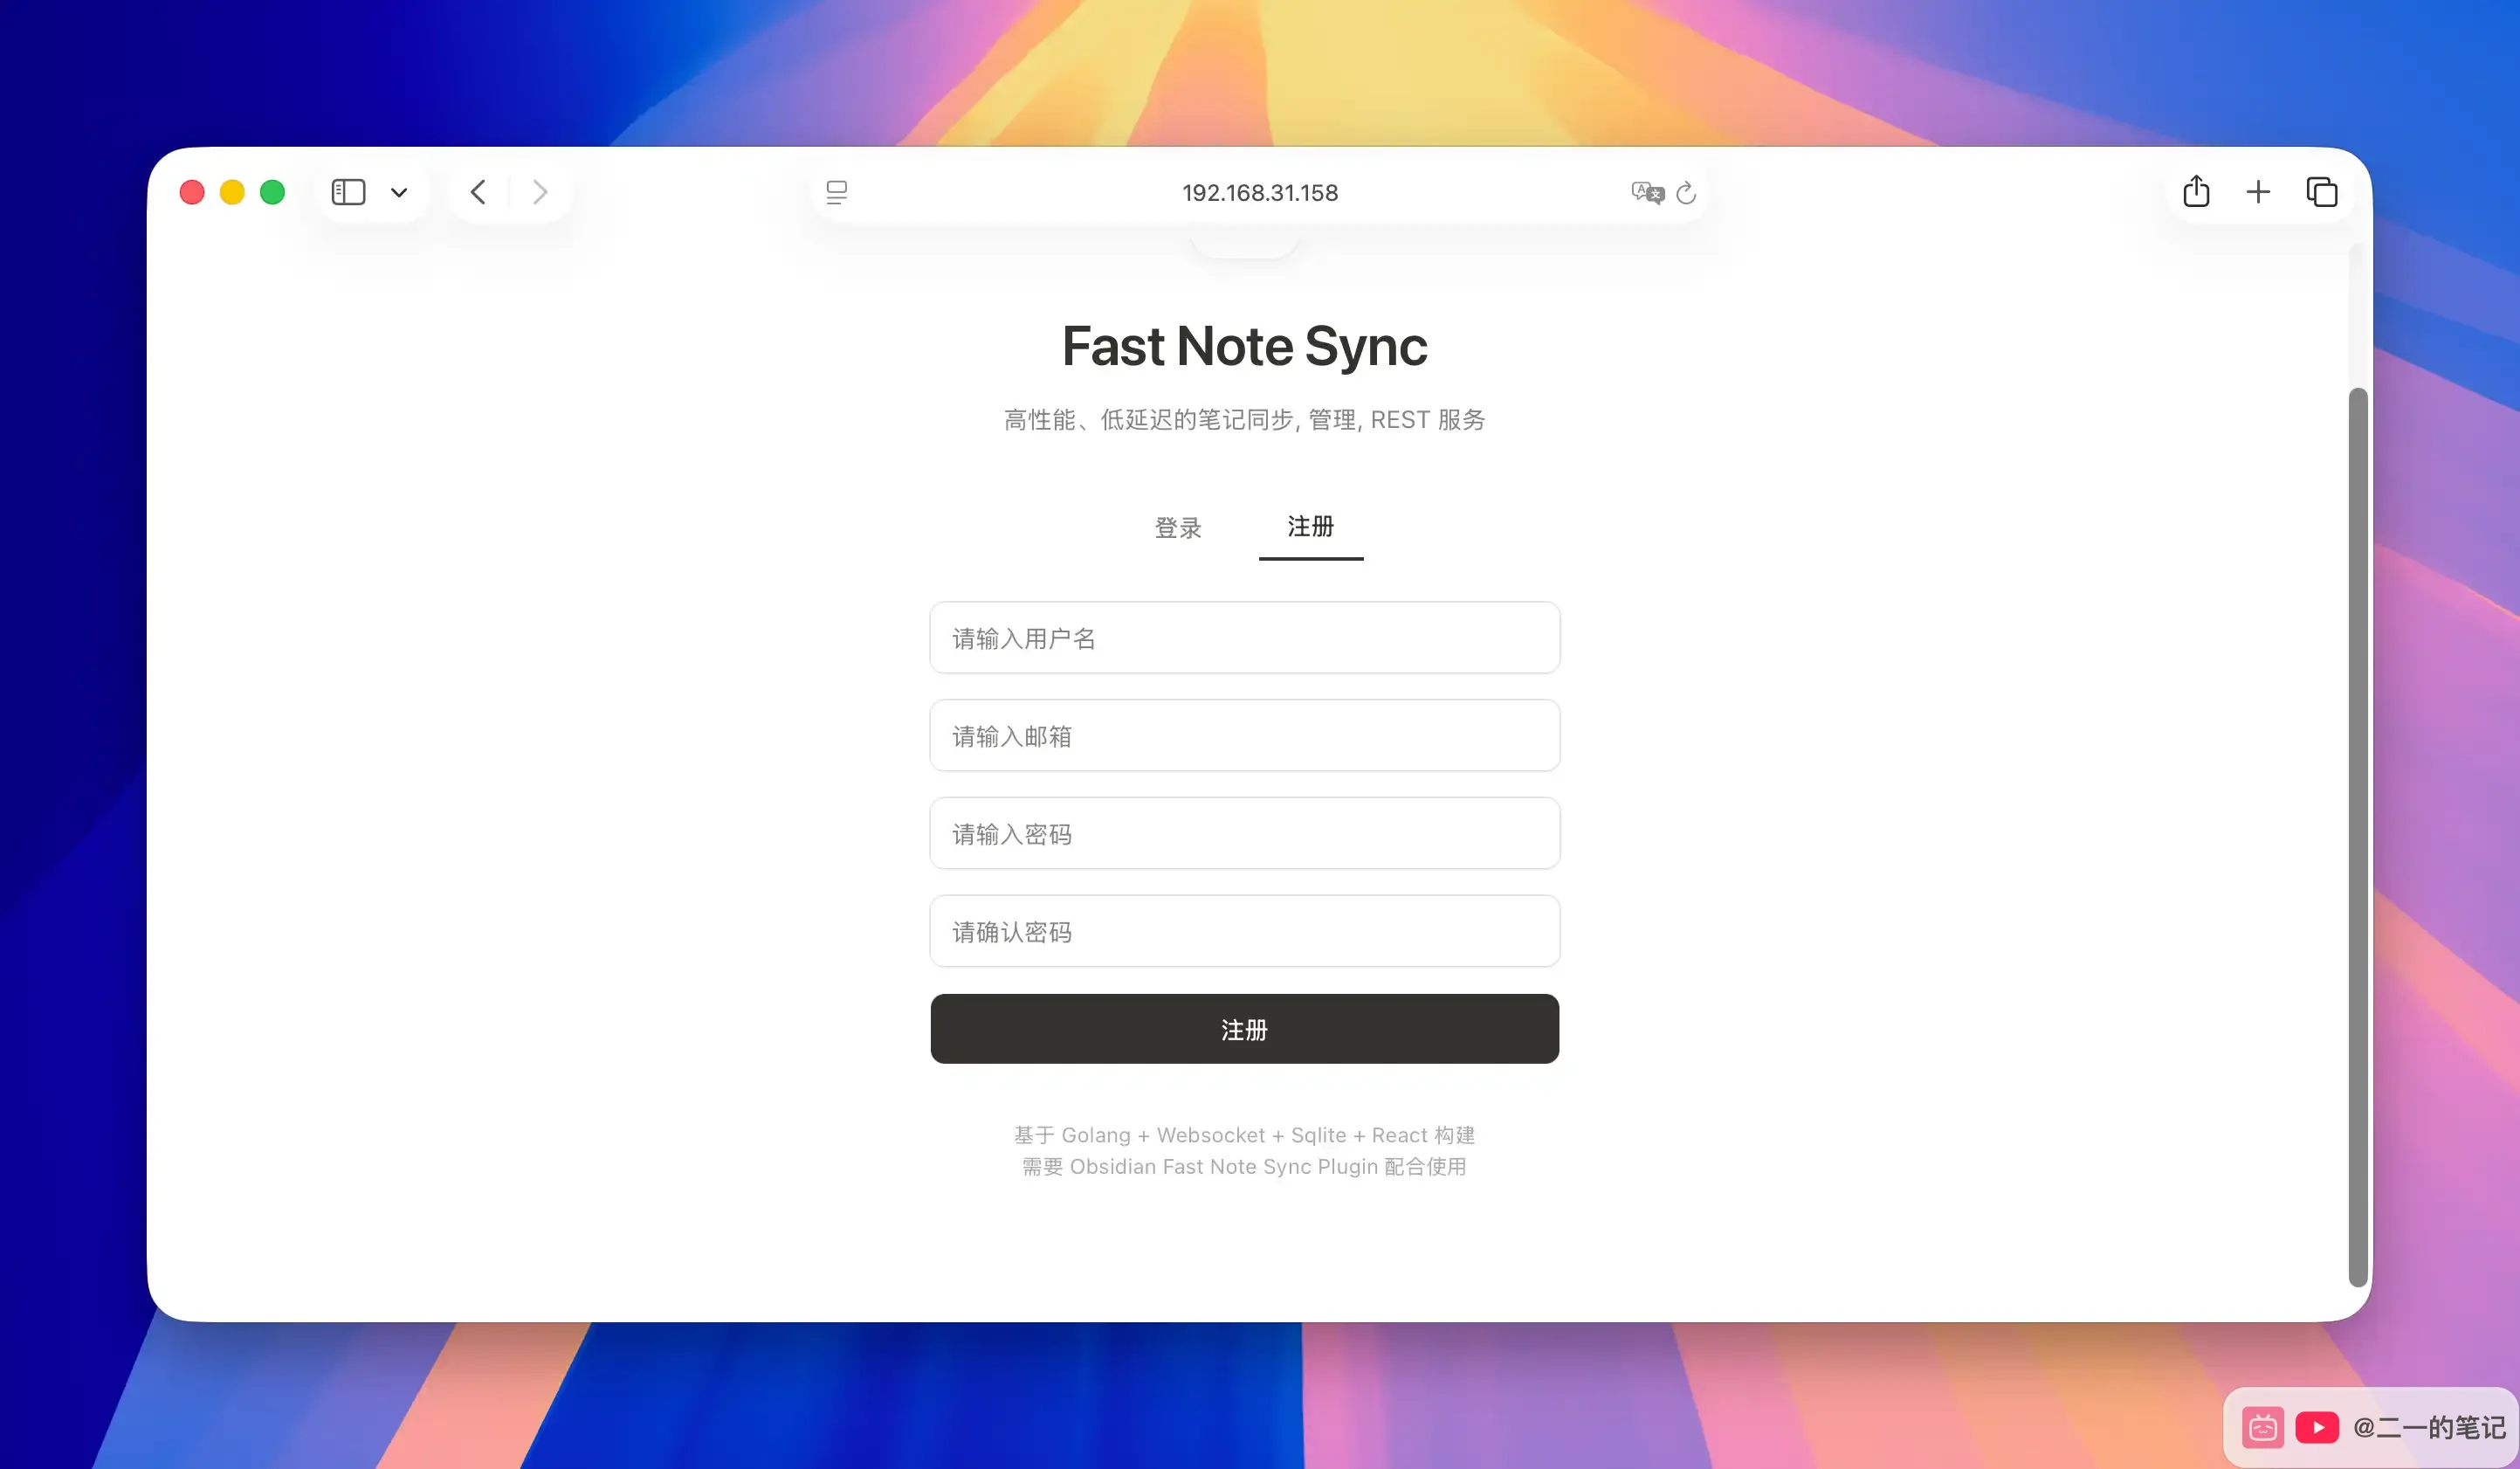
Register an account the first time you open it. After registering and signing in, you will enter the server dashboard.

Install and configure the Obsidian plugin
Start with the Mac.
In Obsidian, open Community plugins, search for Fast Note Sync, install it, and enable it. If you have not installed community plugins before, see the Obsidian plugin installation guide. If you already know that process, continue below.
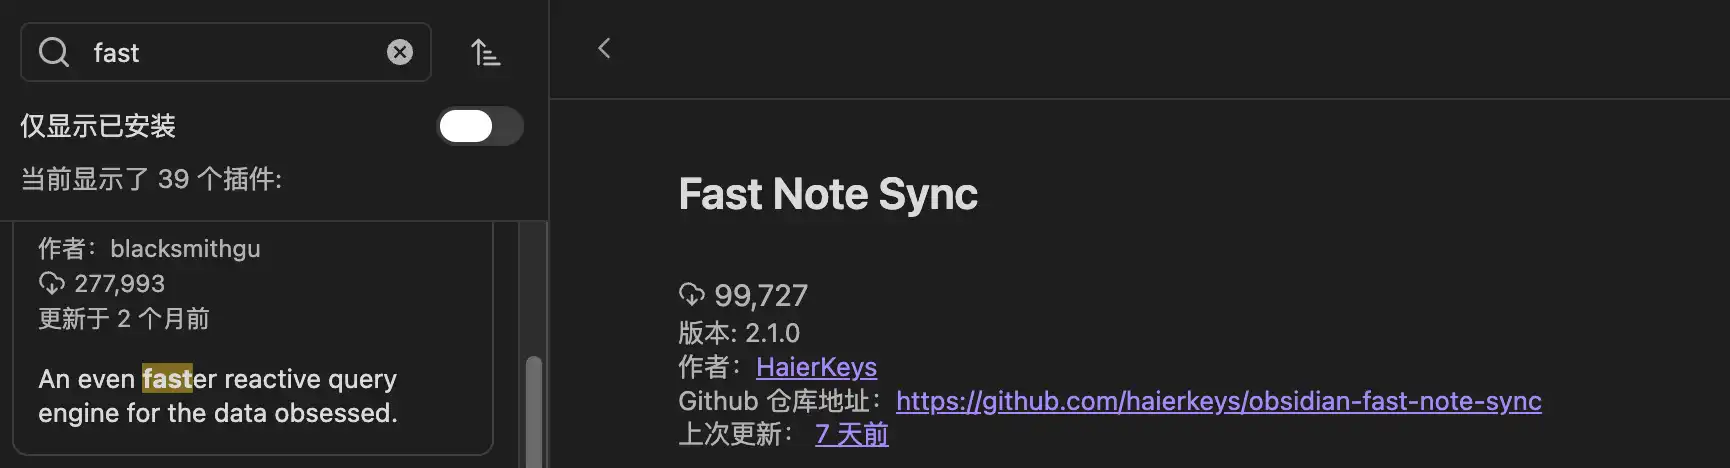
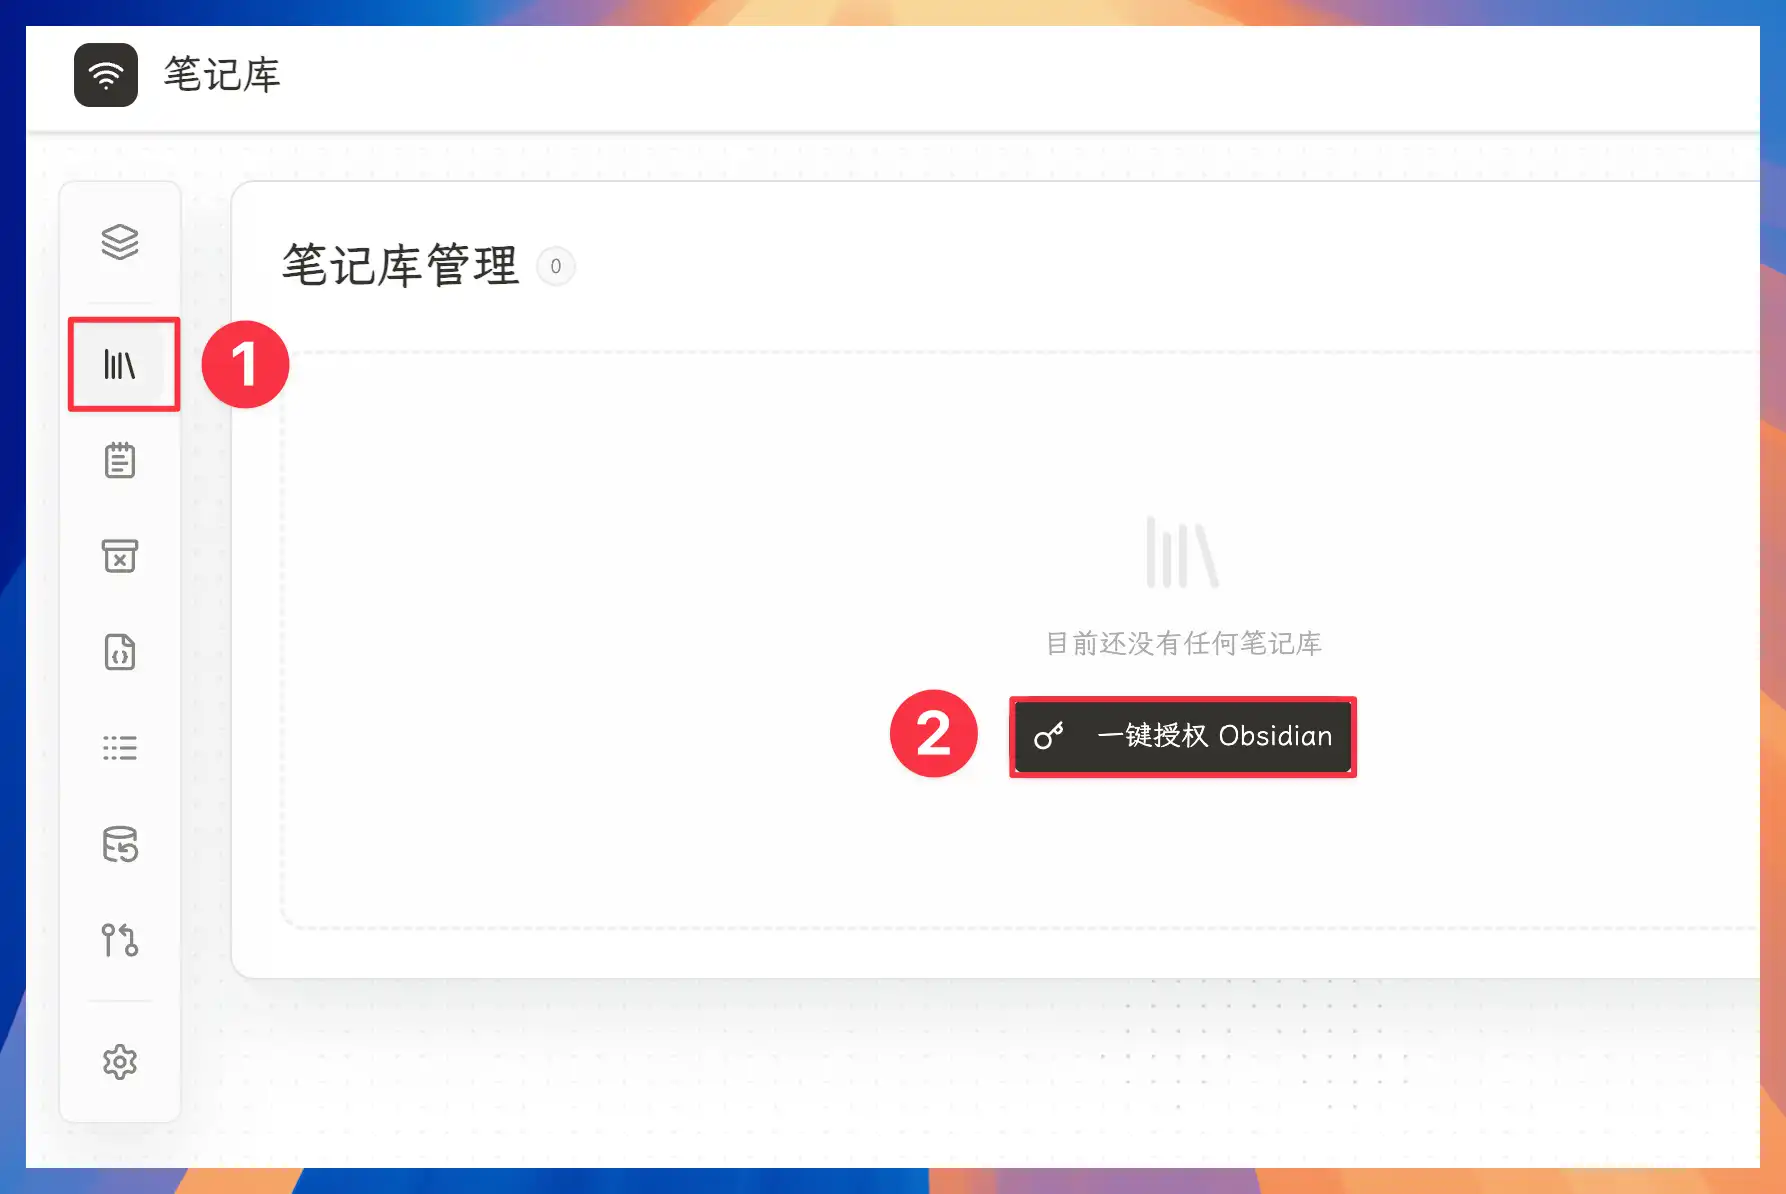
Go back to the server dashboard and open Vault Management. If this is the first setup, there is no vault yet. Click the one-click authorization button for Obsidian.
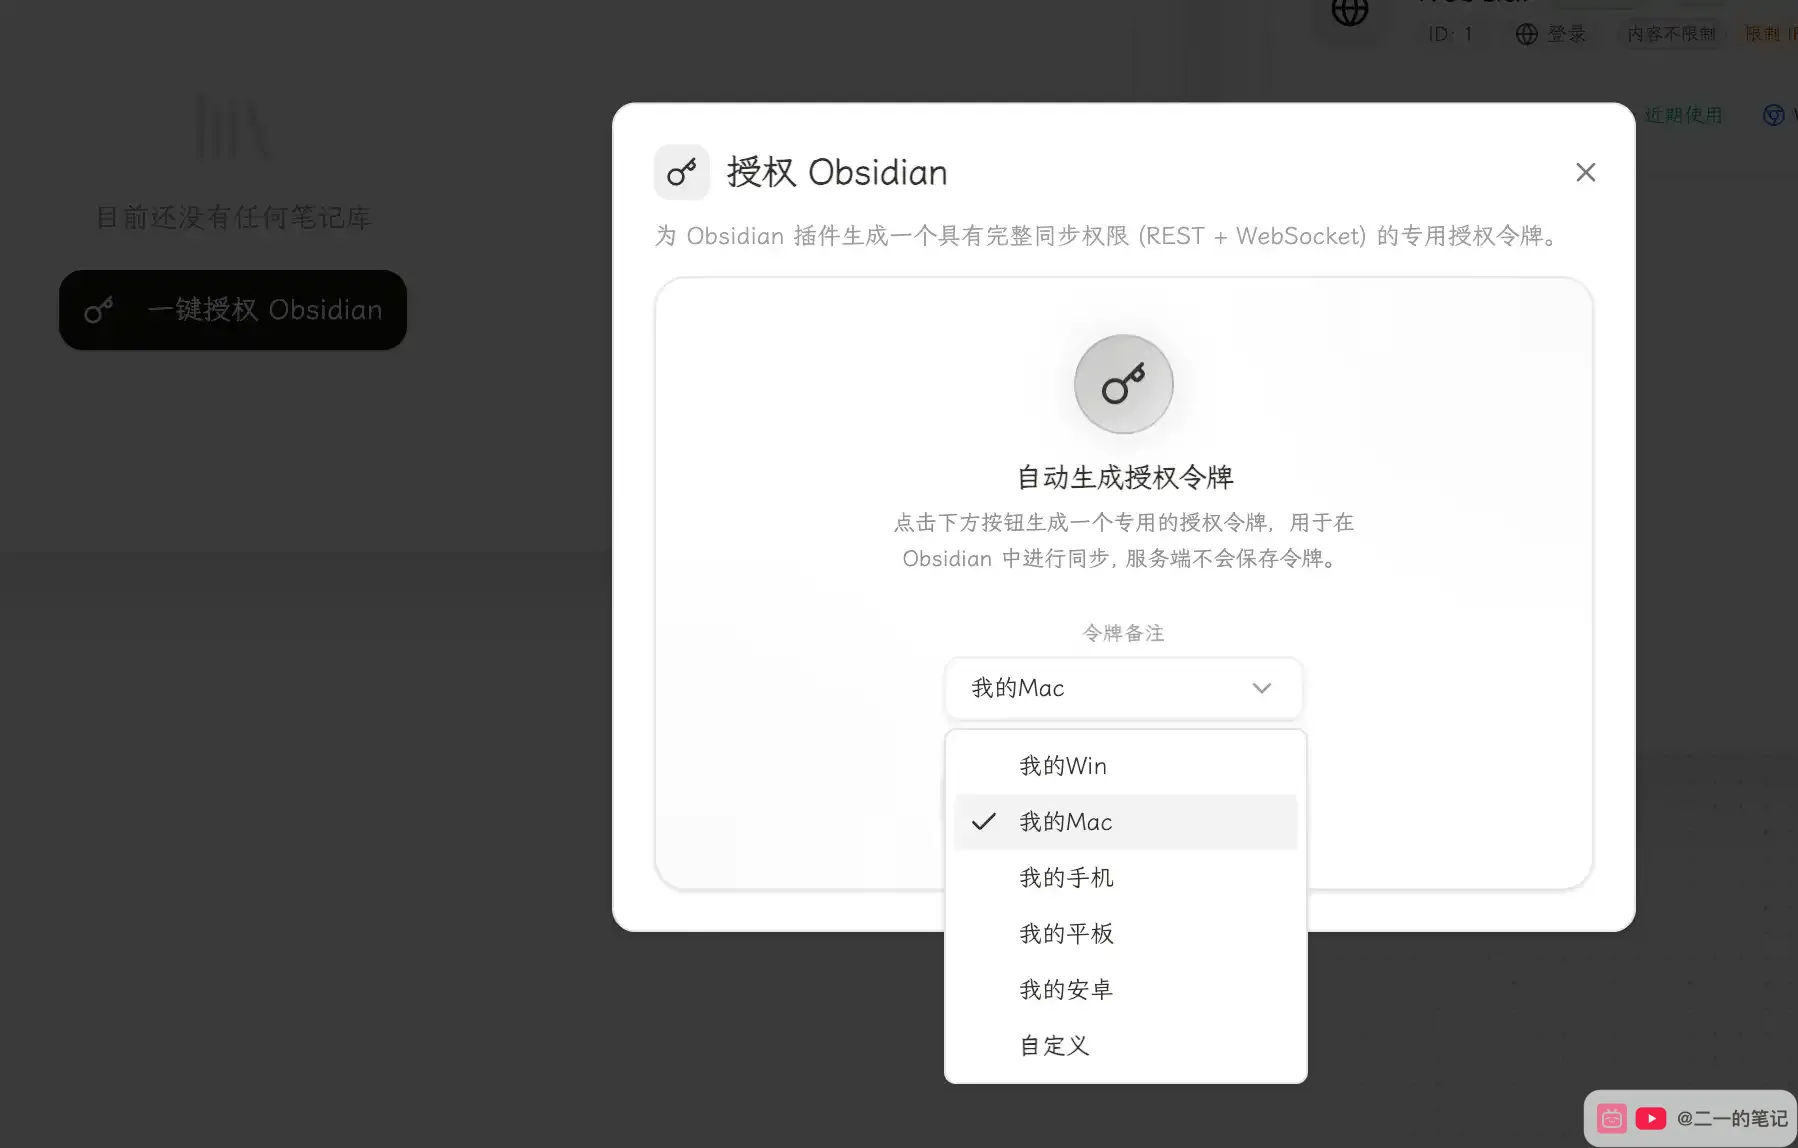
In the popup, choose or enter a device note. In this example, use something like My Mac.
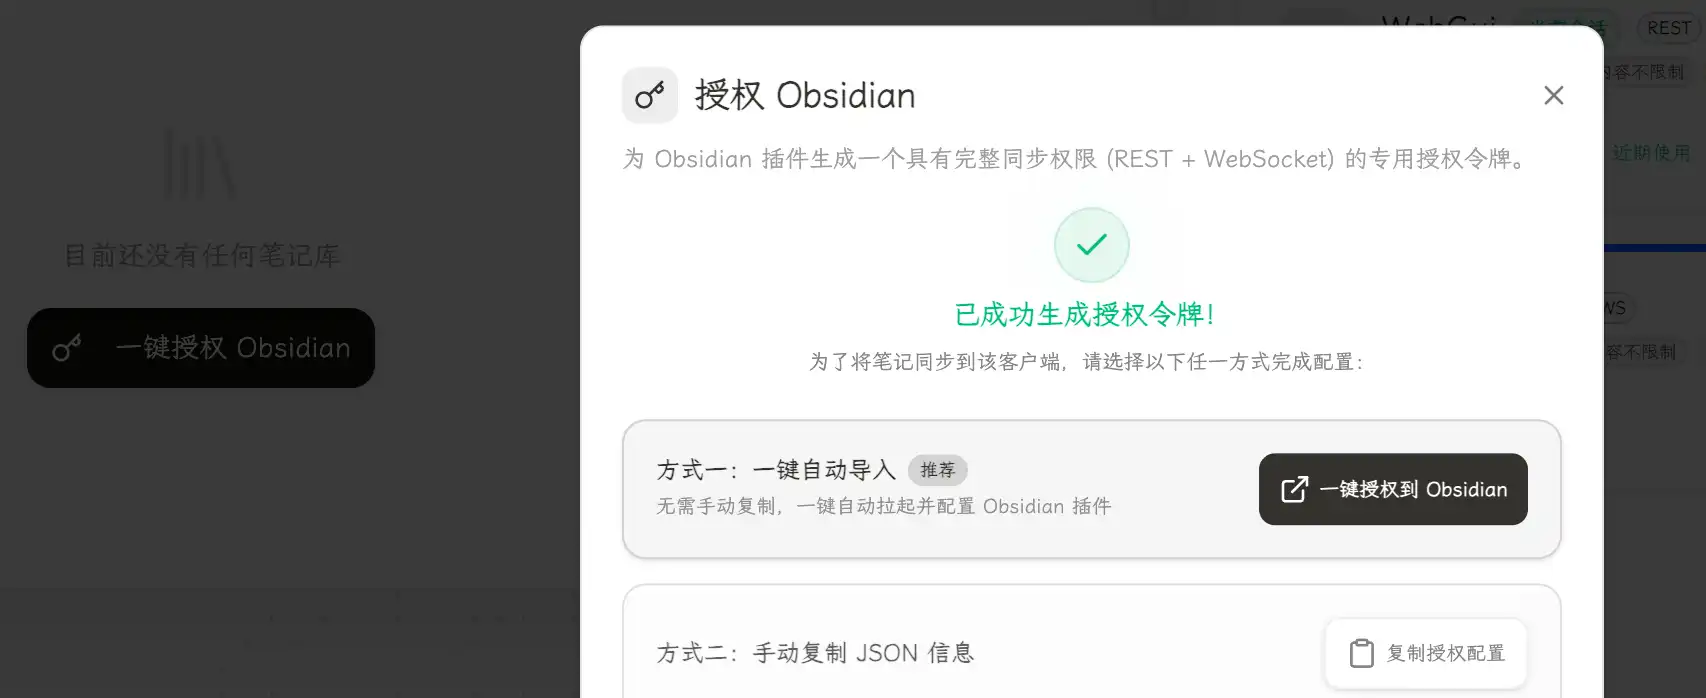
After it generates the authorization, click the button to authorize Obsidian.
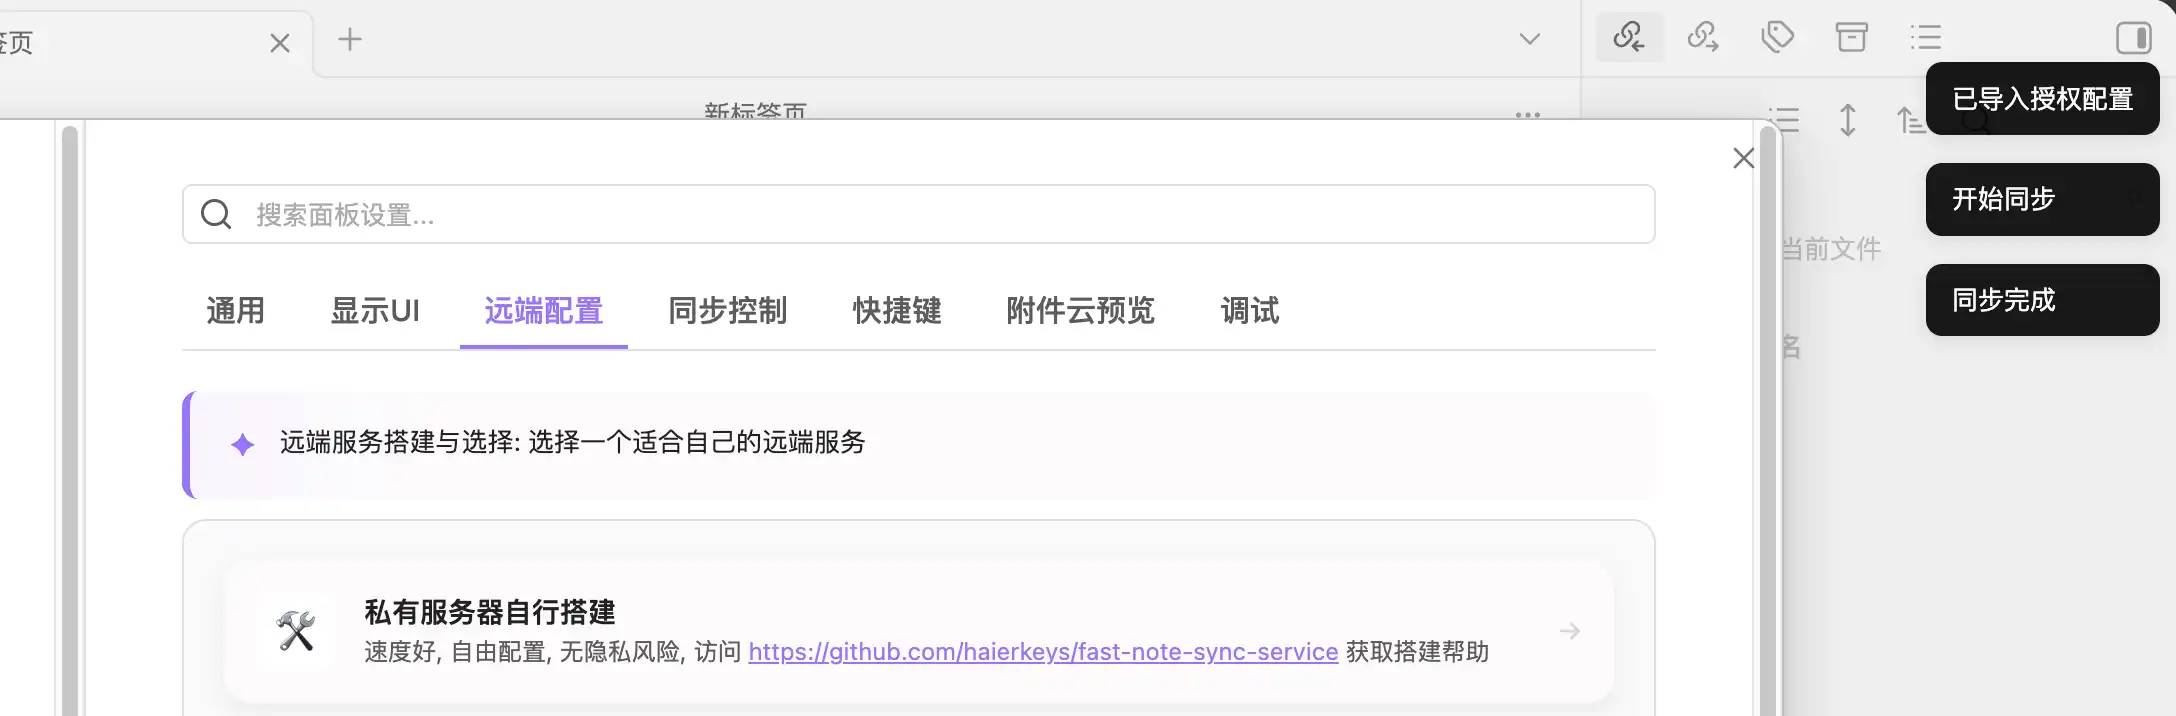
The web page will open Obsidian. The plugin imports the authorization config automatically and starts syncing the current vault. When it says the sync is complete, this device is done.
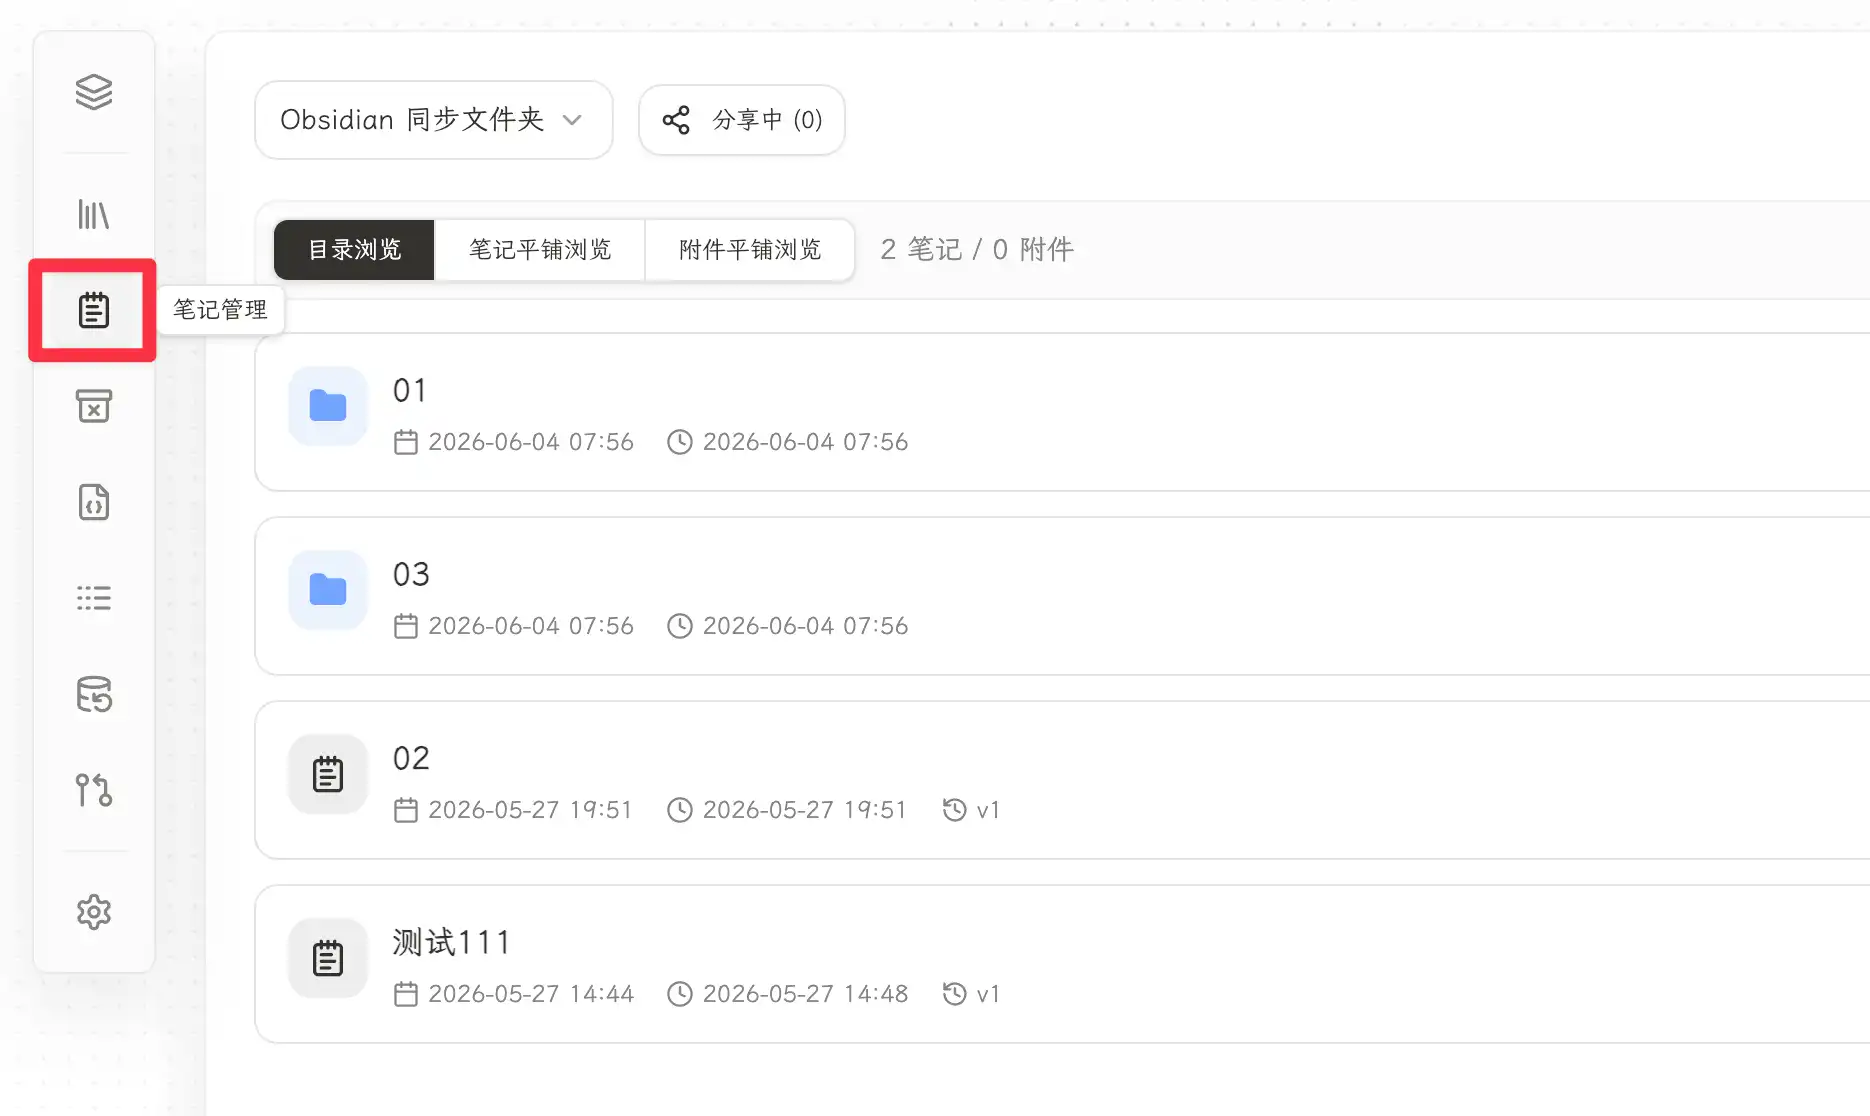
Go back to the web dashboard and open Note Management from the sidebar. If you can see your notes and folders, your Mac has synced to the server.
Configure iPhone and other devices
On iPhone, first prepare a new Obsidian vault:
- Install Obsidian on the iPhone
- Open Obsidian and tap
Create new Vault - Create a new vault, the name does not need to match the Mac exactly
- Choose a local folder, do not choose
Store in iCloud - Tap
Create, then open the new vault - Install and enable the
Fast Note Syncplugin in this vault
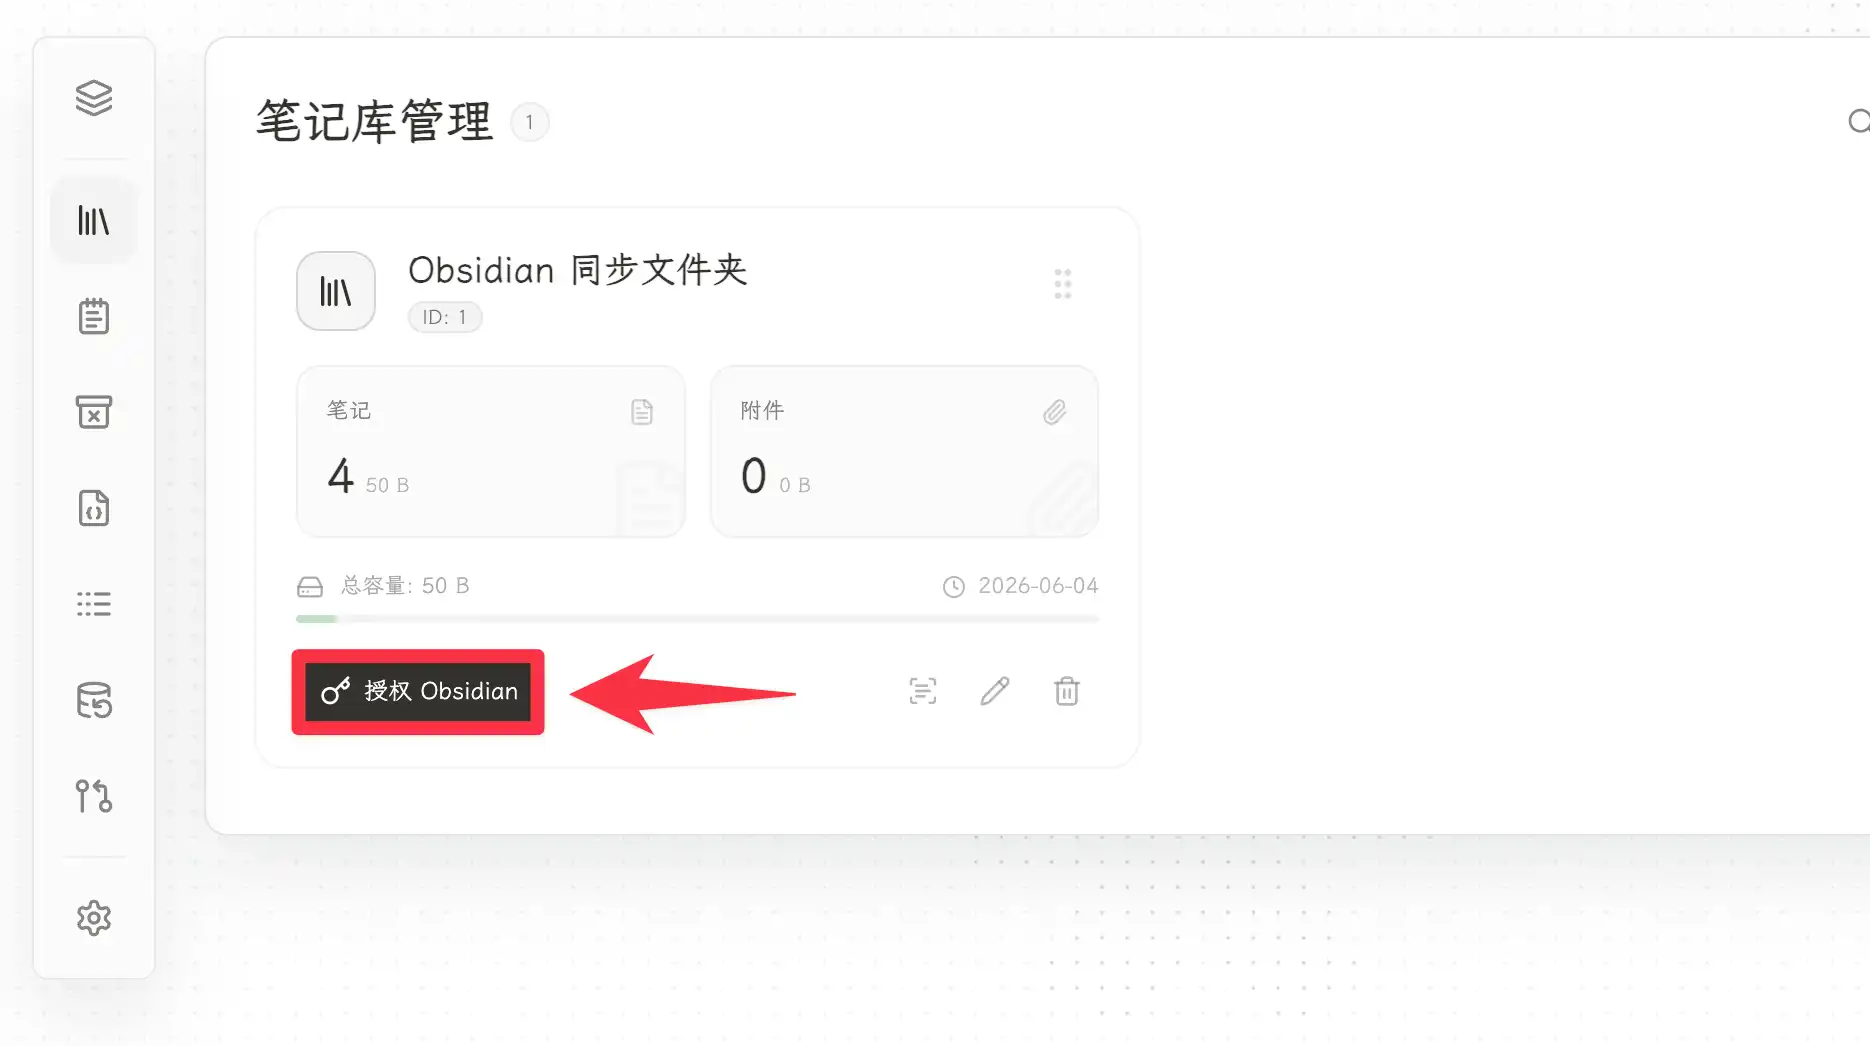
Now return to the Fast Note Sync web dashboard. Open Vault Management, find the vault that was synced from the Mac, and click the button to authorize Obsidian.
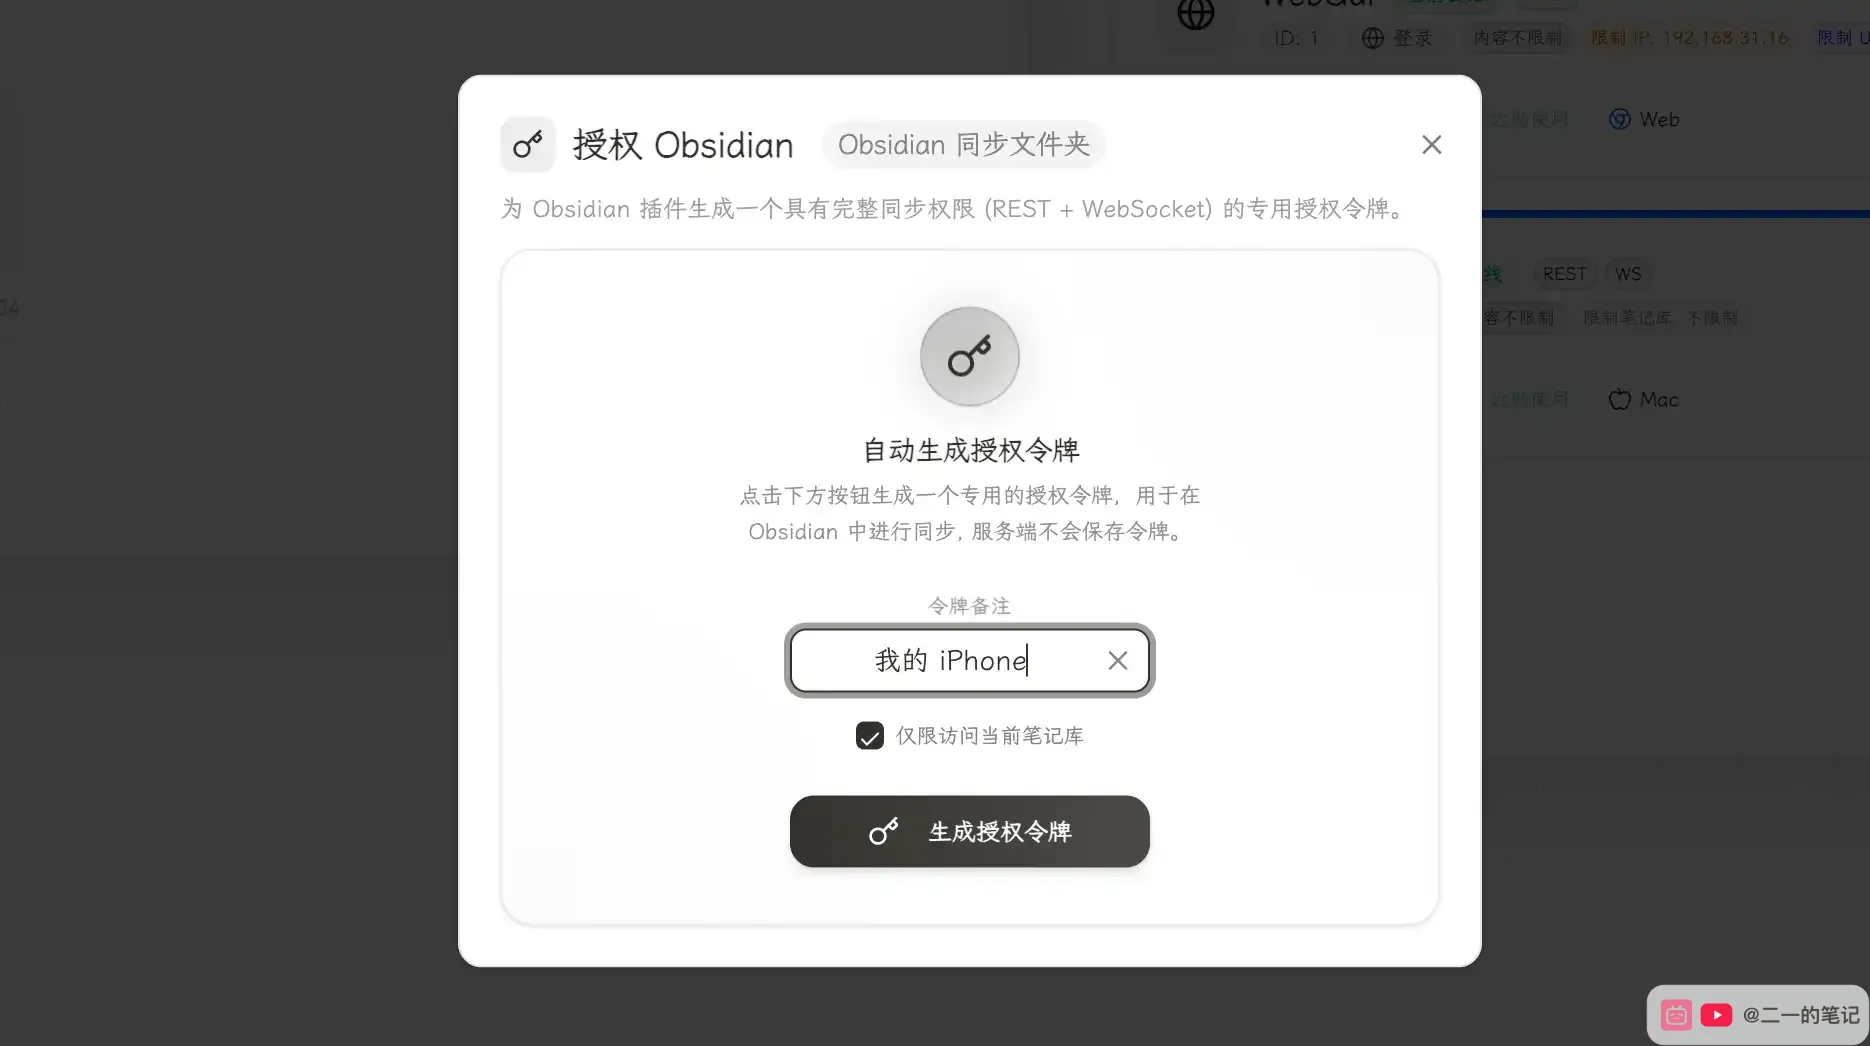
For the token note, enter My iPhone. Select the option that limits access to the current vault, then click Generate authorization token.
You will get a JSON authorization token. Copy it and send it to the iPhone.
After copying the token on the iPhone, open the Fast Note Sync plugin settings in Obsidian. In Remote Config, tap the button to paste the server authorization config. The iPhone sync setup is now complete.
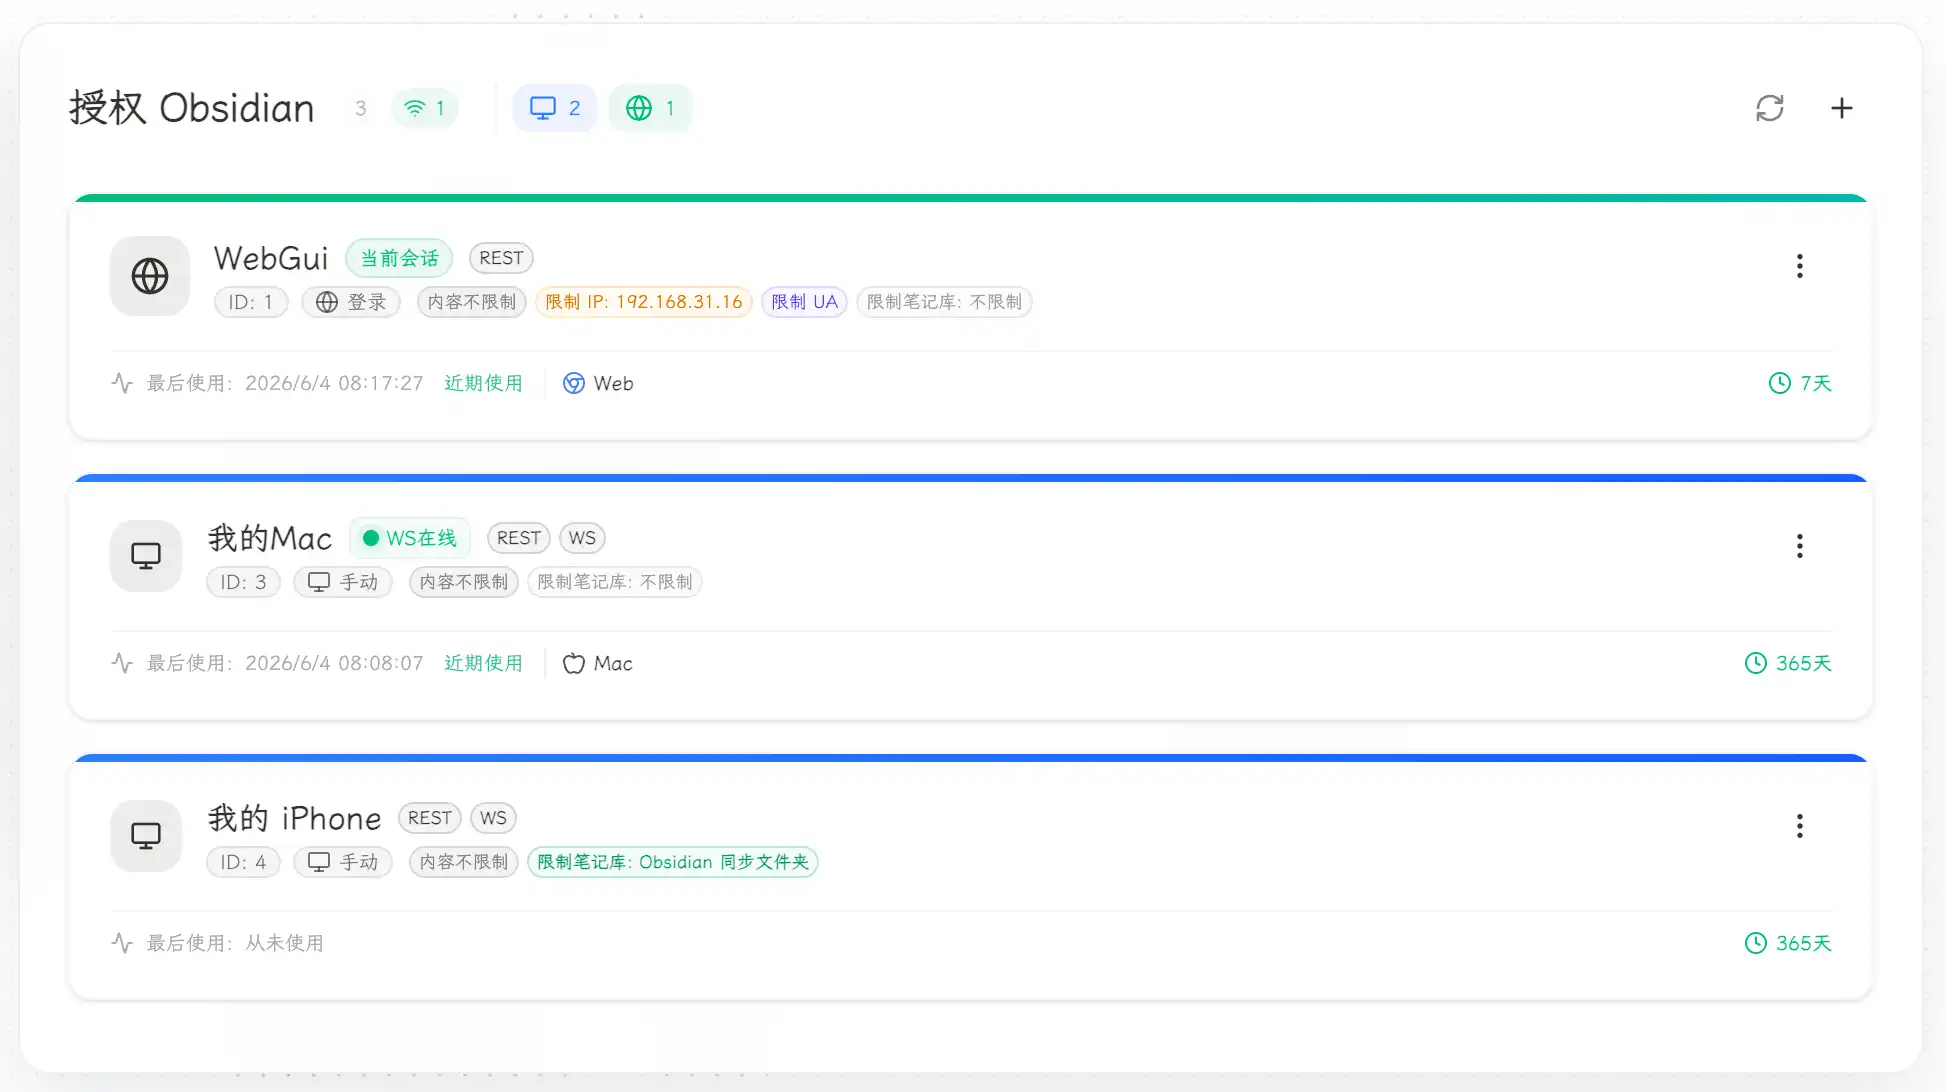
Other computers, tablets, and Android devices use the same process. Create or open an Obsidian vault on the new device, generate an authorization token from the web dashboard, then paste it into the plugin settings.
Other plugin settings
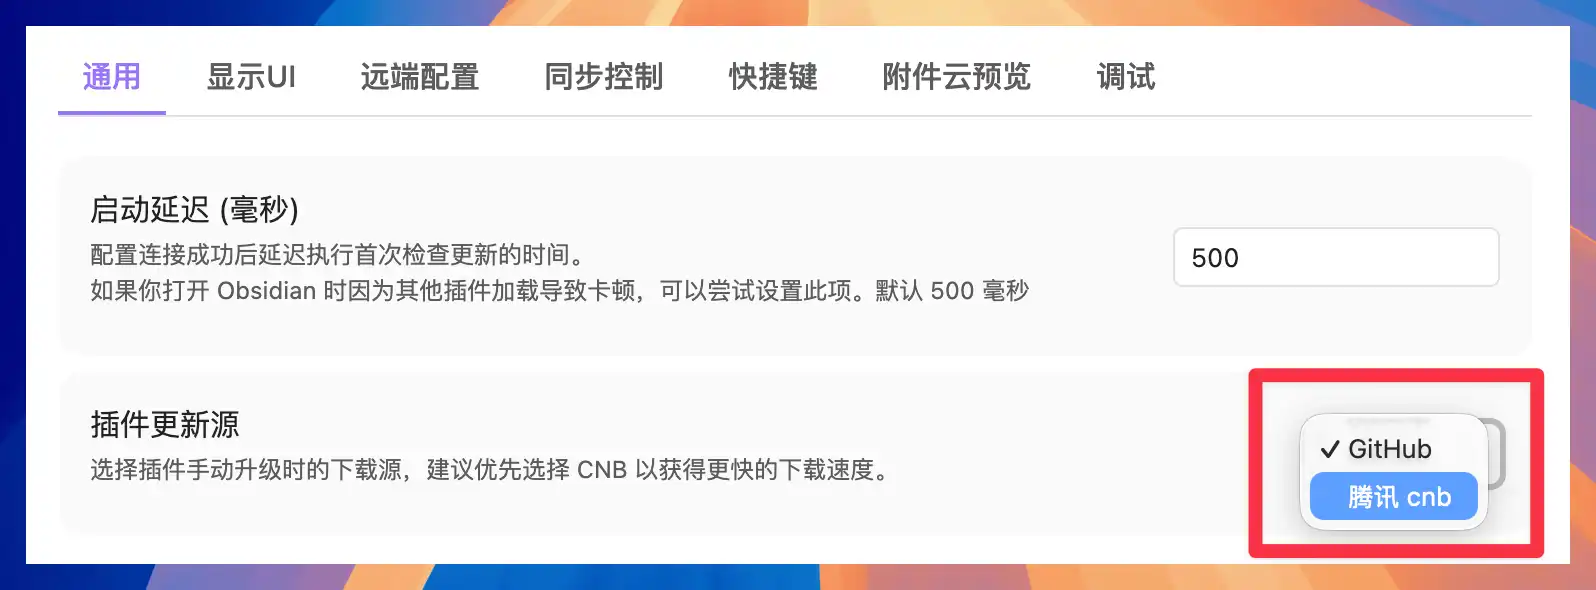
In the General section of the plugin settings, you can change the plugin update source based on your network environment. For mainland China networks, Tencent CNB may work better.
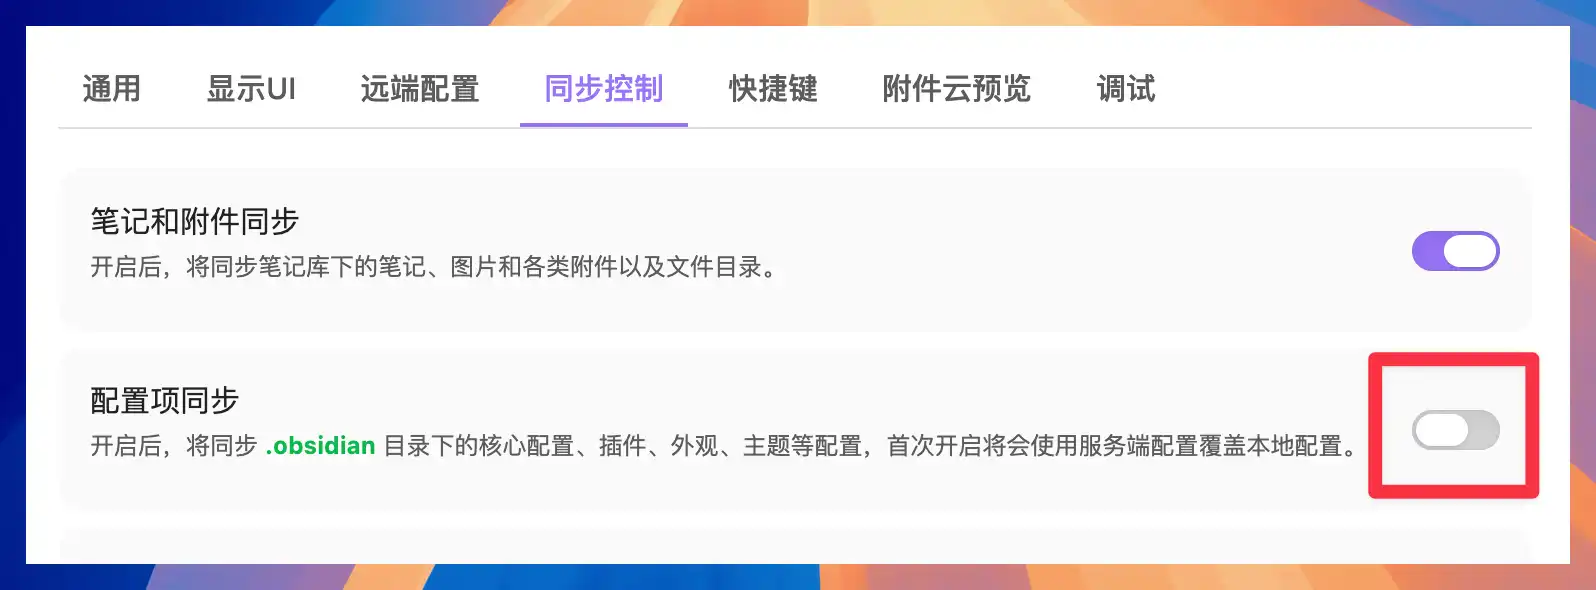
In Sync Control, notes and attachments are synced by default. If you want to sync plugins, appearance settings, themes, and other files under the .obsidian folder to other devices, enable config item sync.
Fast Note Sync also supports sync exclusions, extension exclusions, and allowlists. In plain terms, you can tell the plugin which folders or file types should not be synced, and you can use the allowlist to add certain paths back.
After installing the plugin, Obsidian shows a sync button in the left sidebar. Click it to choose default sync, full sync, sync logs, trash, and other actions.

Summary
After using it, the most obvious advantage of Fast Note Sync is that the setup is shorter. If you already know Docker, the server can be running in a few minutes. Even if you have not used Docker much before, following the screenshots above should keep the process understandable. The main part to check in Feiniu Docker is the real folder path and the directory mapping in Compose.
Once the server is ready, adding more devices is simpler. Mac, iPhone, iPad, and other computers all follow the same pattern: generate an authorization token in the web dashboard, then paste it into the Obsidian plugin on that device. A new device does not need the whole sync setup explained again, and you do not need to fill in a long list of server fields on every device.
The Chinese interface also makes a real difference. The plugin settings, server dashboard, sync controls, and authorization flow are easier to read for Chinese users. Many foreign plugins are usable, but their settings can be scattered, and their explanations are not written with this reading experience in mind. That makes setup harder for ordinary users, especially when they are not sure whether each step is correct.
My conclusion is that Fast Note Sync is more suitable than LiveSync for many ordinary NAS users who want a long-term setup. LiveSync is powerful, fast, and supports end-to-end encryption, but it also asks you to maintain CouchDB. After long-term use, database growth, compaction, and unusual sync states can become problems you need to understand. Fast Note Sync is simpler because the server focuses directly on vaults and file management.
The actual sync speed is also very good. After editing on the Mac, the iPhone usually receives updates quickly, close to a real-time feeling in daily use. The web dashboard can also show notes directly, and in some cases you can view or edit content in the browser without opening Obsidian. With version history, trash, full backups, and incremental backups, an important vault gets another layer of protection. If the data already lives on your own NAS, having one more backup layer feels much safer than relying only on a cloud-drive sync folder.
Fast Note Sync does not currently support end-to-end encryption. If you plan to expose the service to the public internet, account security, access entry points, and backup strategy still need careful handling. The plugin also has AI-related features worth exploring, but this article stays focused on sync. AI workflows can be covered separately later.
Once the server and plugin are set up, you have a vault that syncs across devices. To give it a clear structure from the start, follow the FLO.W Obsidian template install guide and add the template to your already-synced vault.
If you have already used WebDAV on Feiniu, compare it with the Feiniu WebDAV + Remotely Save guide. If you clearly need end-to-end encryption and stronger real-time sync, read the LiveSync on Feiniu NAS guide. If you have not chosen a final route yet, return to the Obsidian sync guide and filter by devices, budget, and maintenance effort.
More Posts

Obsidian 2026 百度网盘同步教程:电脑之间同步 Vault 的完整设置方法
这篇教程会用百度网盘同步空间作为示例,演示如何把 Obsidian 仓库放进同步空间,并在多台电脑之间打开同一份 Vault。需要注意,百度网盘同步空间不是免费能力,使用前请确认账号是否已开通对应会员或同步权益。


Obsidian LiveSync self-hosted sync tutorial: run CouchDB on a NAS with Docker
Obsidian LiveSync self-hosting guide: deploy CouchDB with Docker on a Feiniu NAS; also works on Synology, QNAP, UGREEN and other Docker-capable NAS devices.
Obsidian 2026 Latest Remotely Save Sync Tutorial: Complete Tencent Cloud COS Setup Guide
Obsidian Remotely Save tutorial (2026): configure Tencent Cloud COS to sync your Obsidian vault between computers and mobile phones, step by step.