Obsidian Git Sync Tutorial: GitHub Backup, Plugin Setup, and Multi-device Pull Workflow
This tutorial shows how to sync an Obsidian vault with GitHub and the Obsidian Git plugin, then pull the same vault on Windows, Android, and iPhone.
Before You Start
Git is the most difficult Obsidian sync option to set up.
If you only want the same notes to appear on several devices, start with Obsidian Sync, iCloud, paid Nutstore, or Syncthing.
We recommend Nutstore sync for paid users or users starting with a new vault containing few files. The free plan allows 1GB uploads and 3GB downloads per month. WebDAV allows 600 requests per 30 minutes for free accounts and 1500 for paid accounts. Avoid syncing an existing vault with many files all at once. Bulk requests can trigger rate limits, 503 errors, and failed syncs, even on a paid plan.
Git is a better fit when you clearly need version control. For example, you want to know exactly what changed each time, go back to an older version, or you enjoy experimenting with Obsidian: trying plugins, changing themes, editing CSS snippets, code blocks, templates, and all kinds of settings. As long as you commit before experimenting, even if the whole vault gets messy later, you can usually restore it quickly.
This setup mainly fits two types of users: people who need one vault across Mac, Windows, Android, and iPhone, and people who care about version history enough to accept the learning cost of GitHub and command-line work. If you only want low-maintenance notes sync, I do not recommend using Git just for the sake of using Git, because setup and maintenance take more work than ordinary cloud-drive sync.
The Git sync flow looks roughly like this:
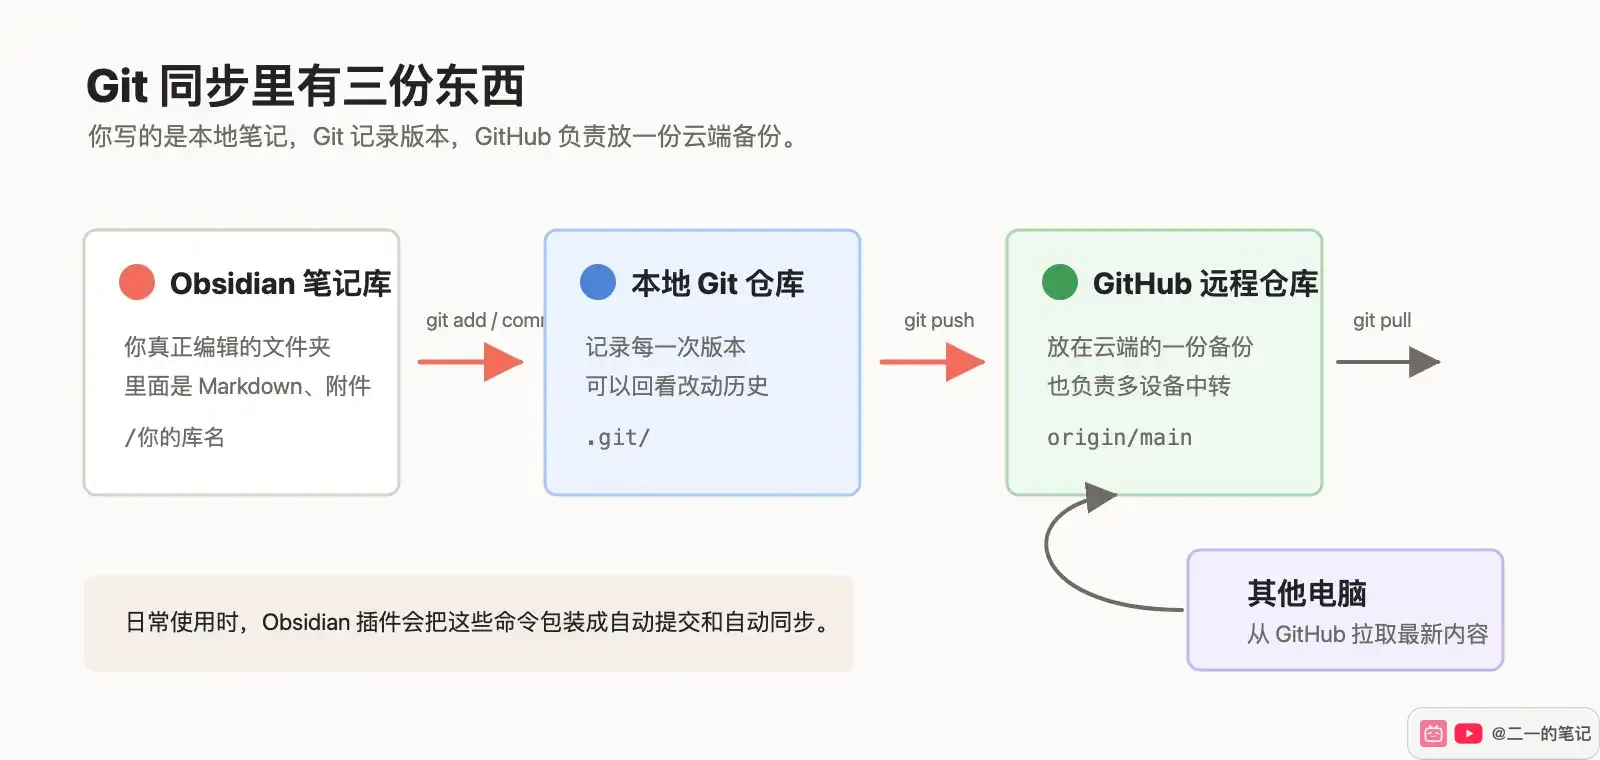
If any step below already feels like too much, it is better not to force it, because similar issues will keep showing up during daily maintenance.
The rest of the tutorial is split by device, but the core order is always the same:
- Create a remote repository first.
- Turn your local Obsidian vault into a Git repository and push it to the remote repository.
- Pull the same vault from the remote repository on other devices.
- In daily use, pull before writing, then commit and push after writing.
On desktop, the Obsidian Git plugin can handle these actions directly. Mobile devices have more restrictions, so Android and iPhone use dedicated Git apps for syncing, while Obsidian only opens and edits the notes.
Obsidian Git Sync Tutorial
Create A GitHub Account
Before using Git sync, prepare a remote repository. GitHub and Gitee both work. This article uses GitHub as the example.
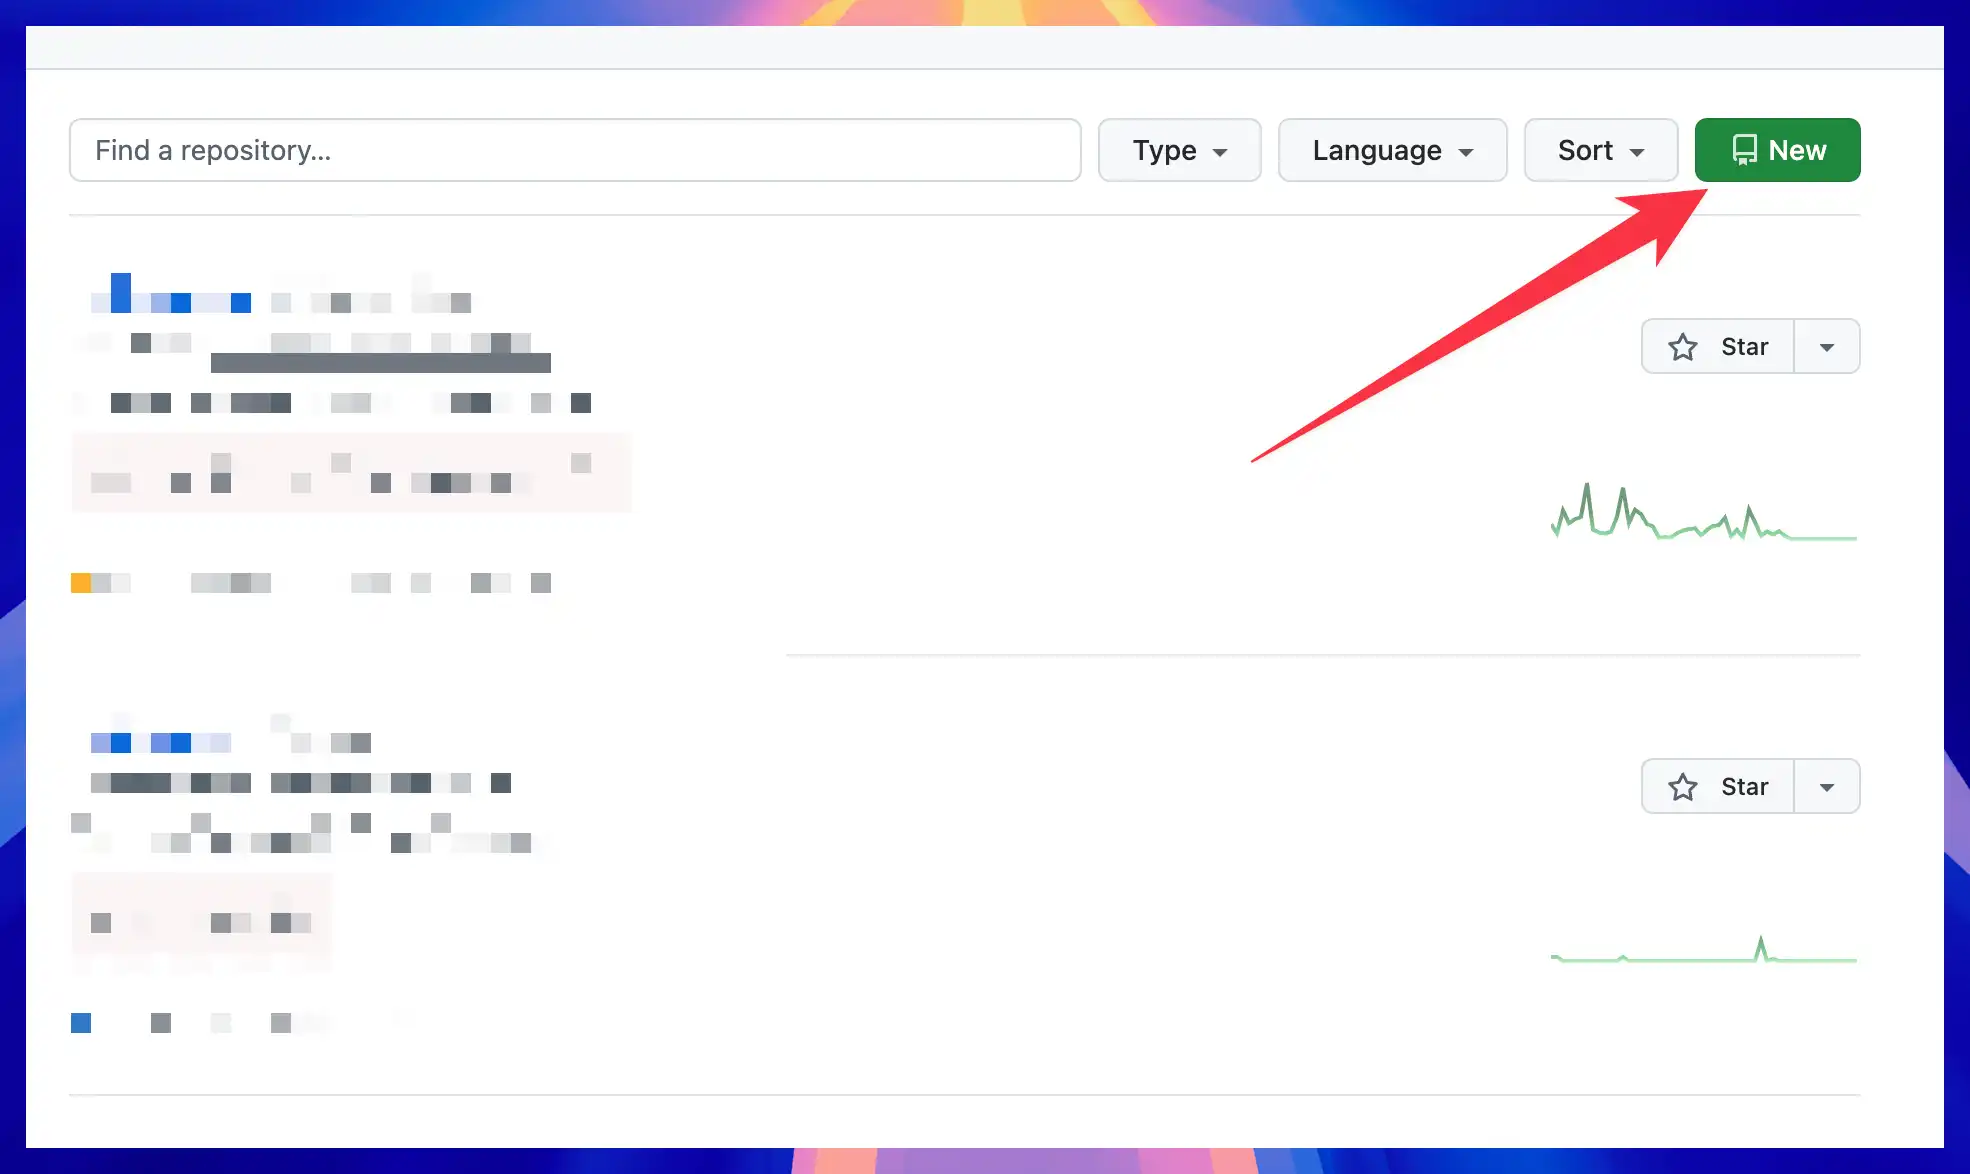
After registration, open your repository list and click New in the upper-right corner.
You can name the repository obsidian, or use your own vault name. Make sure the repository is set to Private, not Public. Obsidian often contains private notes, screenshots, attachments, plugin settings, and temporary files. It should not be exposed publicly on the internet.
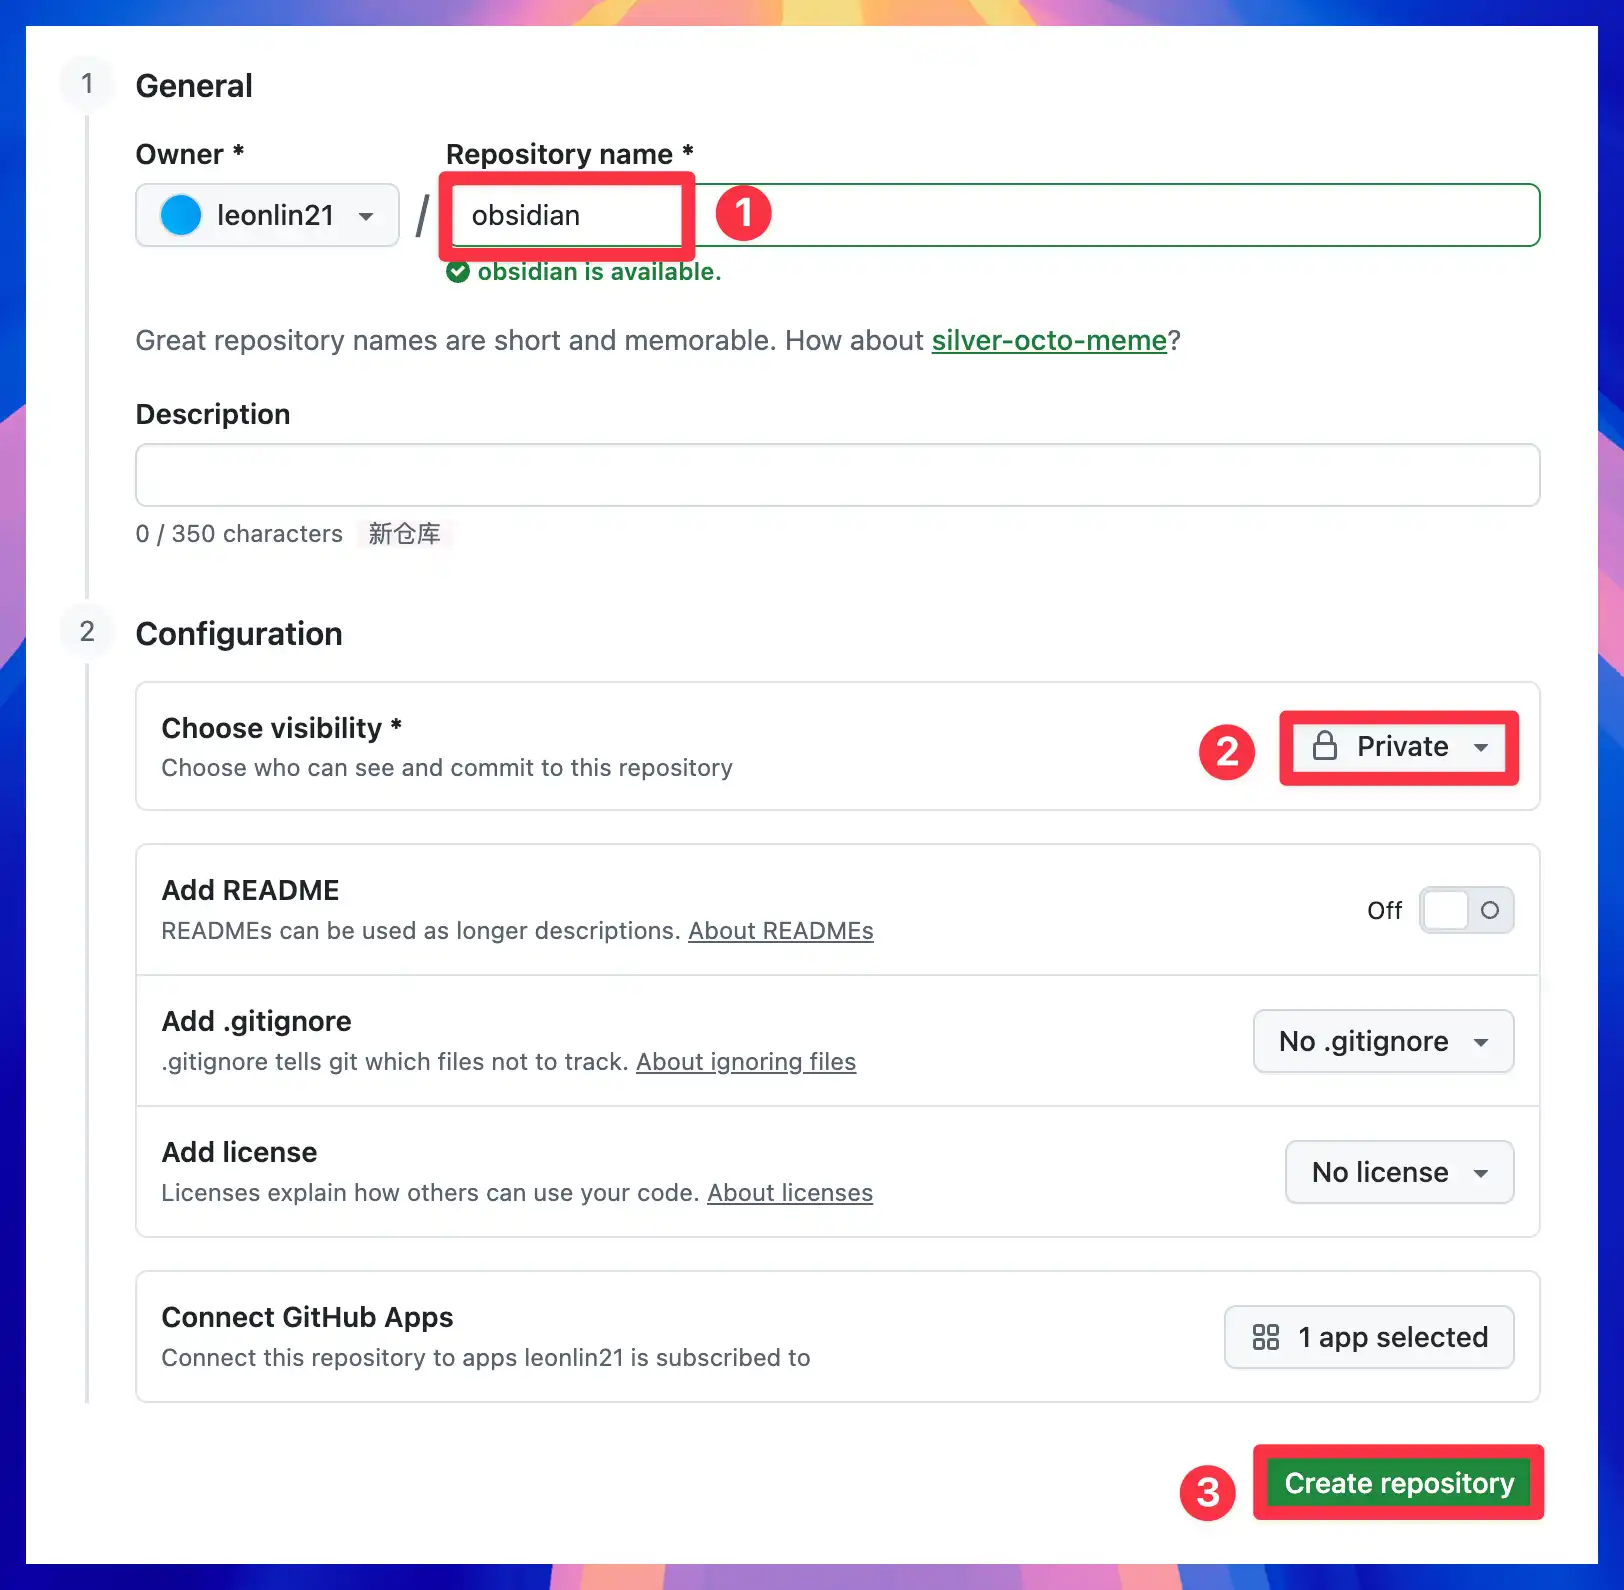
After the repository is created, GitHub gives you a repository URL. This is the address you will use later, such as:
https://github.com/leonlin21/obsidian.gitWhen you do this yourself, copy the URL from your own page. Do not copy the example above.

Install Git On Your Computer
Git needs to be installed on your computer first. The Obsidian Git plugin only calls Git. It does not install the underlying Git tool for you.
Official download page: https://git-scm.com/downloads
If you like using AI as a setup assistant, you can send this URL to your AI tool and ask it to walk you through the installation for your system.
After installation, run:
git --versionIf you see a version number, Git is ready.
Configure Git For The First Time
The first time you use Git, you need to tell it what name and email should appear in commit records. Open Terminal on Mac or PowerShell on Windows, then run:
git config --global user.name "Your Name"
git config --global user.email "your-email@example.com"
I recommend using the email address registered with GitHub. This only affects the author information shown in commits. It is not your GitHub password.
Initialize Your Local Obsidian Vault
Before you start, make a backup of your Obsidian vault. Git is a version-control tool, but during first-time setup it should not be your only safety net.
Find the path of your Obsidian vault, then enter that folder in your terminal.
Windows example:
cd "C:\Users\YourUserName\Documents\Obsidian\YourVaultName"Mac example:
cd "/Users/YourUserName/Documents/Obsidian/YourVaultName"The quotes protect paths with spaces or non-English characters. If your path is simple and has no spaces, quotes are optional.
Inside the vault folder, run:
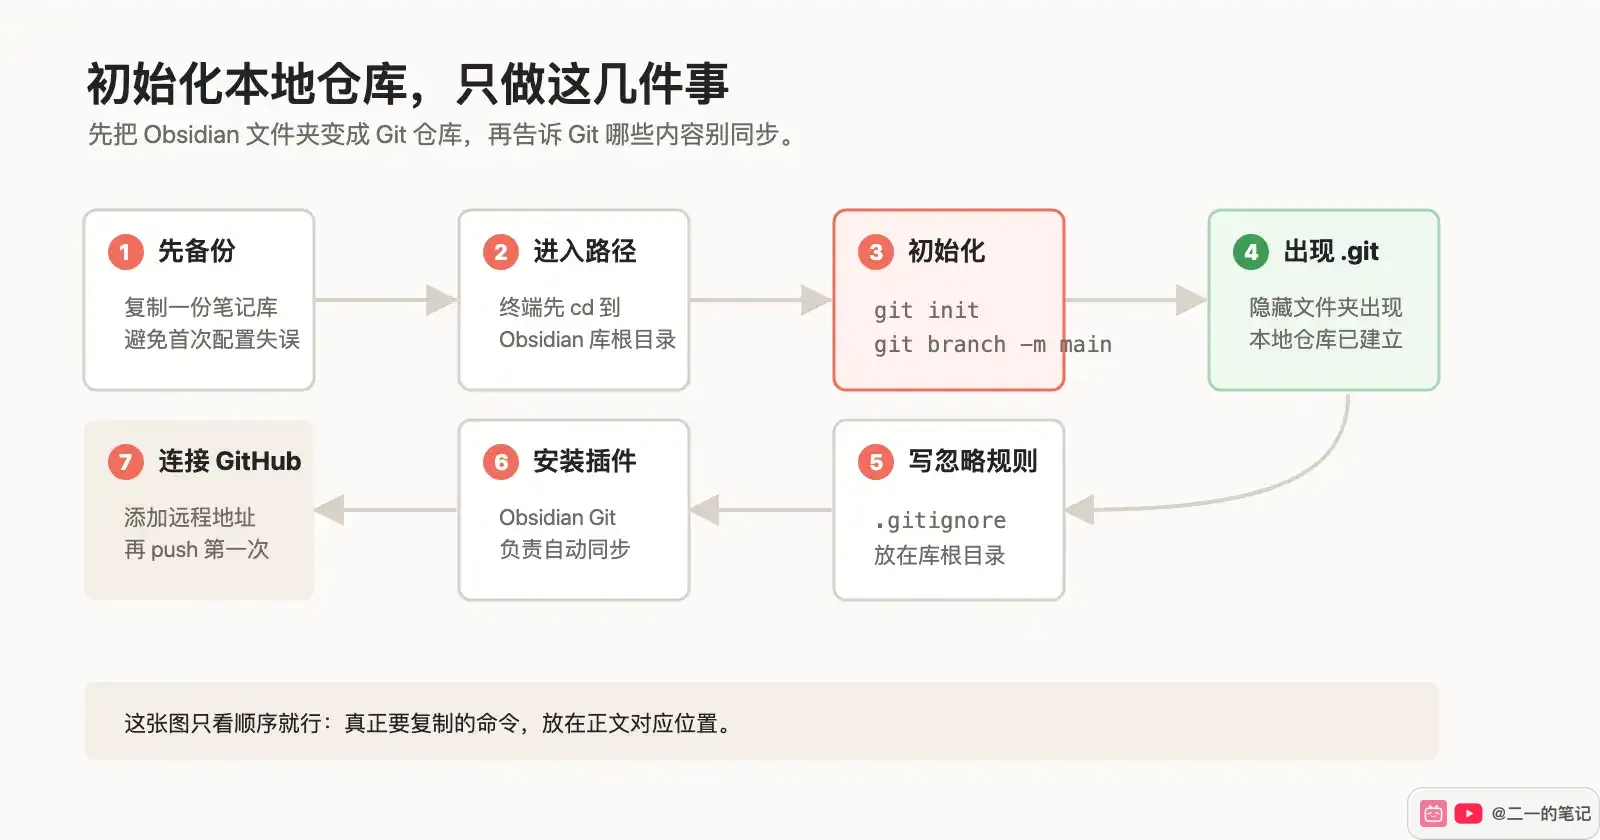
git init
git branch -m main
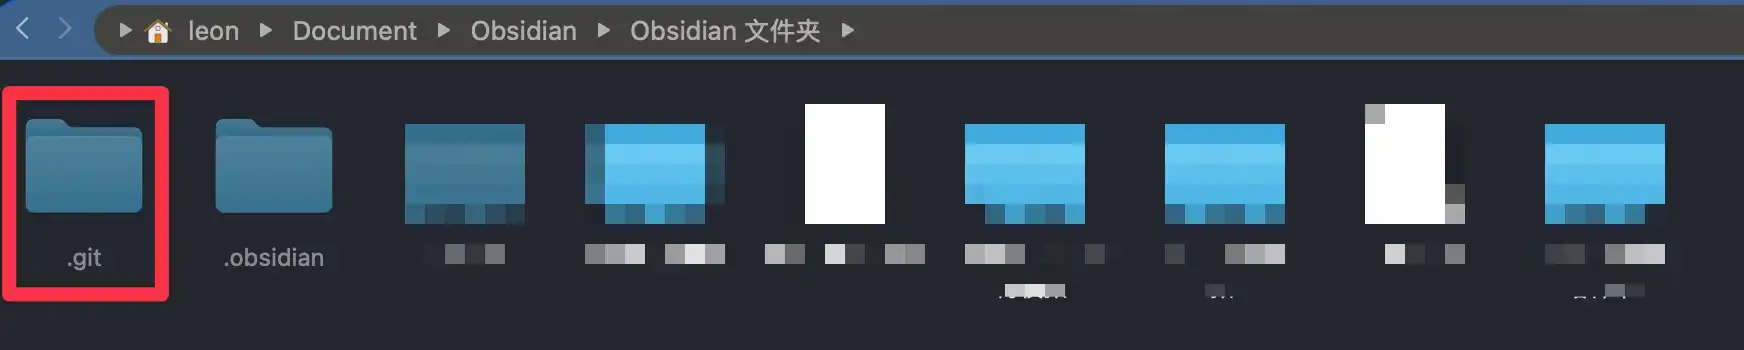
After git init succeeds, a hidden .git folder appears in the vault root. Finder or File Explorer may hide it by default. The screenshot marks that folder.
Use this diagram to check the order first, then return to the text and copy the commands.
Next, create a .gitignore file in the vault root. This file should be placed in the vault root, not inside the .git folder.
.gitignore tells Git which files should not be synced. The following starter config is suitable for beginners:
# ===== Recommended common ignores for beginners and multi-device sync =====

# 1. Device-specific workspace layout, strongly recommended
# Different computers and phones have different window layouts and open tabs.
# Syncing these files often creates conflicts.
.obsidian/workspace.json
.obsidian/app.json

# 2. System-generated clutter
.DS_Store
Thumbs.db
.directory

# 3. Obsidian trash folder
.trash/

# ===== Optional advanced ignores =====

# 4. Ignore the entire .obsidian folder
# Use this if you do not want to sync plugin settings, themes, or hotkeys.
# .obsidian/

# 5. Protect private keys and tokens
# Many plugins may store API keys or tokens in data.json files.
.obsidian/plugins/*/data.json

# 6. Large files and attachments
# If your vault has many images, PDFs, or videos, consider ignoring them
# or syncing them in another way.
# attachments/
# *.pdf
# *.mp4

# 7. Other common cache and temporary files
*.log
*.tmp
.cache/
If you do not want to sync .obsidian settings at all, remove the # before # .obsidian/. Beginners should not start with this, because plugins, themes, and hotkeys will stop syncing as well.
Install The Obsidian Git Plugin
If you have never installed community plugins before, read this first: Obsidian plugin installation tutorial. If you already know the process, continue below.
Open Obsidian's community plugin marketplace and search for Git.
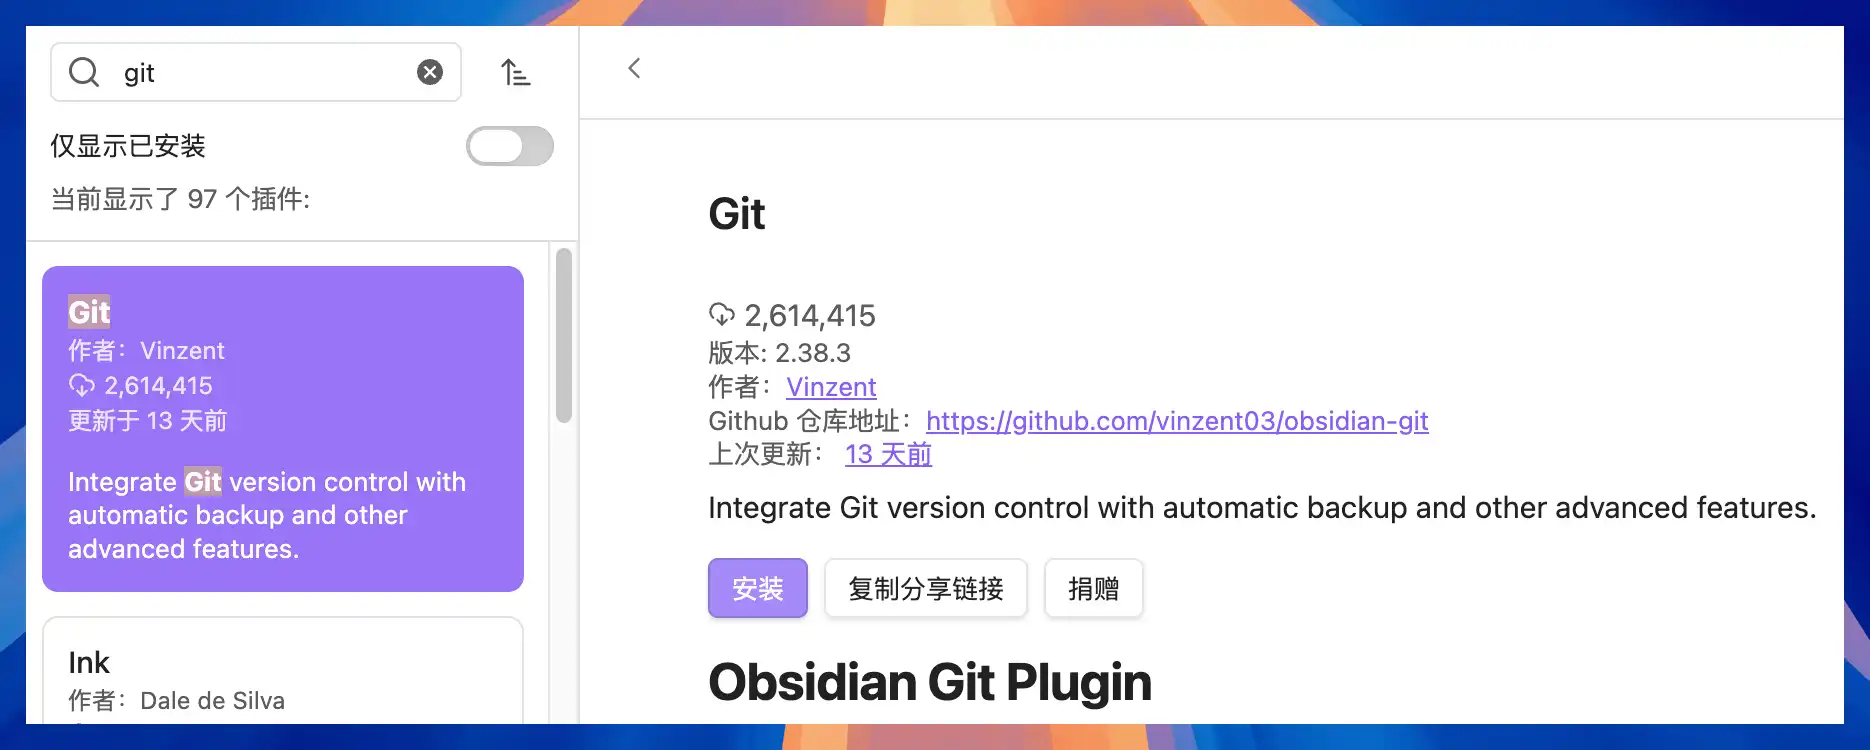
After installation, open the plugin settings. Focus on two settings first.
The first is Auto commit-and-sync interval. It controls how often Obsidian automatically commits and syncs. The screenshot uses 1 minute for testing. For long-term use, 5 or 10 minutes is usually better, because it avoids overly frequent syncs.

The second is Pull on startup. I recommend turning it on. It pulls the latest content from the remote repository whenever Obsidian starts, which helps reduce conflicts when switching between devices.

Leave the other settings at their defaults for now. Git sync has enough moving parts. In the beginning, get the basic commit, push, and pull flow working first.
Sync The Local Vault To GitHub
Now return to the terminal. On both Windows and Mac, enter your Obsidian vault folder first.
Windows example:
cd "C:\Users\YourUserName\Documents\Obsidian\YourVaultName"Mac example:
cd "/Users/YourUserName/Documents/Obsidian/YourVaultName"As before, replace the path inside the quotes.
Add your GitHub repository URL to the local repository:
git remote add origin https://github.com/your-username/your-repository.gitWhen this command succeeds, it usually prints nothing.
Then run the following three commands:
git add .
git commit -m "Initial commit: Add all vault files"
git push -u origin main
These commands do three things:
git add .: puts the current vault files into the staging area.git commit ...: creates a local version record.git push ...: uploads the local version to GitHub and links the localmainbranch with GitHub'smainbranch.
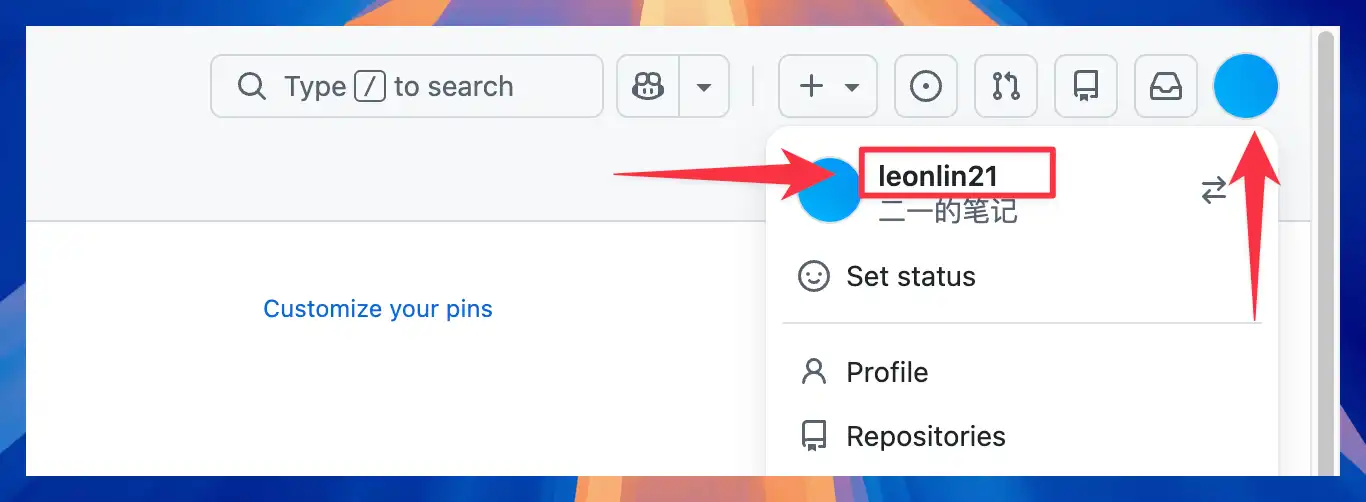
After git push -u origin main, the terminal asks for your username first.

The username is your GitHub username, the one shown in your avatar menu, such as leonlin21 in the screenshot.
Next, the terminal asks for a password.

Do not enter your GitHub account password here. GitHub now requires a token, which is the key you will generate below.
Open this page: https://github.com/settings/tokens
In the left sidebar, choose Tokens (classic). In the upper-right corner, click Generate new token, then choose Generate new token (classic).
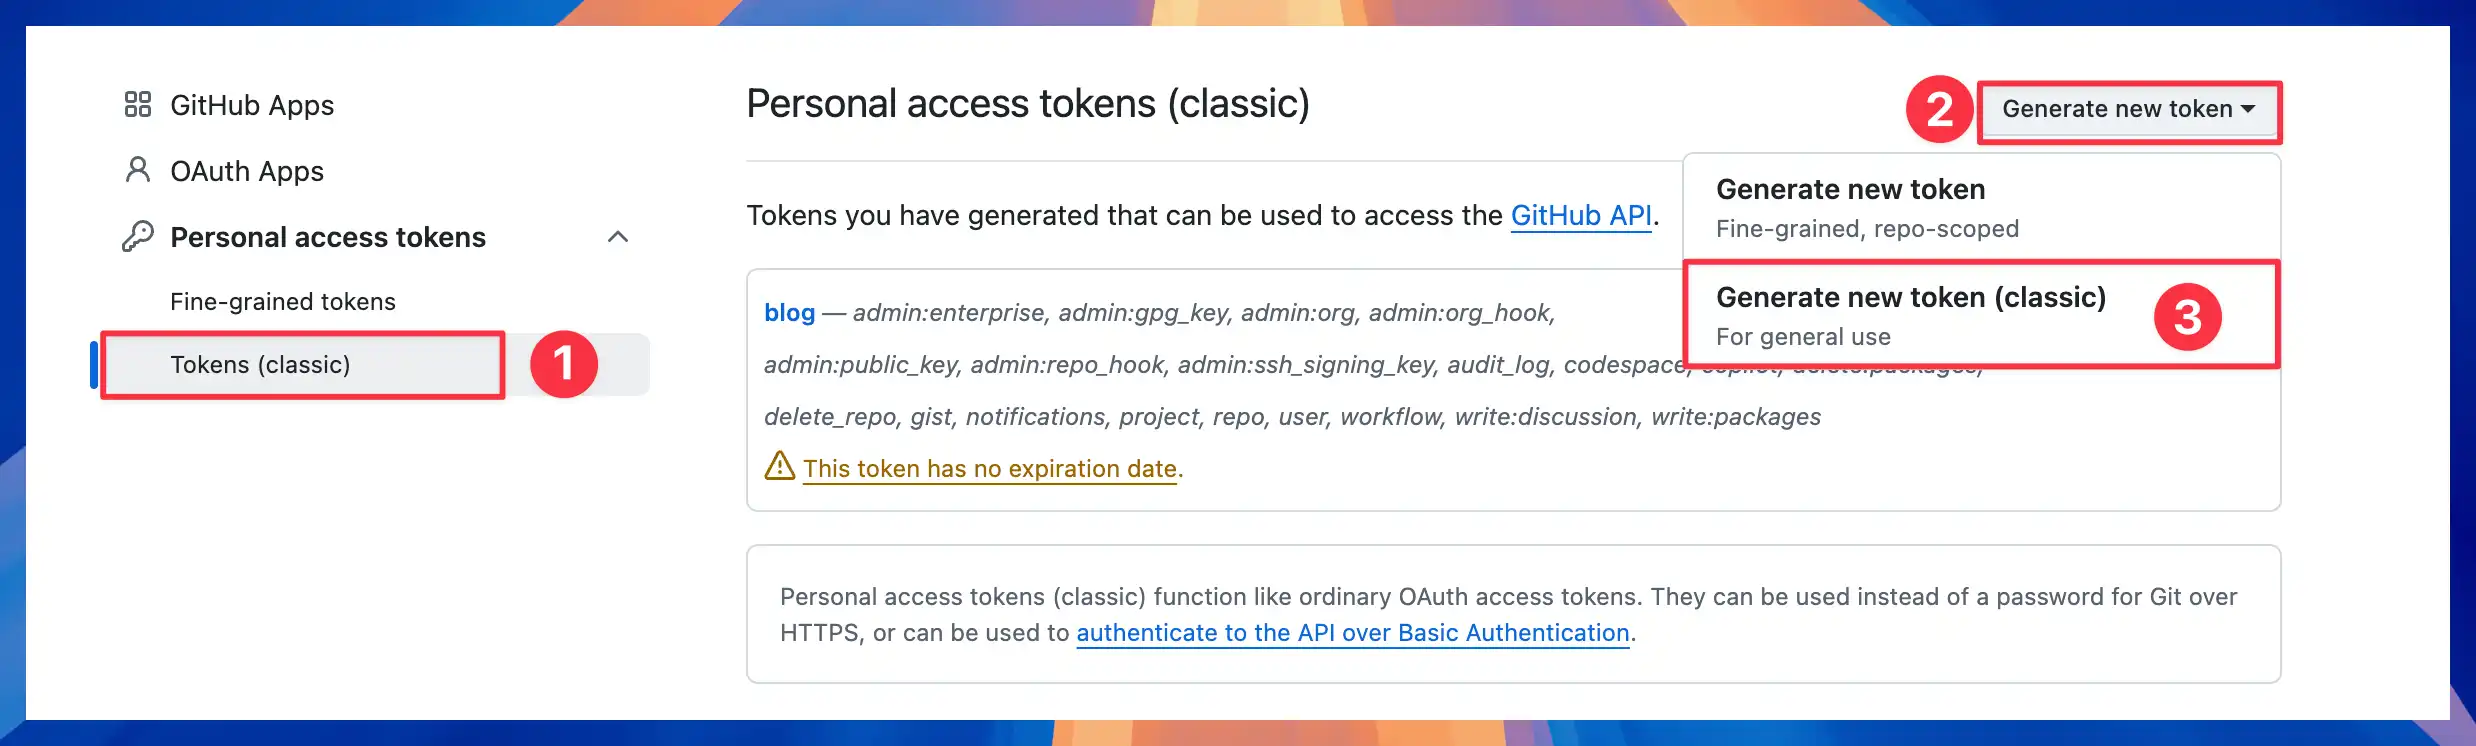
Fill it in like this:
Note: use a name you can recognize, such asObsidian Git Sync.Expiration:90 daysis fine. You can chooseNo expirationif you do not want to regenerate it later, but that is less secure.Select scopes: only checkrepo.
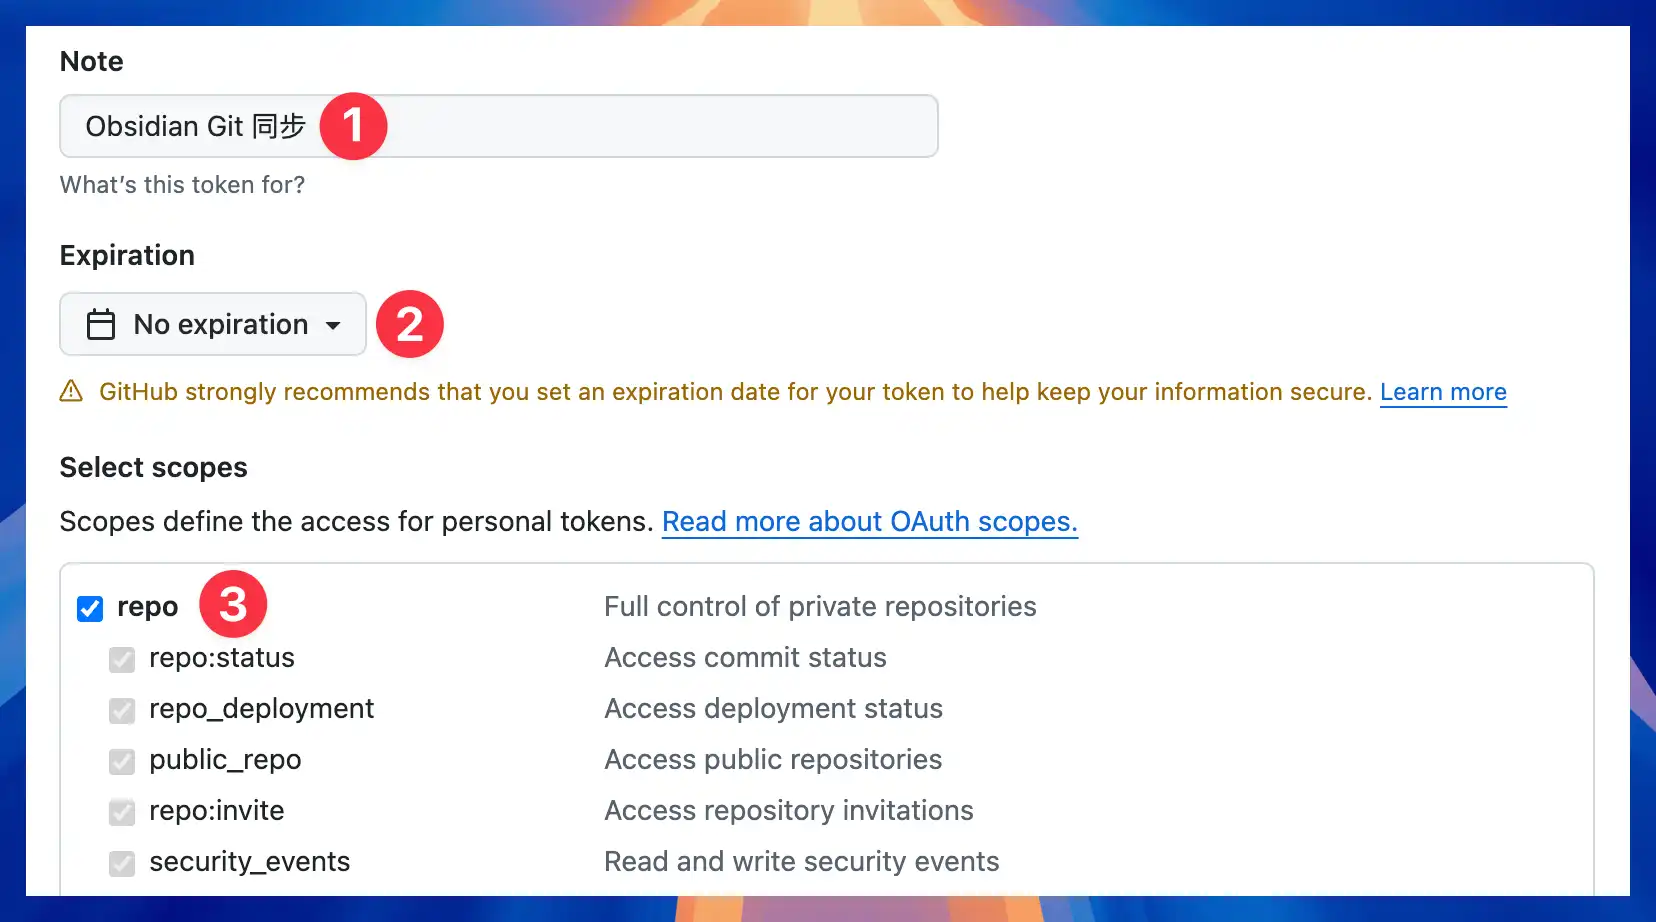
Scroll to the bottom and click Generate token.
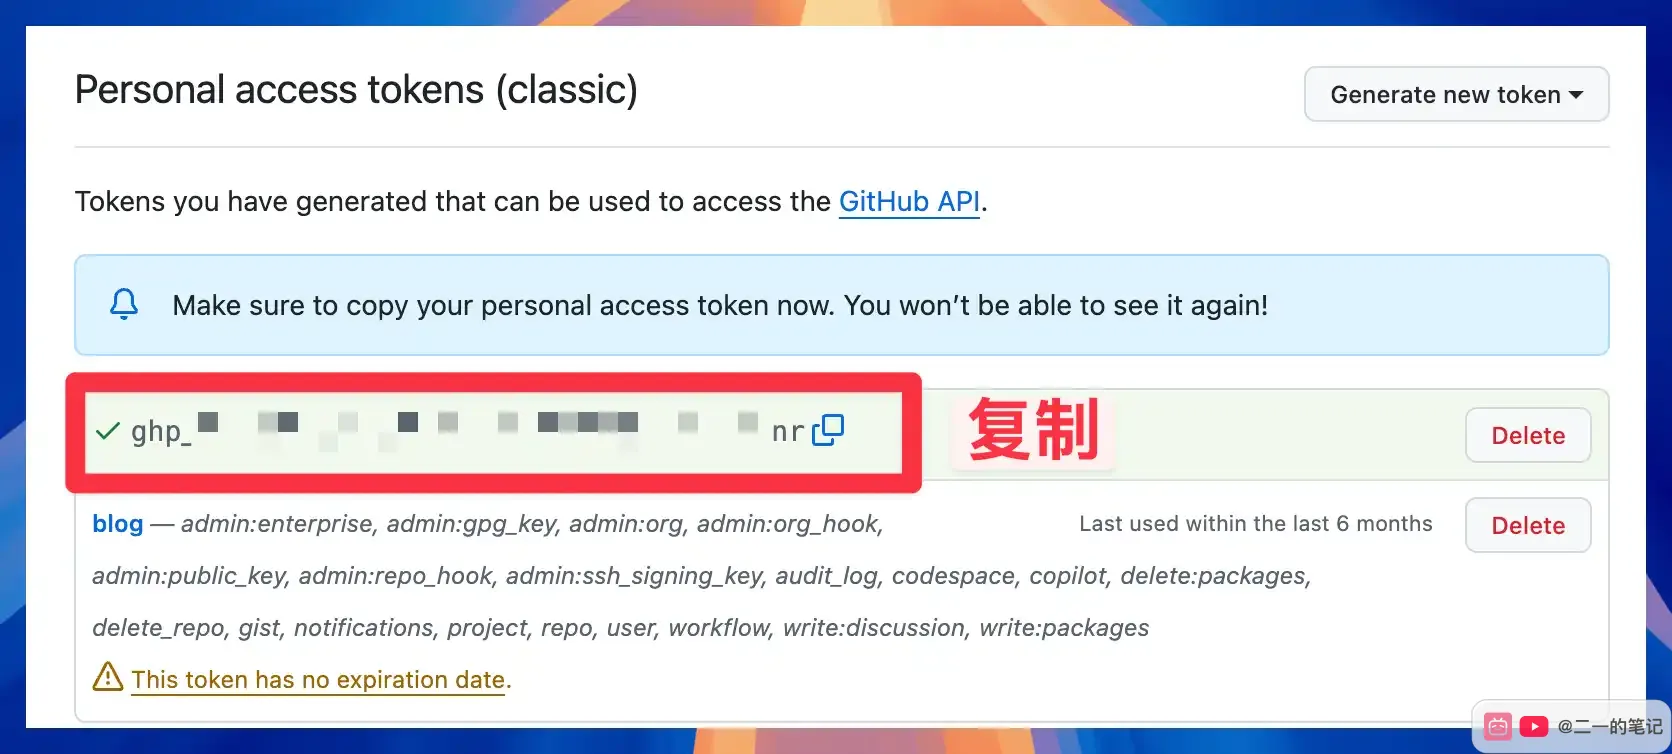
After it is generated, you will see a value starting with ghp_. The token is shown only once, so copy and save it immediately. Return to the terminal and paste it after Password for ....
When pasting a password or token in the terminal, the screen usually shows no characters at all. That is normal. Paste it and press Enter.
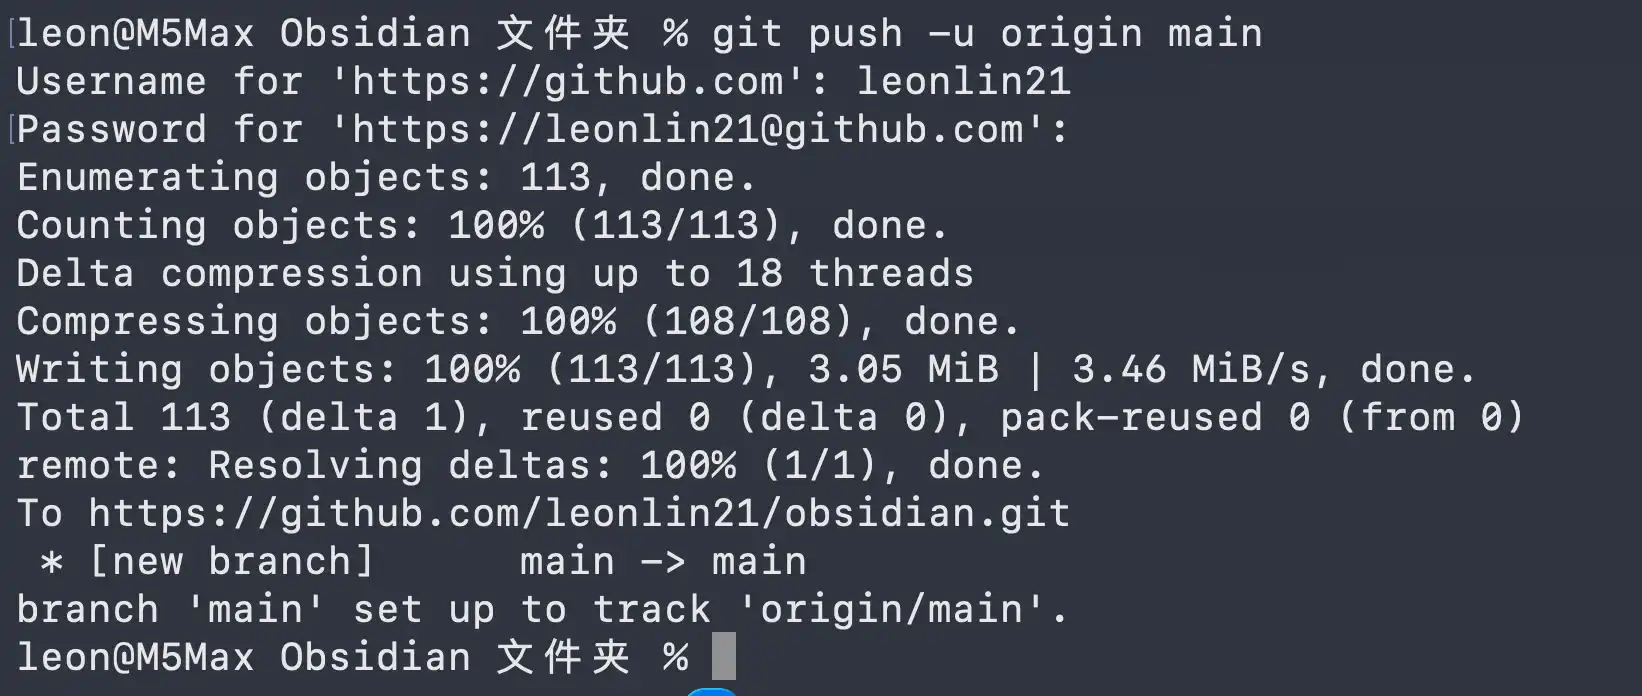
If you see something like this, the first push succeeded:
branch 'main' set up to track 'origin/main'.After pushing, return to the GitHub repository page and check it once. You should see Private next to the repository name, which means the repository is not public. Above the file list, GitHub shows the latest commit record, such as vault backup: 2026-05-28 09:51:23, and the right side shows the total number of commits.
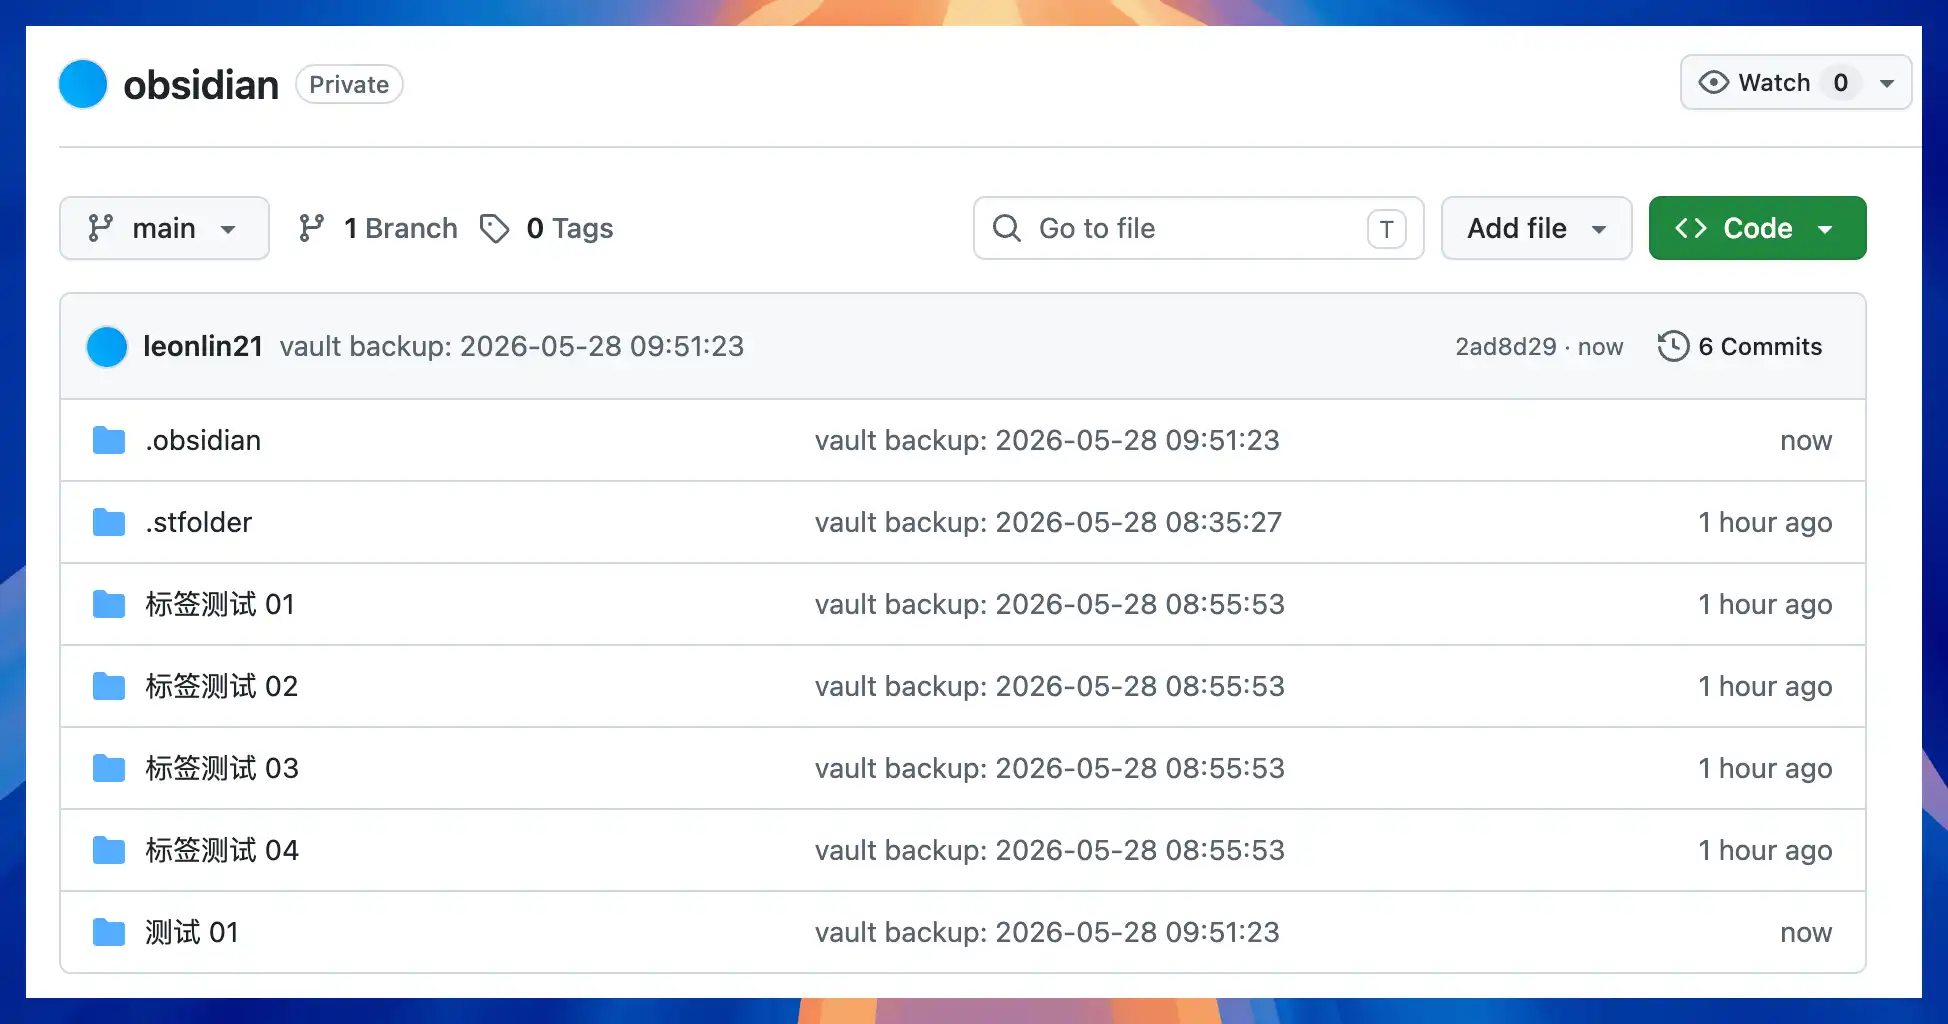
If the files appear on GitHub and the latest commit time shows now or a few minutes ago, the sync worked. Later, when the Obsidian Git plugin syncs automatically, you can check the same place again.
Your local vault is now linked to the GitHub repository. When you edit notes in Obsidian later, the plugin can automatically commit and sync according to your settings.
Obsidian Git Plugin Buttons
After setup, a Git Source Control panel appears on the right side of Obsidian. The screenshot below shows the real plugin interface. Most daily actions are in this panel.
Start with the first five buttons in the top toolbar. They mainly save local changes and upload saved content to GitHub.
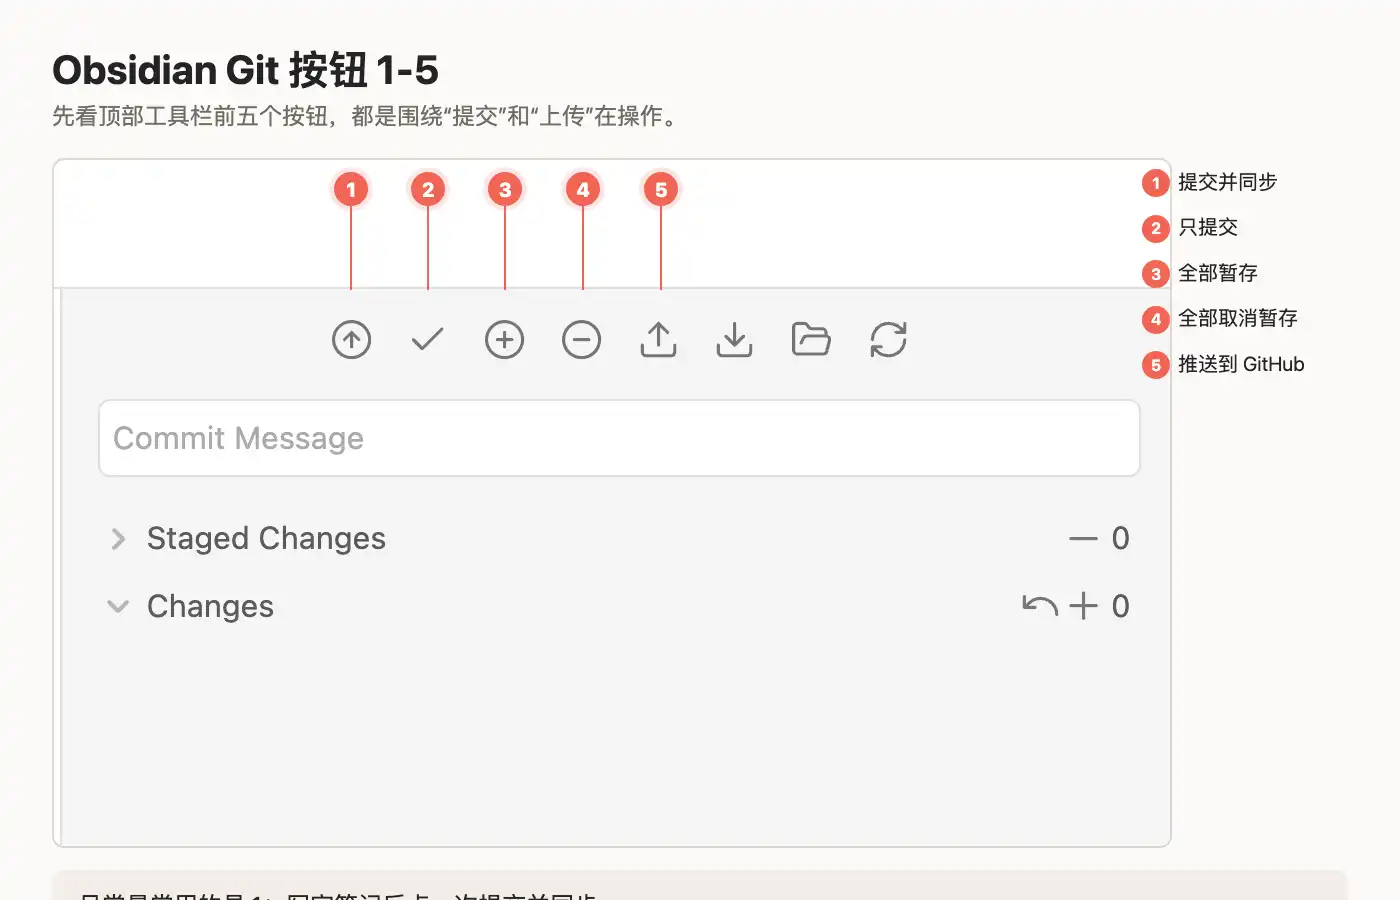
Commit and sync: the best daily button for beginners. It saves current changes as a version record and syncs them to GitHub.Commit only: creates a local version record without uploading to GitHub. Use it when you only want to save a local checkpoint.Stage all: puts all changes into the staging area. Beginners usually do not need to click it separately.Unstage all: removes files from the staging area.Push to GitHub: uploads locally committed content to the remote repository.
Next, look at buttons 6 to 10. This area covers pulling, refreshing, commit messages, and staged files.
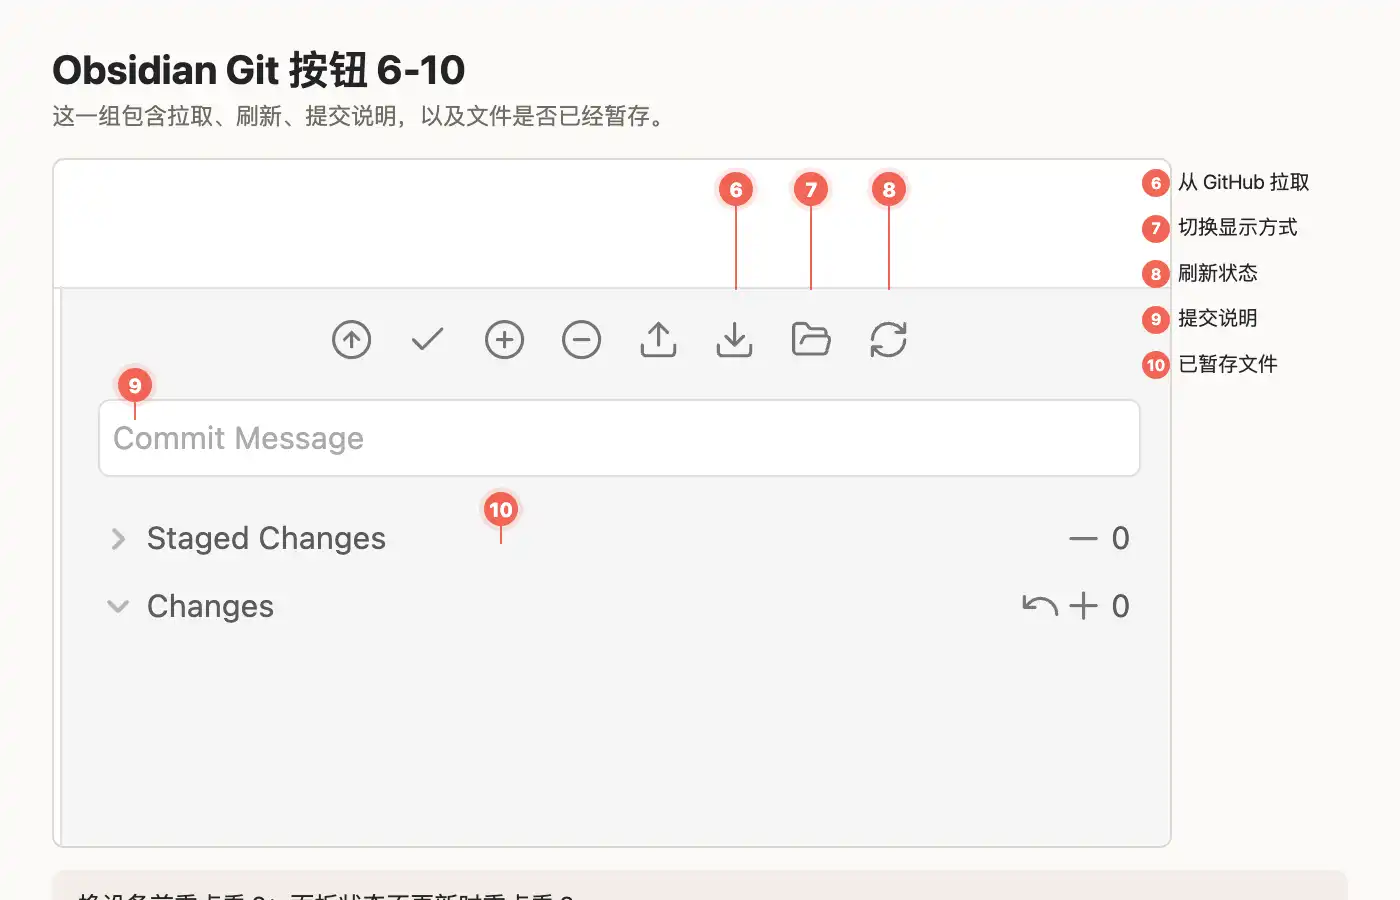
Pull from GitHub: downloads new content from the remote repository. Before writing on a different device, pull once first.Toggle display mode: changes how the change list is displayed. It can help when there are many files.Refresh status: asks the plugin to recheck changed files. If you just edited something but the panel does not update, click this first.Commit Message: the commit description. You can write simple notes like整理笔记orupdate sync tutorial. If left empty, the plugin uses the default message configured in settings.Staged Changes: files that are staged and ready to commit.
Finally, look at the file-change area. It shows files that have changed but are not staged yet, plus small action buttons on the right.
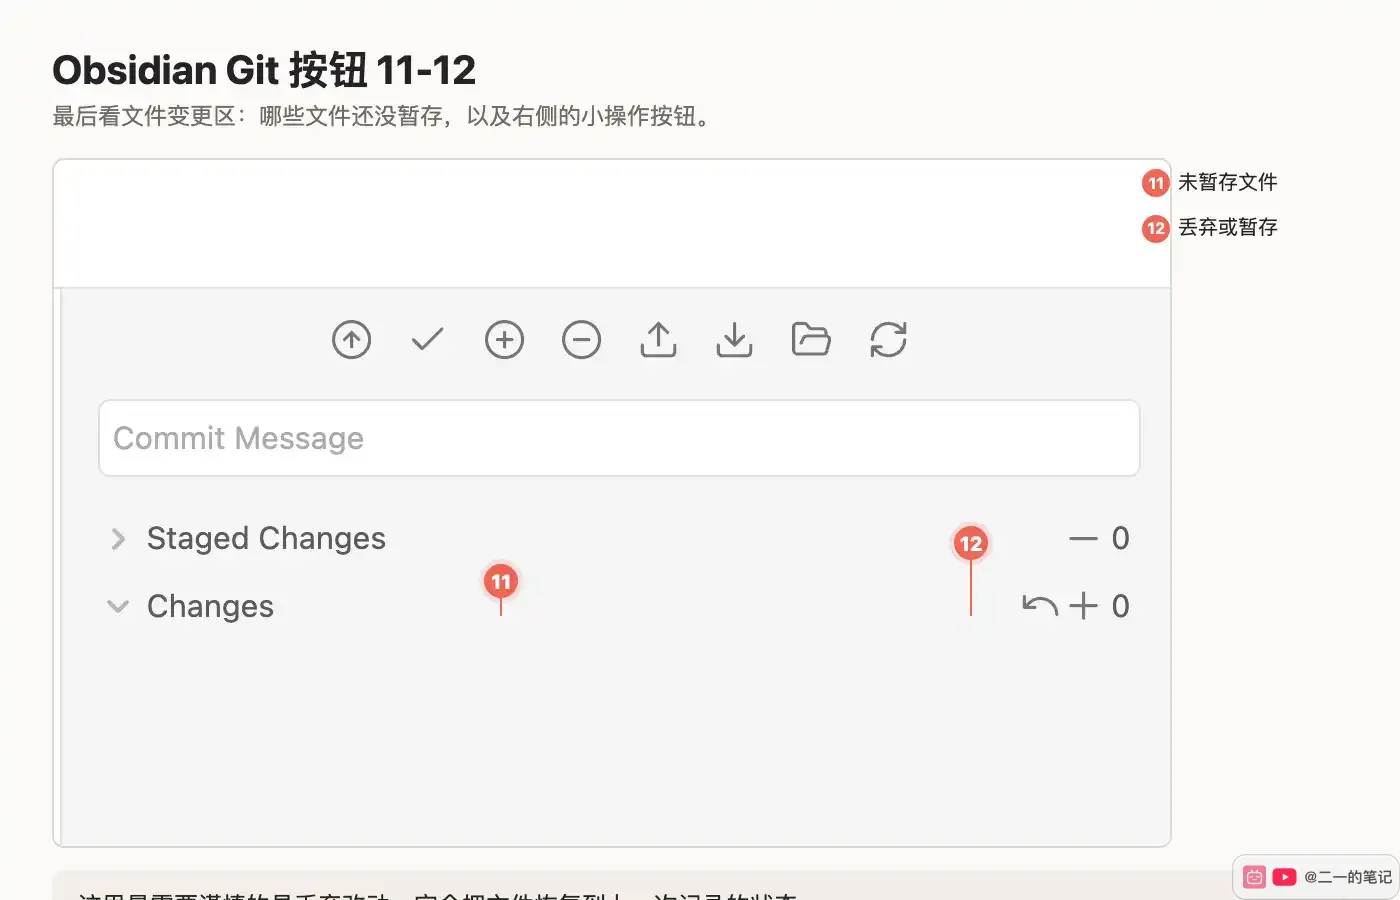
Changes: files that have changed but are not staged yet.- Small buttons beside each changed file:
+stages the file, and the curved arrow discards the current change. Discarding restores the file to the last Git record, so be careful with this button.
Daily use is simple: after writing notes, click Commit and sync. If the panel does not update, click Refresh status. For the other buttons, come back to this section when needed.
If you switch between multiple devices, build two habits:
- After opening Obsidian, click
Pull from GitHubonce to make sure the local vault is up to date. - Before shutting down or switching devices, click
Commit and synconce to make sure current changes have been uploaded.
The easiest way to create Git sync problems is editing the same file from two devices that are both on old versions. That often creates conflicts, and you will need to manually decide which content to keep.
Pull The Vault On Windows
After confirming that the Mac has pushed successfully to GitHub, Windows does not need another git init, and it does not need a new repository. It only needs to clone the same remote repository and open that folder in Obsidian.
First, install Git on Windows. I recommend downloading Git for Windows:
https://git-scm.com/download/win
On Windows 11, you can also open PowerShell and run:
winget install --id Git.Git -e --source wingetUse the default installer options. After installation, open Git Bash and check whether Git works:
git --versionThe first time you use Git on Windows, configure the commit name and email:
git config --global user.name "Your Name"
git config --global user.email "your-email@example.com"
The email should ideally match your GitHub account email.
Next, choose where to store the Obsidian vault. For example, if you want it under D:\ObsidianVaults, enter this in Git Bash:
mkdir -p /d/ObsidianVaults
cd /d/ObsidianVaults
Then clone the remote repository that your Mac already synced:
git clone https://github.com/your-username/your-repository.gitIf you use Gitee, replace it with your Gitee repository URL. After cloning, a repository folder appears under D:\ObsidianVaults. It contains your Obsidian notes, the .git folder, and the .gitignore created earlier.
Open Obsidian, choose "Open folder as vault", then select the cloned folder. After opening it, Windows shows the same notes that your Mac pushed to GitHub.
If you also want automatic sync on Windows, install the Obsidian Git plugin again. The process is the same as on Mac:
- Open Obsidian settings.
- Go to "Community plugins".
- Search for and install
Obsidian Git. - Enable the plugin.
After enabling it, manually pull the latest content once. Press Ctrl+P to open the command palette, then search for and run:
Git: PullYou can also open the Git plugin panel on the right and click Pull from GitHub. On the first pull or push, if Windows opens a GitHub login or authentication window, sign in as prompted, or paste the GitHub token generated earlier. Windows Git Credential Manager usually remembers this authentication, so you do not need to enter it repeatedly.
Plugin settings can match the Mac side. At minimum, I recommend turning on Pull on startup, so Windows pulls the latest content from GitHub whenever Obsidian starts. You can also reuse the auto commit and sync interval from Mac, such as 5 or 10 minutes.
Common Windows issues:
It keeps asking for a password. What should I do?
GitHub no longer accepts account passwords for pushing. Paste your GitHub token again, or run this in Git Bash:
git config --global credential.helper manager-coreWill line endings cause problems when syncing between Mac and Windows?
Run this in Git Bash on Windows:
git config --global core.autocrlf inputThis reduces unnecessary changes caused by different line endings across systems.
What if the Obsidian Git plugin cannot find Git?
If you installed Git for Windows normally, this usually does not happen. If the plugin says it cannot find Git, manually set the git.exe path in plugin settings. A common path is:
C:\Program Files\Git\bin\git.exeIs it normal for the first clone or pull to be slow?
Yes. The first run downloads the entire vault and attachments. If you have many notes and images, it may take a while. Later, only new and changed files are synced, so it will be much faster.
How should I finish after editing notes on Windows?
Same as Mac: before shutting down or switching devices, click Commit and sync once. When you return to Mac or another device, open Obsidian and click Pull from GitHub first.
Pull The Vault On Android
I do not recommend syncing directly with the Obsidian Git plugin on Android. Once the vault gets slightly larger, the plugin is more likely to freeze, fail, or become hard to troubleshoot.
Use Obsidian App plus GitSync App: Obsidian opens and edits notes, while GitSync syncs the GitHub or Gitee repository to a local folder on the phone.
GitSync is a mobile Git sync tool. It supports Android, HTTPS, SSH, and GitHub OAuth. It can clone remote repositories, pull, commit, and push. On Android, it can also sync when the app starts, sync on a schedule, and sync from a quick settings tile.
GitSync:
https://github.com/ViscousPot/GitSync
Prepare two apps on Android:
- Install Obsidian.
- Install GitSync from Google Play, F-Droid, or GitHub Releases.
After installation, open GitSync and create a sync repository. The information is the same as the remote repository used on Mac and Windows:
Remote URL: paste your GitHub or Gitee repository URL.Username: enter your GitHub or Gitee username.Token: paste the personal access token generated earlier.Sync Directory: choose the phone folder where the Obsidian vault should be stored.
If you use GitHub, you can also sign in through GitHub OAuth inside GitSync. Beginners may find HTTPS plus token easier to keep consistent with the earlier steps.
During the first sync, GitSync clones the remote repository to local storage on the phone. This may take a few minutes. The more notes and attachments you have, the longer it takes. After sync finishes, open Obsidian, choose "Open folder as vault", and select the folder synced by GitSync.
After opening it, Android shows the same notes that Mac and Windows synced to the remote repository.
You can enable automatic sync in GitSync according to your habits. Stable choices include:
- Sync once before opening Obsidian.
- Sync once after closing Obsidian.
- Or sync every
15to30minutes. - Sync only on Wi-Fi to avoid mobile data usage.
You do not need to create .gitignore again here. It is already synced with the repository. Files ignored on Mac will follow the same rules on the phone.
Two Android notes:
- Do not enable the Obsidian Git plugin again. GitSync and Obsidian Git operating on the same repository can interfere with each other.
- After editing notes on the phone, manually confirm GitSync has synced successfully before returning to the computer.
If mobile sync fails, first check whether the token has expired, whether the repository URL is wrong, and whether Android is restricting GitSync background activity. Android battery optimization may stop background sync. If sync is often delayed, add GitSync to the battery optimization allowlist.
Pull The Vault On iPhone
Git sync on iPhone is a little more troublesome than Android, mainly because of iOS file-access restrictions. The Obsidian Git plugin is also not stable enough on mobile and can fail to recognize the repository, fail to pull, or crash.
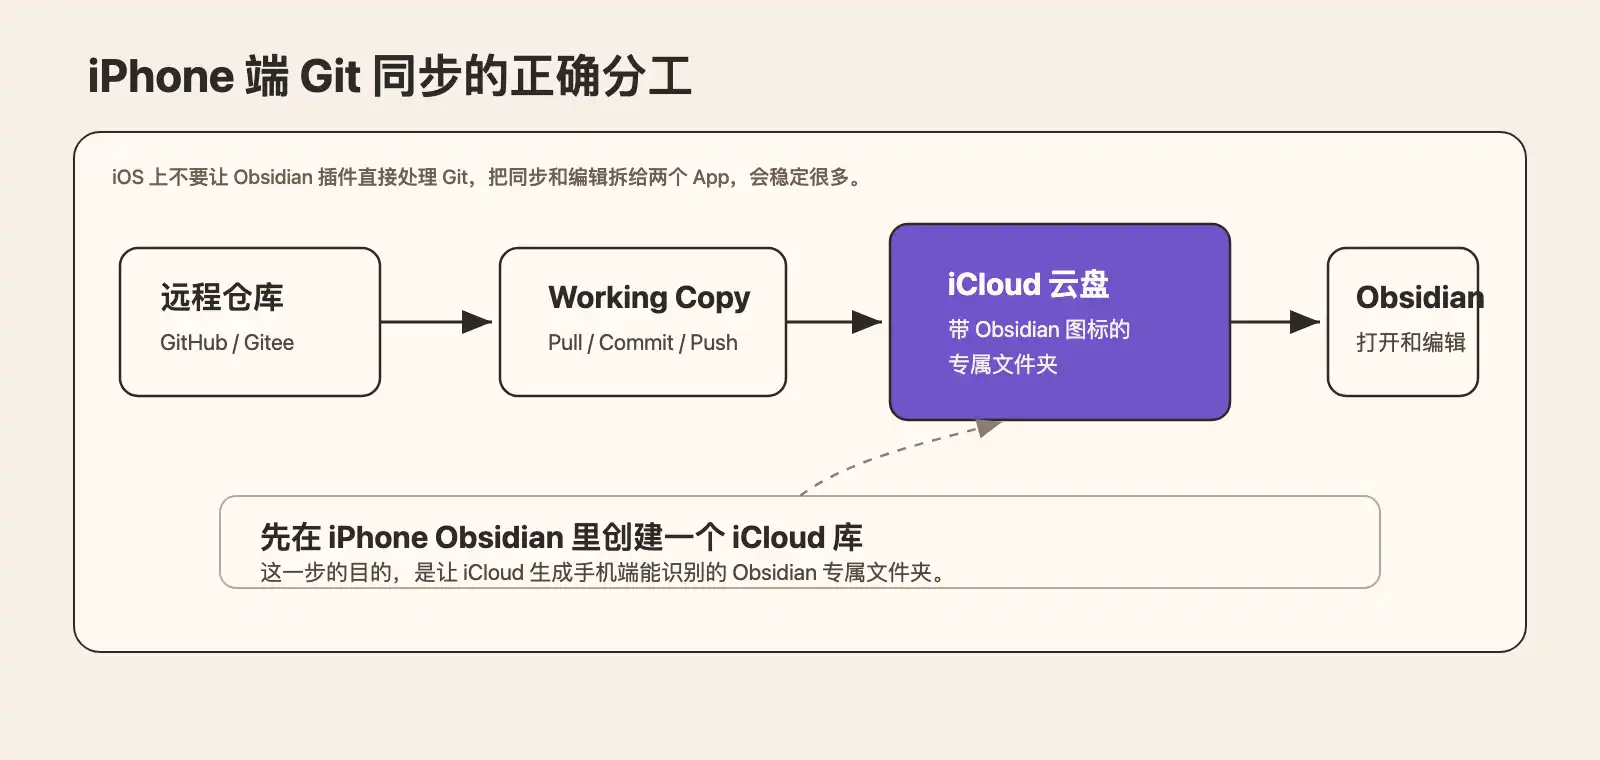
The more stable iPhone setup is Working Copy plus Obsidian. Working Copy handles clone, pull, commit, and push. Obsidian opens and edits the notes.
First, look at this diagram to understand how the pieces relate on iPhone:
Create Obsidian's iCloud Folder First
This step is easy to skip, but it directly affects whether the vault can be opened correctly later.
Do not manually create an ordinary folder named Obsidian in iCloud Drive. On iPhone, the more stable approach is to let the Obsidian app create its own dedicated folder. This folder appears in iCloud Drive and has the Obsidian icon.
Steps:
- Install Obsidian from the App Store.
- Open Obsidian.
- Create a new vault.
- Choose iCloud as the location.
- A temporary vault is fine. The important part is letting Obsidian create its dedicated iCloud folder first.
After this, open the iPhone Files app and go to iCloud Drive. You should see an Obsidian folder with the Obsidian icon.
If you cannot find this folder, read my Obsidian iCloud sync tutorial. It explains why the folder should be created by Obsidian and how to confirm the correct path between Mac and iPhone.
Install Working Copy
Next, install Working Copy from the App Store. It is a mature Git client on iOS and can handle clone, pull, commit, and push properly.
Working Copy is a paid app. If you only read notes occasionally on your phone, you may not need this setup. If you really want iPhone to join the same Git sync workflow, Working Copy is much more stable than running a Git plugin inside Obsidian.
Clone The Repository In Working Copy
Open Working Copy, tap the + button in the upper-right corner, and choose Clone repository.
Enter the same remote repository URL used on Mac or Windows. It can be GitHub or Gitee. For login, I recommend continuing with the personal access token generated earlier.
After cloning, open this repository, find Status and Configuration, then choose Link Repository to Folder.
This links the repository to Obsidian's dedicated iCloud folder, the one created by the Obsidian app earlier.
The path is roughly:
iCloud Drive/Obsidian/YourVaultNameAfter this, Working Copy continues managing Git, and Obsidian can recognize and open the vault normally.
Open The Vault In Obsidian iOS
Return to Obsidian, choose "Open folder as vault", then find the folder that Working Copy linked.
After opening it, the iPhone shows the same notes that Mac, Windows, or Android synced to the remote repository.
Daily Workflow
Keep the iPhone workflow as fixed as possible:
- Before writing, open Working Copy and run Pull.
- Return to Obsidian and edit notes normally.
- After writing, return to Working Copy and run Commit.
- Finally run Push to upload the phone changes to the remote repository.
You can use iOS Shortcuts for a bit of automation, such as pulling in Working Copy when opening Obsidian. But iOS background limits are strict, so do not expect it to behave like a desktop computer.
Do not enable the Obsidian Git plugin on iPhone. Let Working Copy handle Git and let Obsidian handle editing. Also, do not put the vault in an ordinary iCloud Drive folder. Prefer the dedicated folder with the Obsidian icon.
If you mainly sync between Mac and iPhone, iCloud is already the easiest option. Git is better for version history, or when Mac, Windows, Android, and iPhone all need to work around the same remote repository.
Summary
The biggest advantage of Git sync is version history. Every commit is like a snapshot of the vault. You can see what changed and return to an older version. It is platform-independent. As long as the remote repository exists, Mac, Windows, Android, and iPhone can all use the same repository.
The cost is also clear: first-time setup is more troublesome than cloud-drive sync, and you need to understand repositories, commits, pushes, pulls, and tokens. If multiple devices edit the same file at the same time, conflicts can happen, and you must decide which content to keep. The Obsidian Git plugin is not stable enough on mobile, so GitSync or Working Copy is a better choice there.
My recommended order is:
- Apple devices only: iCloud is the easiest.
- Multi-platform, but you do not want much setup: Obsidian Sync, iCloud, paid Nutstore, or Syncthing.
- Need version history or cross Mac, Windows, Android, and iPhone: Git.
- If you choose Git: Obsidian Git plugin on desktop, GitSync on Android, Working Copy on iPhone.
Git works best when you keep one habit: commit and push before switching devices, then pull after switching devices. With that habit, Git is more controllable than cloud-drive sync. Without it, Git quickly becomes the most annoying option.
Related Reading
If you are still comparing Obsidian sync methods, continue with these:
- Obsidian iCloud Sync Tutorial
- Obsidian Nutstore Sync Tutorial
- Obsidian Syncthing Sync Tutorial
- Obsidian Remotely Save Sync Tutorial
- Obsidian Plugin Installation Tutorial
FAQ
Is it normal that git init appears to do nothing?
Yes.
Is it normal that git remote add origin ... appears to do nothing?
Yes. Check it with:
git remote -vIf you see the GitHub URL, it was added successfully.
What if it says remote origin already exists?
It means you have already added a remote URL before. Check the current URL:
git remote -vIf the URL is wrong, replace it with:
git remote set-url origin https://github.com/your-username/your-repository.gitI pasted the token but no characters appeared. Did it paste correctly?
Terminal password input usually shows nothing, not even asterisks. Paste it and press Enter.
What should I do when the token expires?
Go back to GitHub's token page and generate a new one. An expired token only affects pull and push. It does not delete your local notes.
Should I sync the entire .obsidian folder?
If you want themes, plugin lists, and hotkeys to stay mostly consistent across devices, you can sync part of .obsidian. But do not blindly sync all plugin data, because some plugins store API keys or tokens in data.json.
Beginners can start with the .gitignore in this article, then adjust it after the sync setup is stable.
More Posts

Obsidian 2026 剪藏插件 Web Clipper 最新安装教程
从 Chrome 商店或压缩包安装 Obsidian Web Clipper,设置保管库和剪藏模板,保存第一篇文章。

Obsidian 2026 Latest iCloud Sync Tutorial: Step-by-Step Mac and iPhone Setup
This tutorial starts by creating the correct Obsidian iCloud folder on iPhone, then shows how to open the same Vault on Mac and iPhone and verify sync.
Obsidian Fast Note Sync tutorial: deploy the server on Feiniu NAS with Docker
This guide deploys the Fast Note Sync server with Docker on Feiniu NAS, then connects Mac, iPhone, and other devices to the same Obsidian vault sync setup.